8.16.23 : Stage 1 Was a Biggie
It's been a very long time coming, but the wagon is finally tuned and in a drivable state. I just need to take it to the emissions center for testing, and then hopefully no further delays pop up before I can finally get plates on it.
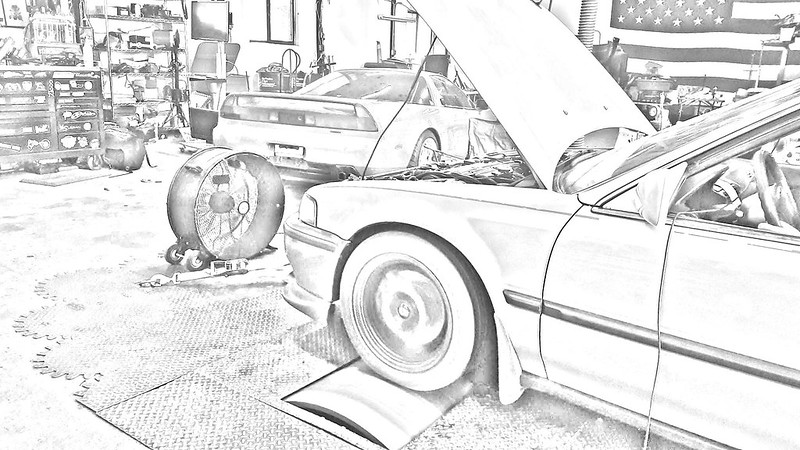
Prior to the dyno, I found out that Colorado had changed its law on catalytic converts in the years since I had pieced together my exhaust system, to now require California-rated cats. So I had to drop some cash to have that part of my fresh exhaust system re-done. Luckily, the tuner was able to knock that out for me, as well as the tune itself, in the span of a few days. And on that front, the end result fell disappointingly short of expectation. Researching nearly identical builds, I was seeing cars making at least 30 whp more than the 202 that mine ended up putting to the ground. Largely, that should be down to my elevation of nearly 5,000 ft vs theirs at nearly sea level, but still I felt I should have broken 210, maybe neared 220 in corrected numbers. Ah well, there are further mods I already planned to do while the car is still naturally aspirated, so that exploration will come in time. Photos and even a video clip of one of the final dyno pulls can be seen rounding out the end of the first stage of the wagon build.
Prior to the dyno, I found out that Colorado had changed its law on catalytic converts in the years since I had pieced together my exhaust system, to now require California-rated cats. So I had to drop some cash to have that part of my fresh exhaust system re-done. Luckily, the tuner was able to knock that out for me, as well as the tune itself, in the span of a few days. And on that front, the end result fell disappointingly short of expectation. Researching nearly identical builds, I was seeing cars making at least 30 whp more than the 202 that mine ended up putting to the ground. Largely, that should be down to my elevation of nearly 5,000 ft vs theirs at nearly sea level, but still I felt I should have broken 210, maybe neared 220 in corrected numbers. Ah well, there are further mods I already planned to do while the car is still naturally aspirated, so that exploration will come in time. Photos and even a video clip of one of the final dyno pulls can be seen rounding out the end of the first stage of the wagon build.
7.12.23 : Ready for the Dyno...?
I think the car's actually ready for the dyno now... I think. I ended up splitting the fab and dyno steps into two shops, after approaching a fabricator who's website claimed they provided tuning, but who don't currently employ a tuner. They handled the job of intake and exhaust fab in good time, however, and were great with communication. It ended up costing quite a bit more than I thought it would, but luckily I tend to budget with a nice safety buffer in case of situations like that. That, of course, delayed the dyno as I saved up more cash, so maybe it was for the better that the same shop didn't handle both at the same time. It feels like a real milestone to have the metal work completed, but a little annoying to hear that despite the cat, two resonators, and a muffler, the exhaust is still louder than I had hoped.
While the car was back in storage, I again took the time to go over the car some more and tackle small jobs. Stupidly, while my added gauges were wired in to function on their own, I never connected them to the ECU for the tuner to take proper advantage of, so that was taken care of. I also discovered that the brand new cam seals are already leaking - I've only idled the engine a few times since it's been built! I can't remember if the head seals I used were OE or Felpro, but I have new OE Honda seals in hand and will be swapping those in after the dyno. It looks to be only a minor leak, and because of the press-on ATI crank damper, the engine will probably have to come back out to get behind the timing cover and loosen the timing belt, just so I can unbolt the cam gears. As always: the dirty deets.
I'm currently talking to a couple different people about tuning, so hopefully something can be figured out soon...

10.21.22 : ... and it's gonna take another
As has become typical of this project, things haven't worked out as planned. Soon after my last post, I finally took the car to a shop for exhaust fab and dyno tuning, but it turned out the shop owner was having trouble holding onto employees and was taking care of his long list of clients all by himself. As a result, my car sat for two months, missing appointment after appointment, until I finally got impatient and decided to take the car back to get some more work done on it at home, which I had been collecting parts for while it sat. In hindsight, that was probably a bad idea and I should have just left the car there for the guy to get to it when he got to it. I'd probably be enjoying my built engine by now - which was supposed to be the focus here, not all the other stuff I've got going on with the car.
This new work was mainly simple stuff; I gave it a full stereo system, replaced the horns, and took care of a couple minor engine fluid leaks I discovered since getting the car back home. The trouble started when I thought I'd give the car a simple lowering spring setup, like on my old sedan, to hold me over until the big 'chassis' part of this build comes and I can afford proper coilovers. It was the same simple setup that I had given my old sedan, and it went just easy as could be back then, so why not knock it out real quick? Well, I should have remembered that the rear toe adjustment bolts had to be cut off this wagon back in 2020 when I installed the billet control arms, because the bolts securing the bottoms of the struts to the spindles were similarly seized in place. And that meant replacing the bushings they passed through, which meant forking over the money for the tools I didn't have to do that particular job. And while my head was in the rear arches, I noticed the upper camber arms were also in desperate need of replacing, and pretty soon almost half of the money I had set aside for tuning was gone. So now I need to work that money back up, and the new plan is to take the car back (to a different, more local shop) in early spring, while I spend the winter collecting parts for a big resto project on the daily-driver RSX.
As usual, jump to the dirty details by clicking here.

4.29.22 : It Took A Couple Years...
...but the time has finally arrived! Much of these last months have been used to save up for the now-scheduled intake/exhaust fab work and dyno tuning. I "knocked out the little things" (mainly fluids and installing the 255 lph fuel pump) and turned the engine over for the first time about a week ago. Surprisingly, there was pretty much no drama. Two minor issues I ran into were an easily dealt-with engine oil leak where I have the pressure gauge teed into the factory pressure switch; and the power steering pump wasn't drawing fluid from the reservoir, making a slightly scary sounding chattering noise as the dry pump whirred away. For now, I've just removed the p/s belt and will deal with that later; I just need to figure out how to fill the lines with oil so it has something to pump, because for some reason the reservoir is mounted a bit lower than the pump in these cars. The engine itself sounds fantastic, though. This is my first engine build, and I am so proud of myself! Not that there isn't still plenty of opportunity for this engine to grenade itself on the dyno or in the first few thousand miles of its life. Check out the wagon Stage 1 page for all the details (there's much more than just engine work to check out, too!), including a short clip of that first start-up, and I'll be back in a couple weeks with the dyno results!

7.3.21 : Swapped n' Loaded
It's been too long since I updated here, but everything accomplished on the wagon since the last post is up - click HERE to jump straight to the details. The H22 is finally in the car, and some other mods that I probably shouldn't have spent the money on just yet have also made their way into the build. Physically, I'm so close to getting this thing on the road, but the budget is well blown at this point so we'll see how long it takes to knock out the little things I've got left before the engine can be cranked over for the first time and save up for the dyno tune...

1.18.21 : Shifting Gears
Hit a milestone with the wagon recently, having completed the auto-to-manual transmission conversion. For full details, click here.

10.27.20 : Catching Up
A fair bit has been accomplished since the last update, with the engine being fully assembled and the car receiving some more cosmetic changes. Full details on the wagon's page.

7.15.20 : Ready for Assembly!

I actually got the block back from re-sleeving and "crank check" a week after the head, but there was some work I assumed would be basic and taken care of but wasn't, like polishing the crank for new bearings. So a couple weeks later I took the whole bottom end into a second machine shop for the crank polish and new bearings (the old ones had somehow gone missing at the first shop, even though I'd planned on new ones anyway), and decided to get more work done while it was in. So now the rotating assembly is balanced, I got new bearings and thrust washers for a freshly polished crank, the line hone was checked, and the piston rings were file fit to double-checked cylinder bores. I can now begin engine assembly, but the car still needs a manual transmission conversion and I've been trying to hold out for a Prelude H22 trans to show up in the junkyards or private sale for the right price, but we'll see how long that can last before I finally settle for a longer-geared Accord trans just to finally be driving my wagon...
6.15.20 : Overcoming the Biggest Hurdle...
... that being waiting for the machine shops. A lot more restoration has been accomplished in the last couple of months (sedan trim, custom grille, new wheels, and more), and today was finally the day I got my engine back... well, half of it anyway. I got the head - which Heads By Drew of Aurora, CO did an absolutely beautiful job with - but when I went to pick up the block there was a minor setback and I should be picking that up within these next seven days. Once again there's a lot to show, so check out STAGE 1.

4.16.20 : Wagon Progress Update...
I'm making good progress on the Accord, restoring where the car needs it and installing parts I've saved or collected since the old sedan. If there's a setback, so far it's only with the machine shops. The head and block were both taken in for work in February, but I've yet to hear back from either shop, so I'll be giving them a call soon to see if this virus mess is affecting things - I've got an "essential" job and am a natural introvert, so I'm barely affected and am mainly annoyed that I can't get a haircut, haha. I've done too much so far for me to want to spread it out on this main page, so check out the "Stage 1" page I've created by clicking HERE. I was all pumped and looking forward to this car being a great excuse to begin getting into video and doing the YouTube thing, but it just hasn't worked out. I drive out to where the car's being kept, and I just forget to do any filming. I need to get on that, though. For now, it's the good ol' text and photos that I'm good at.

I also got into another automotive-related hobby and picked up a Traxxas Slash 4x4 Ultimate R/C car. I very quickly realized that I really just picked up another project car with this thing. I took it out a few times, and "geez, it gets dirty inside, I should really get a dust cover to cut down on the time it takes to clean it out underneath the body." And the suspension gets squeaky because of the dirt and water, so that's cleaning supplies it needs, and some of the plastic parts can't quite take the beating that the truck begs to be given so they should be upgraded, and after some jumps on concrete ramps the body's getting beaten up and will probably need to be replaced at some point... so expensive, what did I get myself into?! It's so much fun, though! It's a short course truck, so it's very versatile as far as the terrain it can be used on, and I went straight to a 3S LiPo battery so it just moves. I'm loving it.

1.29.20 : Finally!!!
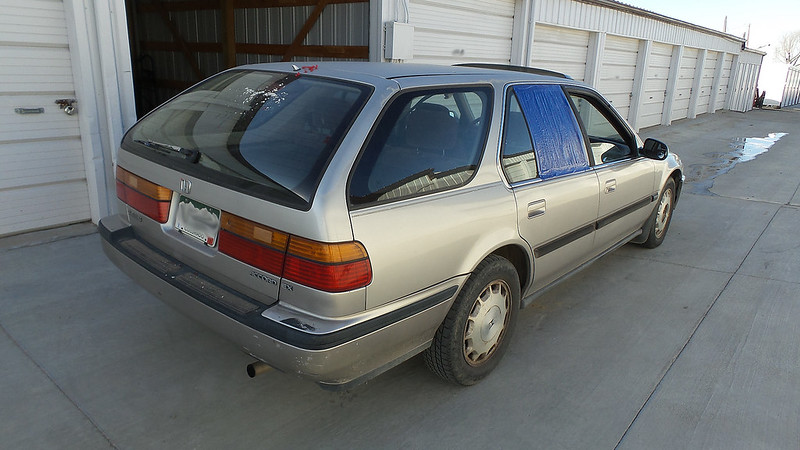
It's been years coming, but the Accord wagon project is finally going to be driving soon. On the 18th I picked up the chassis for the H22 I've been building, a '93 EX. It needs a bit of cosmetic restoration and a manual transmission swap, but otherwise it runs and drives as-is, the chassis is solid (no rust!) and the interior is in great shape. The money's in hand to get this thing driving and looking good very quickly, it's just a matter of having the time outside of work to dig in. Engine, wheels, suspension, and some other exterior pieces that I've collected over the years, all before summer, so watch out...


6.30.19 : Can't Miss ThE Six-Month Update!
The personal-life issues that halted progress about a year ago now are finally coming to an end, and in August I'll be able to start working toward getting the Accord build driving. In the meantime, the mind is always dreaming up the fine details of this build and I thought up a custom gauge cluster, rather than going with the typical Prelude or S2000 cluster swap. It's a rough rendering, since I'll need all of the little pieces in hand to see how they all fit and align together within the factory cluster space, but it should end up pretty close. As I'm sure I've touched on before, two of the biggest inspirations for this build are Honda's own Type R series, and the whole of Ferrari, from whom I'm trying to tastefully incorporate signature styling cues. Inspiration for this particular piece comes from the F430:

And my "Accord Aero R" cluster, using custom gauges from Speedhut.com to mimic the look... and yeah, I'm in love with that custom emblem and want it stitched into the seatbacks and have decals made for the brake calipers! All in the name of making it look as if it's a real factory trim level.
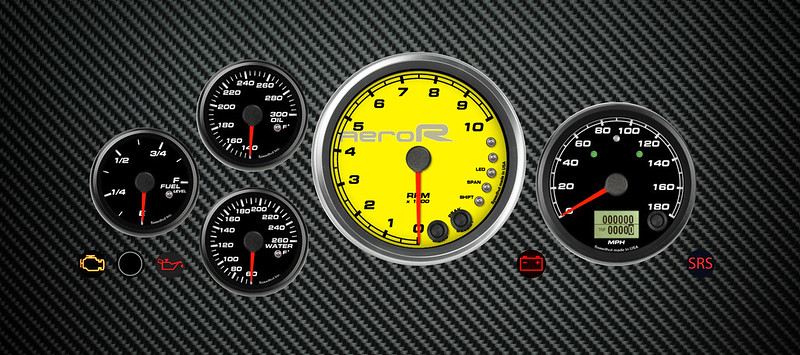
Again, keep in mind that the exact positioning of the pieces above will likely be tweaked slightly. As-is, I guessed roughly where the shape of the cluster housing would push things while allowing for symmetry.
> Finished carbon fiber plate is easy enough to source and cut to shape for mounting in a gutted OE cluster. Due to the buttons on the aftermarket speedo and tach, I won't be able to use the factory plastic dust cover/lense.
> Five gauges will be located in the glove box, to help fine-tune the ECU or if I want to use them to aid in diagnostic troubleshooting down the road: wide band, exhaust temp, fuel pressure, oil pressure, and voltage - this last one still needs purchasing, and the glove box bezel I've already made - (click here to see that) - will need to be remade to accommodate the additional gauge. The gauges I will always want at hand, and therefore be in this main cluster, are the obvious tach (front-and-center, as any proper performance car should do) and speedo, as well as oil temp, water temp, and fuel level. I'm pretty sure Speedhut can color the parts of the scale within the redline red for me; this cluster will come post-tune so I can get a recommended redline from my tuner. Digits/tick marks will light up red at night, an aspect of my RSX that I really like.
To keep the cluster functional for a street car, I made sure it incorporated all of the necessary warning and indicator lights:
> Tachometer has a programmable shift light, plus a couple datalog-style recall features.
> Turn signals and high beam indicator, as well as odo and trip, are built into the speedometer. Thankfully, Speedhut can match your car's existing odometer mileage before sending you the gauge.
> Oil temp gauge has a programmable temperature warning light. A separate warning light at the bottom-left is added for oil pressure.
> Water temp gauge has a programmable temperature warning light.
> Fuel gauge has a programmable low-level warning light.
> At the bottom-left corner is the Check Engine light, as well as a two-position (circuit open/closed) button to flash DTCs. This being an OBD1 car, there's a connector under the dash that you have to jump with a paper clip or something to make the CEL blink out diagnostic codes. In my old sedan, I had a switch wired up to that connector and mounted in one of the blanks on the center console to provide the same function, but I think this is a cleaner solution.
> With the volts gauge hidden in the glove box, I still want a warning light in sight in case of emergency.
> Being a street car, I do want to keep the SRS system fully functioning, so that warning light is in there. Plans toward that end include a DC2R SRS Momo steering wheel and SE dash for the passenger side airbag.
Unless I'm forgetting something, the rest of the warning lights are worthless to me. I don't need a light telling me the handbrake is up, or a door is open, or my seatbelt isn't on. Cruise Control will also be deleted just because I don't need it more than I want to clean up the engine bay as much as possible. That's not to say A/C and P/S won't stay; I'm getting older and want to be comfortable, after all.
For a fun, quickie side project, I found this NB RX-7 rotor in a junkyard, cleaned it up with Purple Power (being careful to leave some 'patina' on the one displayed face), and got a 3" clock insert off eBay to stick in the center. One non-cheesy way to decorate the home with car stuff that most people probably wouldn't even realize is car stuff!

The RSX is doing well, and as of this moment sitting at 248,XXX miles. I recently did some maintenance, replacing a ball joint and bushings on one corner. The ball joint, of course, was seized and had to be cut off. Luckily I was replacing the whole control arm anyway, or it would have been hell getting the ball joint stud out of there.


After having to put a few straight months on my snow tires and wearing them down a good bit, I was finally able to replace my old all-seasons, one of which had developed a sidewall bubble. Trying Michelines this time, Pilot Sport A/Ss, and they're pretty sticky for the high tread wear. For the curious, I'm waiting until I get a third, wider set of wheels before I get proper summer performance tires. I drive about 23,000 miles a year, so for these wheels I'd rather get as much mileage out of a set as I can.

It's starting to look pretty under there. Just need to track down whatever is leaking oil (it's not bad enough yet that I've ever seen a spot on the ground) and powdercoat the subframe silver to match the suspension.


