Project CB, Part 2: The Wagon
As I got deeper into the CB Accord community, I grew a serious interest in the station wagon variant of the chassis. I can't help but think practically, and when I hear of people having to ditch their project car because they started a family, or their finances became tight, or whatever the reason may be, I didn't want that to become an issue for me. I'd have been fine sticking with the sedan, but it's nice to be able to haul things - I do get plenty of use out of my RSX's large hatchback. Besides, there's just something cool about a fast wagon to me, and if its decent fuel economy and ability to comfortably seat four (five in a pinch) while carrying a large amount of cargo will mean I never have to get rid of my project car, then I'm all for it.
My vision for this build is for it to be something of a jack of all trades, not necessarily a master of any one thing. Whether I'm hitting apexes around a road course, hard parking at a meet or show, or am running errands around town, I want it to do it all while exceeding the minimum requirements in any given situation. No, you can't have a competitive track car and a comfortable cruiser, but I believe I can make the right sacrifices for a good all-rounder without turning it into a confusing mess. No aspect of this car will remain untouched, but all in due time.
This page is a timeline of what I call "Stage 1" of the build, which is the initial purchase of the chassis and all of the modifications leading up to getting it driving on the H22 engine swap. This page is very long, so you can skip down to specific work done by clicking the dates below:
January 20, 2020 - Got started by restoring the front lights
February 2, 2020 - Parts haul, including a 2010 Odyssey rear wiper arm to update the rear end
February 16, 2020 - Replaced the missing rear window
February 22, 2020 - DIY glove box gauge cluster installed
March 15, 2020 - Spoon style front lip
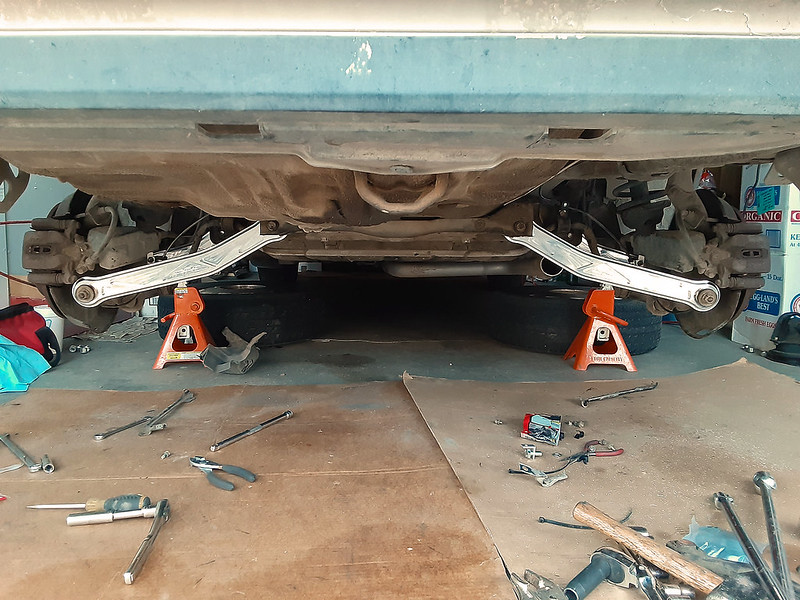
March 23, 2020 - Rear lower control & toe arms
April/May, 2020 - Trim restoration, new wheels, custom grille, emblems
June 15, 2020 - H22 head is back from the machine shop
June 22, 2020 - H22 block is back from machine shop, and engine is assembled
Sept./Oct., 2020 - JDM power folding mirrors & Si-T turn signals installed, H22 timing modifications
Oct. 2020 thru Jan. 2021 - Auto-to-manual transmission conversion
April/May 2021 - Fog light install and H22 swap with full engine bay detail
June 2021 - Intake filter install
July 2021 - Intake NACA ducts, coupe/sedan rear lip
Holidays 2021 - ECU install, power steering details, suspension updates
Feb./March 2022 - Locking hood pins, fuel pump install w/DIY access panel
April/May 2022 - First start-up
July thru Oct. 2022 - Stereo system, maintenance, lowering springs
Nov. 2022 - OEM roof rack, VIS "Evo style" (really E36 M3 style) side skirts
April 2023 - Intake & exhaust fab
Aug. 2023 - Dyno day
January 18, 2020
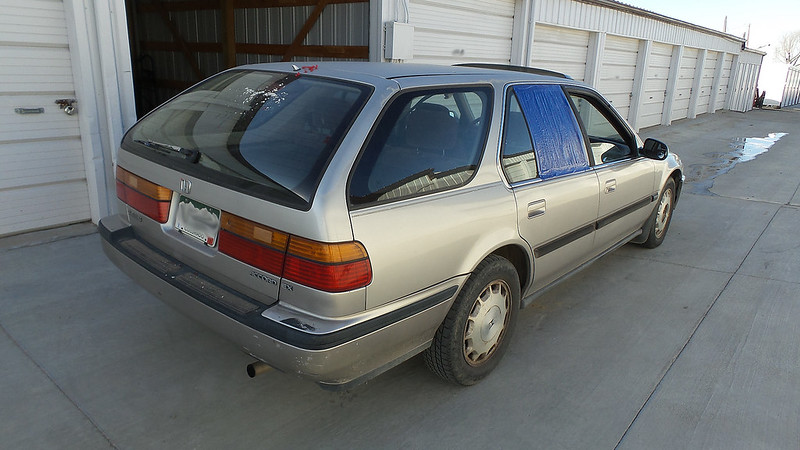
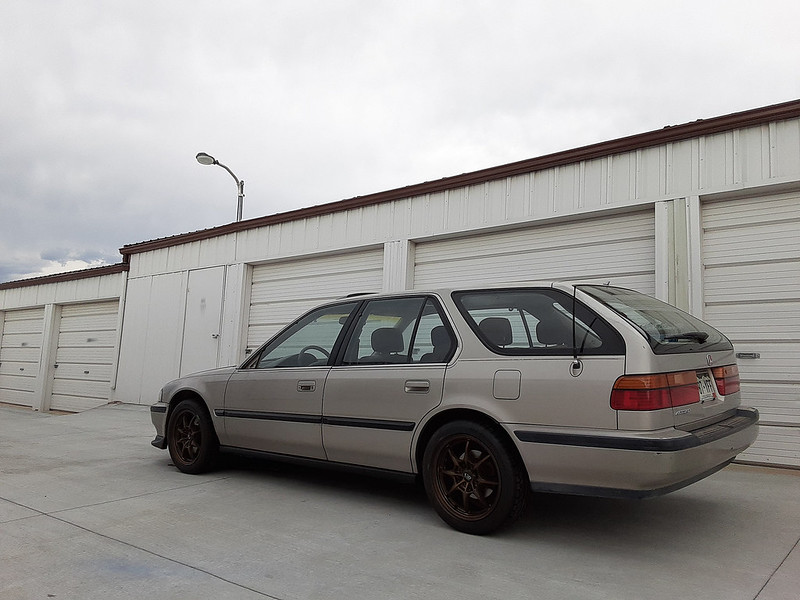
So here it is, a 1993 Honda Accord EX wagon. Bought it within Colorado, about three hours from home - no trailer needed! It's a bit rough, but nothing some trips to the junkyard can't fix. The main thing is that the body is 99.9% rust free. There are some very tiny dots of surface rust coming through the typically worn paint that I can sand down and spray over for now to keep from spreading. It's also an automatic, but a manual conversion shouldn't be difficult (it can be done without welding, at least), and isn't too expensive. CB7Tuner's got a thorough write-up on that here. The car has seen just shy of 287,000 miles, but that hardly means anything considering it's about to get brand new engine and suspension. Some of the needed restoration will be obvious in the photos...


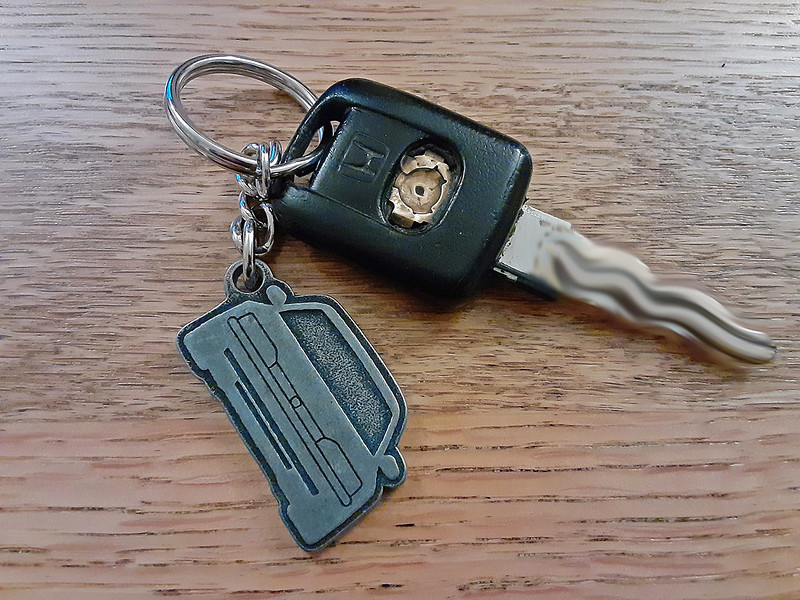
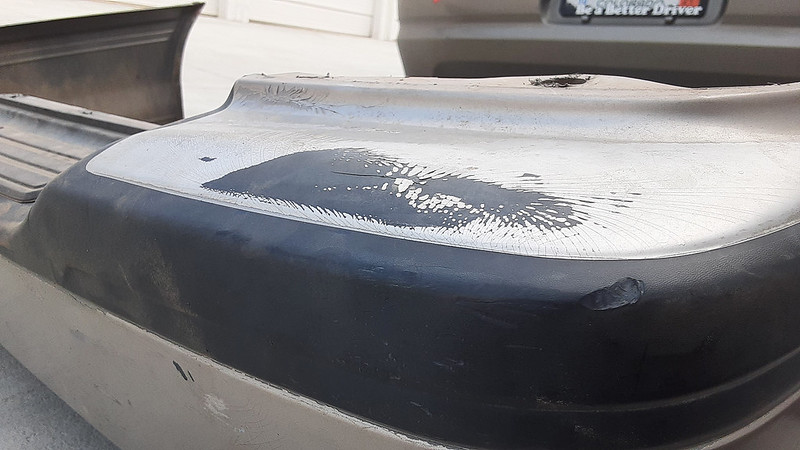
Factory keyless entry in '93! Too bad the buttons are broken, it will be incredibly difficult to replace this fob. '90s Honda tumblers are easy to defeat, though, so the plan is to upgrade to an aftermarket keyless entry system with alarm, and install rear door handles up front to get rid of the tumblers altogether.
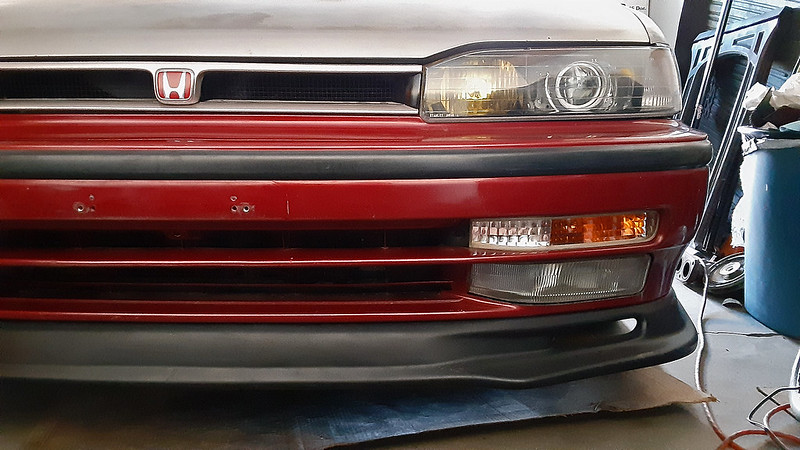
January 20, 2020
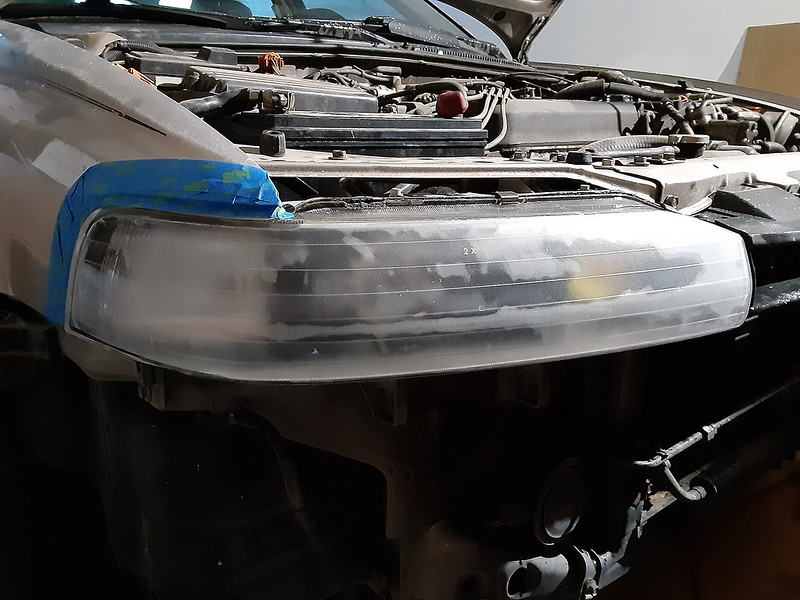
I got right to work on some "free" improvement, restoring the front end by polishing the lights. The JDM one-piece headlights were saved from the sedan. Before I ever bought them, they'd been black-housed with the high beam dishes painted amber, and retrofitted with TSX projectors. I can't remember what temperature bulbs are in these (blueish white), but they've got 35-watt ballasts.


February 2, 2020
With the car in hand, I immediately got to ordering more parts, for both the chassis and upcoming engine/trans swap. Some notable pieces are an Exedy Stage 1 clutch, Competition Clutch 11.56 lb flywheel, S2000 PCX oil filters (pretty universal among Honda engines of the era, they've been proven to maintain oil pressure above 8,000 rpm), newer spring-style lost motion assemblies, and many more OEM Honda maintenance parts - including an '05-'10 Odyssey rear wiper assembly to spruce up the tailgate. I couldn't help but once again get EM1 Civic Si "DOHC VTEC" quarter panel decals, as well.


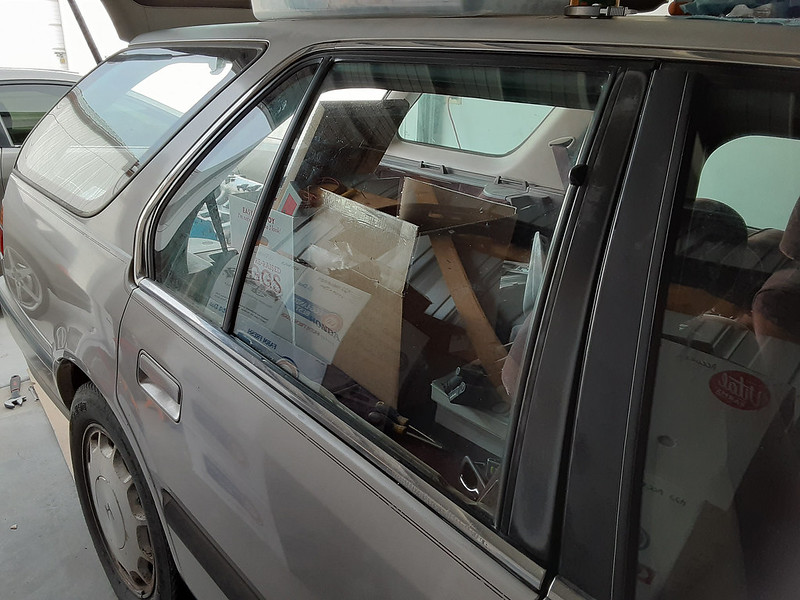
February 16, 2020
One of the first things that needed attention was that missing rear window. Whoever did this was very thorough in their work, but knowing that, I don't understand why they didn't just do what I did and get a replacement glass from a junkyard. Luckily the sedan rear windows fit the wagon:

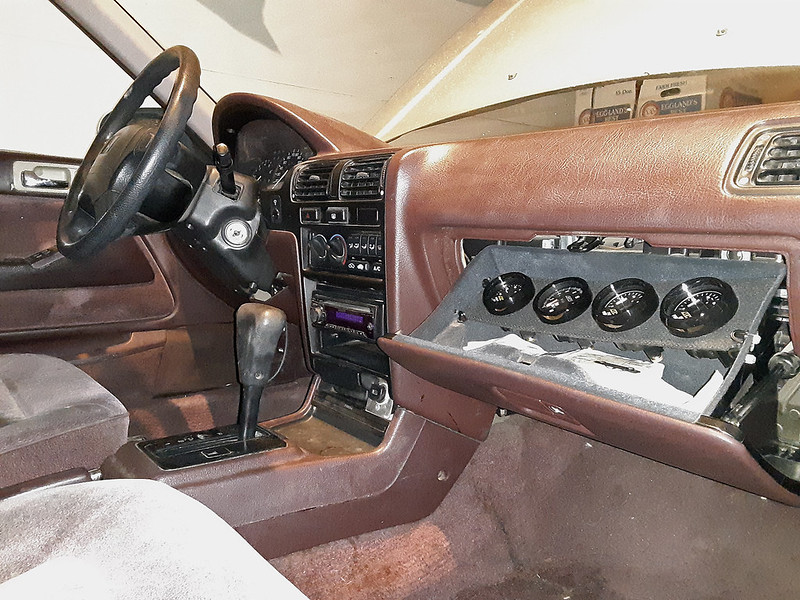
February 22, 2020
Installed my DIY glove box gauge cluster by simply swapping the car's maroon outer shell onto the box I'd already put together. AEM gauges monitor wideband air:fuel ratio, exhaust temp, and fuel & oil pressure.

March 1, 2020
Replaced the off-colored driver's door handle. I later I realized I shouldn't have put the door card back on, because I forgot that the front windows are bottoming out on something when they're supposed to go all the way down (*future edit: turned out to be the speakers; they weren't installed with spacers, so the window was hitting the magnets). This shoddy coverup has me a bit worried; I'm sure I'll find something similar on the passenger side...


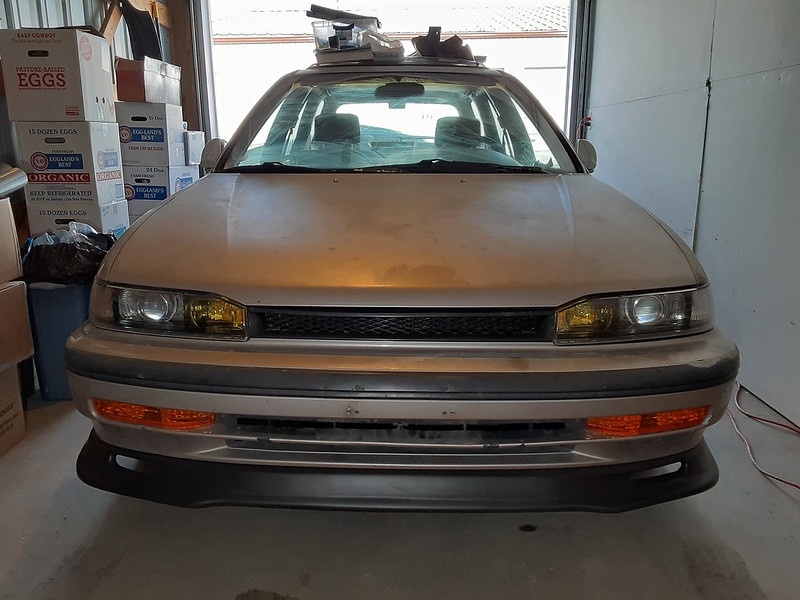
March 15, 2020
I wasn't sure I wanted to put this Spoon-style lip on yet, as I want to get a coupe/sedan front bumper, but it's not likely I'll be finding one in Seattle Silver, in good condition, anytime soon. I got some Allen bolts and nylock nuts from Home Depot for the install. You'll see an aftermarket grille installed here as well, but it was removed soon after. It's the generic "Type R style" grille you can find on eBay that I happened to spot in a junkyard, but they're known to have poor fitment and this one proved it for me - you can see it sag along the top. I'll be making my own from the factory grille, as I did for my sedan.


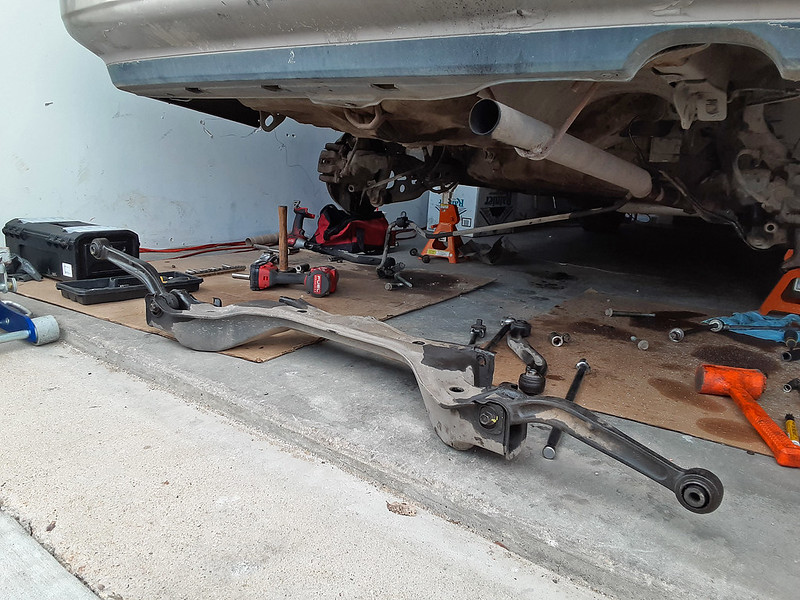
March 23 & 29, 2020
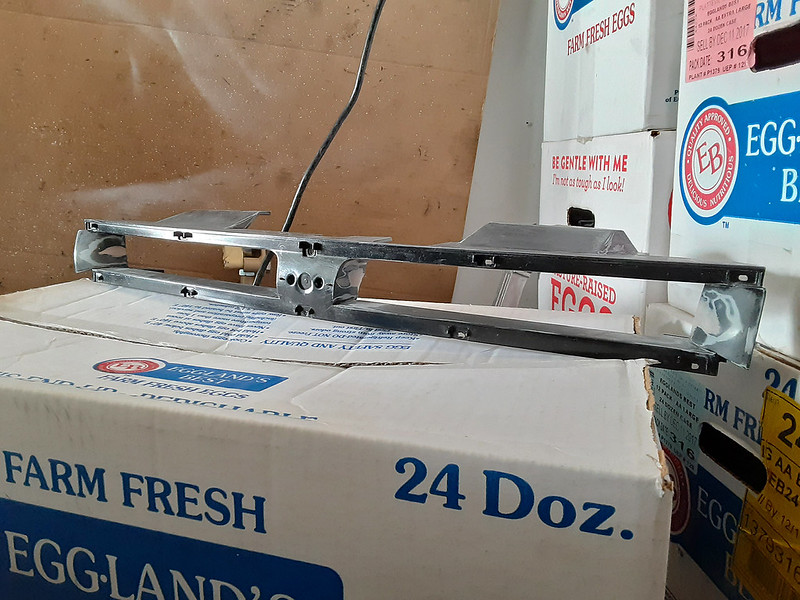
Years back, Fat Four Customs did a group-buy on their rear lower control arms and toe arms, and I got in on it. I went to install them, and ran into these cars' typical problem of the toe adjustment bolts seizing into their bushing sleeves, so one of the arms had to be cut off the subframe. New bolts were then ordered from Honda, and copper anti-seize was applied liberally to everything as the whole subframe/arm assembly was put back on the car. Unlike the DX and LX, the EX Accords have ABS, so I had to figure out a way to secure the wires that normally bolt to the stock control arms. The arms came with a relocation kit but, lacking instructions to go along, it didn't seem to have been designed very well, so the L-tabs from the kit and some rubber-padded P-clips were used to keep the wires away from moving parts. Notice the 'modified' exhaust the car came with. It wasn't quite routed like stock, so I had to cut a couple feet off the end to clear the arms, and a temporary exhaust turn-down tip is on the way so I can set the car back down and not have it spew soot all over my shiny control arms when I move it around.


April / May, 2020
I got that temporary exhaust tip on. You can see how much I had to cut off to make it clear the toe arm. It doesn't matter; the entire exhaust system is going to be custom, and much larger, anyway.

The trim restoration took many a weekend to get through, with the removal of so many pieces, sanding it all down, painting it all, screwing up on some and re-sanding and re-painting, then installing it all back onto the car. The door protector strips are actually from a sedan, because they're a bit slimmer and clean up the overall aesthetic a bit. Eventually I hope to track down some JDM protectors, which are really thin and help tastefully take the car out of the '90s a bit, but to my eye this is already a massive improvement. The sideskirts, for now, remain stock. I've got a couple aftermarket skirts in mind, but one of them is incredibly rare these days and the other may or may not look a bit ricey so I'm undecided on trying it out just yet. Not clearly pictured are the wiper arms and the vertical trim pieces between the front and rear door windows that were also revived. We'll see how long this paint holds up to the elements. I have a feeling I'll be taking some of this in for powder coating before long.


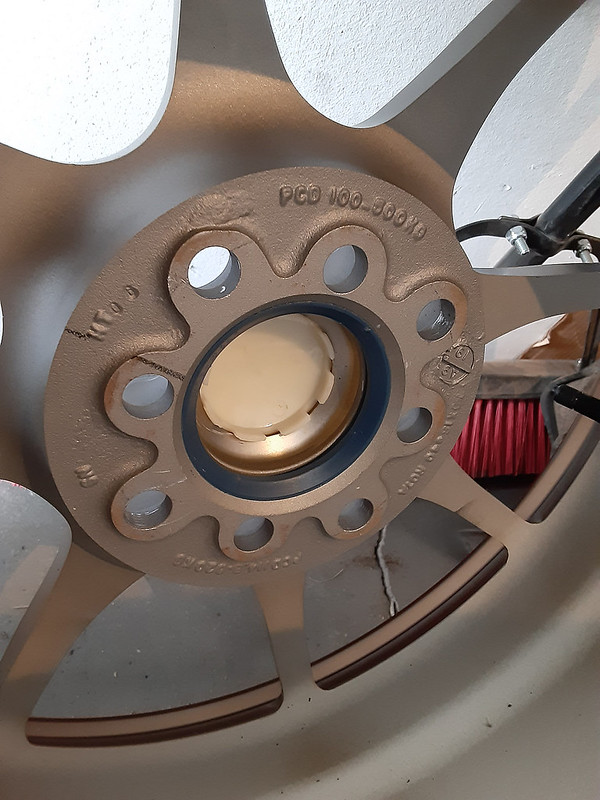
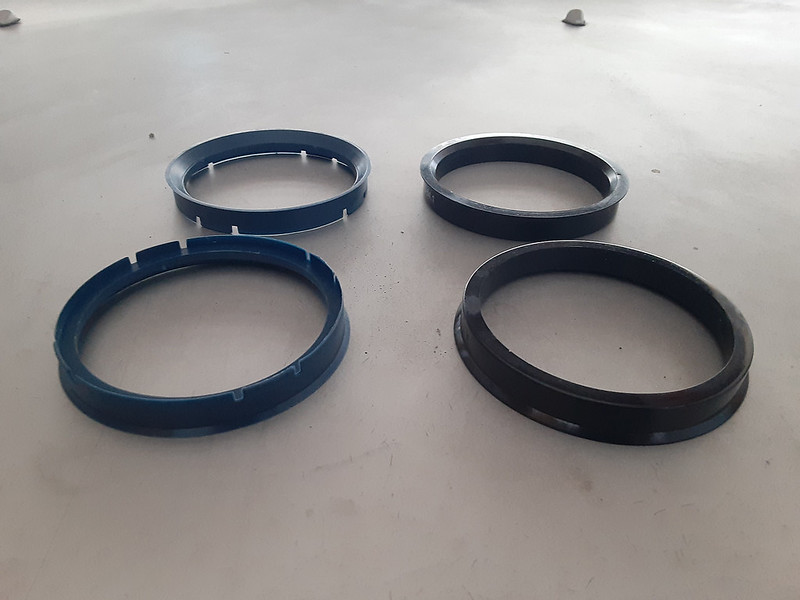
Along the way I got new wheels and tires, because the stock 195s just aren't going to cut it with an estimated 240whp. Normally I'd hate to support knock-off wheel companies, but I justify these Full Royal Sport Bronze Rota Circuit 8s (Mugen MF8 replicas) because this car is eventually going 5-lug and I just don't want to spend much money on the 4-lug setup. 16x7 +40, wrapped in 205/50-16 BF Goodrich G-Force Sport Comp-2s. Because of the stupid way in which the Rota's hub bore is inset from the wheel's actual mating surface, finding hub-centric rings that actually reach the chassis hub from the wheel was a bit of a chore - if you find yourself in a similar situation, look for rings with as little a chamfer as you can find. It's still not as snug of a fit as I'd like, but at least it centers the lug nut holes enough to get the job done. We'll see if I'm getting vibration issues once I start driving the car. But just look at this photo. This is after coming back from the tire store, which means I had room to fit four wheels separate from four tires to the place. God I love the RSX. Why are people going crazy over crossovers these days?! A sporty wagon's only going to be even better!

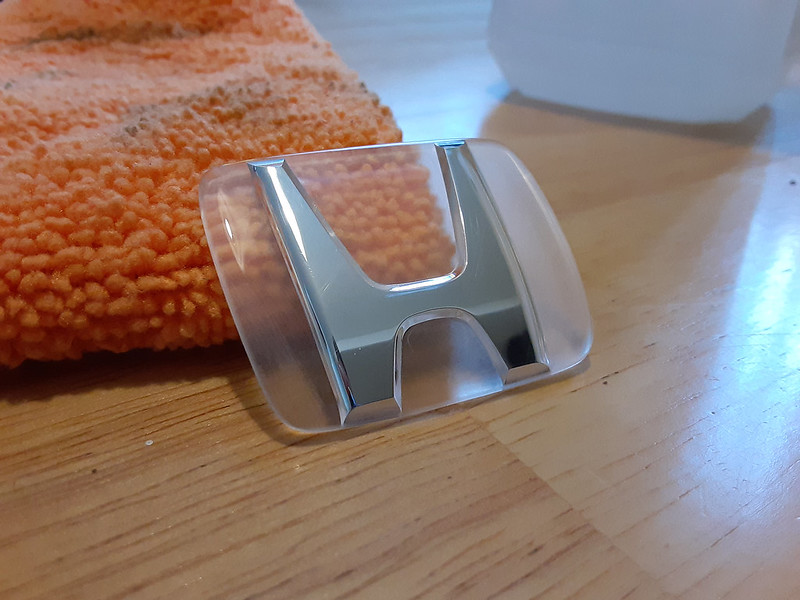
I decided on a rear emblem arrangement, and it unfortunately meant removing that cool Honda World emblem (which turned out to be metal!) so that the tailgate didn't look too cluttered. Here you can see a genuine DC2 Integra Type R red "H" along with a '98-'02-spec "Accord" badge. I have a custom 3D-printed emblem that'll be going under the passenger tail light, but it needs chroming first - I'm extremely proud of that piece, but that's going to have to be for another day.

A lot of work went into customizing the grille, so here's a full DIY writeup if you'd like to try something similar for yourself:
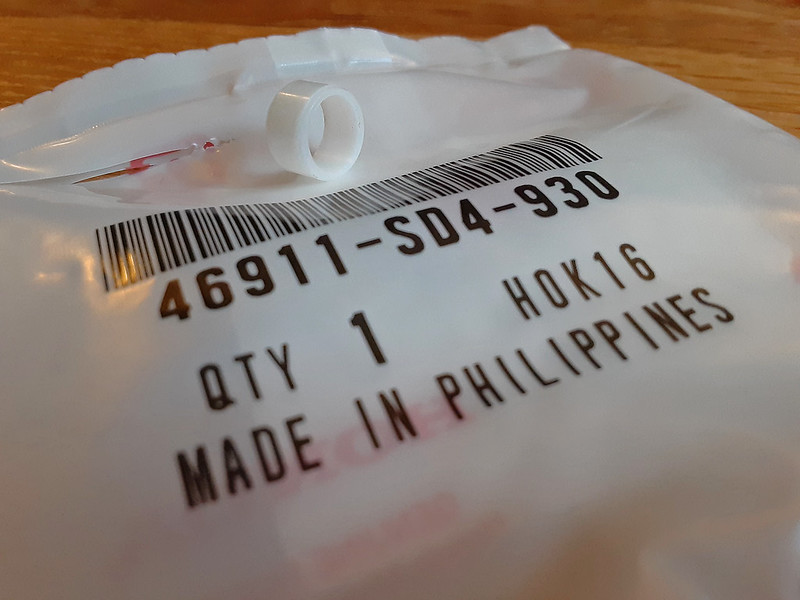
I started by sourcing a brand new front emblem. They're discontinued from Honda, but at the time of this typing there's currently a seller on eBay with a handful of them.
I started by sourcing a brand new front emblem. They're discontinued from Honda, but at the time of this typing there's currently a seller on eBay with a handful of them.

If you want it a color other than black, starting by rubbing the adhesive off the back:

Sand off the original black paint with 1000 grit. In hindsight, I was being too cautious about scratches showing up in the end result with the 1200, noticed when I was later putting down the final black backer that it wasn't wanting to stick in a tiny spot, and would recommend 1000 for a better 'key' for the paint to grab onto. Be careful not to dig into the H; you want to preserve that chrome.

Spray a few coats of your chosen color - I went with Honda R81 Milano Red, trying to match my OEM rear emblem. In the second shot, you can see what I mean about the paint not wanting to stick in one tiny spot. Fortunately it didn't seem to impact the final product.


In direct light, any color will have some natural transparency to it. To prevent the possibility of the hole behind the emblem showing through, finish up with a few coats of black.
After a few days of curing, to stick the emblem back onto the grille while making it (hopefully) possible to remove later without breaking the emblem, I used a minimal amount of double-sided Duck Tape, and then in the center where there's a hole in the grille for you to poke something through and push on the emblem itself, I stuck a tiny square of 3M's exterior molding tape to act as a protective cushion and prevent a screwdriver or something from scratching the paint.

Now here it is (admittedly pre-black backer) next to the OEM emblem. While the Integra's uses a metallic paint, the standard Milano is still a very close match.

Getting to the body of the grille, cut out the inner ribbing with a hacksaw for that little improvement in air flow.

Get up to 600 grit sanding all the rough edges smooth.

This photo's a bit out of sequence of actual events due to mistakes, but you get the idea: get generous with the body filler and then once again sand it smooth, being careful to avoid pockmarks in the filler. There's no natural stress being put on the grille, so filler is plenty strong enough for this application. You could always plastic weld, if you prefer. I didn't take a photo of the next step by itself, but at this point you can scuff up the entire grille body and spray it with some semi-gloss black (... or match it to your car's body color, or whatever color you want).
Moving on to the chrome strips, if you want to paint those, you can sand them down if they're smooth enough as is, but mine were pretty rough so I took a razor blade and peeled it all off. If your chrome is in good shape to begin with, and you want to preserve the ring around the H, you can do so by making careful cuts with the razor. I masked mine off and shot the whole thing with body-matched Seattle Silver Metallic. You'll see freckles in the paint because I never have any luck with metallic paint coming out of a rattle can. I've since been told that you can set the can in hot water for ten minutes or so to help the paint spray smoother. Something for me to try later...

Here it is all back together, with the grille body painted semi-gloss black. For the ring around the H, since my stock chrome wasn't salvageable, I sprayed it with Spaz Stix Mirror Chrome. It came out decent enough, but it's not durable so I'll definitely be sourcing a new upper chrome strip later on to try this again while preserving the stock chrome.

Mesh from the gardening center at Wal-Mart was cut to size and precise fitment. When I made one of these grilles for my old sedan I used the more common 'wavy' mesh pattern from Home Depot, but this time I wanted to try this square design. I was careful to make the cuts a very tight fit so that the 'teeth' of the mesh bite into the plastic a bit and provide their own grip, in addition to the glue I'll be using later on.

More semi-gloss black was laid down over the mesh, so the grille didn't look like something taken out of the late '90s/early '00s Fast and the Furious era. Going back to the grille, scuff up its backside with rough sandpaper (which I clearly didn't think to do at the time; we'll see if that bites me later on) so that you can then use a hot glue gun (or I suppose a similarly goopy super glue) to lock the mesh in place. You'll see by this photo the surfaces you'll want to sand.
... And we're finished. The goal for mine was a piece that looked like it might pass for OEM, if Honda had actually made something along the lines of an Accord Type R back then (they did for the European market a few generations later), and I don't think it's too far off.

Now the car sits, for the most part, waiting for its new heart. The side mirrors are still missing but, again, I'm waiting to pay for the engine before taking more out of my budget for that project. Gotta do something about that truck stance as well...

June 15, 2020
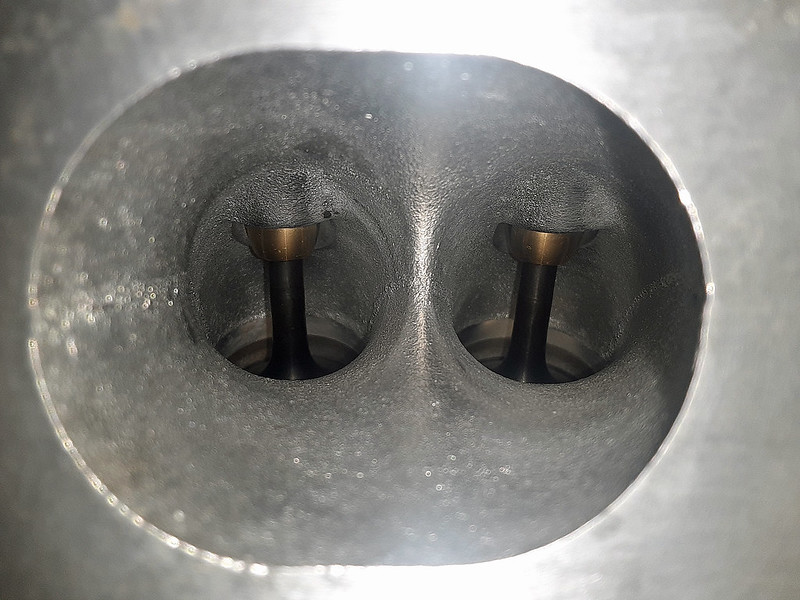
I picked up the H22 head today from Heads By Drew in Aurora, CO. In the couple of times I talked to this machinist, it's very obvious that he's passionate about his work. I definitely went to the right guy, so I'm feeling good about this being a reliable head. One thing that deviated from plan is that he didn't use the Supertech guides I had supplied, and instead swapped them out with GSC B-series guides. While he's a Supertech fan, he's not comfortable with their guides because of how they're not quite big enough where they need to properly grip the valve seals. You could literally put the seals on and pull them off again by hand. GSC has been one of his go-to brands for a while. But since it took so long to get my head done (setbacks with other customers' heads), he didn't charge me for them. There weren't any other real hiccups; he said mine was the nicest H-series head he's had come through - not really surprising, considering it's a low mileage engine from H Motors Online. He included a full reassembly and valve lash adjustment, so all I have to do is pull the cams and bolt the head onto the block, install some minor exterior pieces (cam gears, sensors, etc), and it's ready to go. Photos of the head below were all supplied by Drew.
A rundown of my full head setup, once running:
- Ishino/Stone (OEM) top-end gasket set
- Fel-pro MLS head gasket
- ARP head studs
- New OEM '97-'01 spring-style lost motion assemblies
- New OEM valve spring seats
- Supertech 79lb valve springs
- Supertech titanium spring retainers
- Supertech machine hardened valve locks
- Supertech black nitrided dish valves
- GSC Power-Division manganese bronze B-series valve guides
- Supertech valve seals
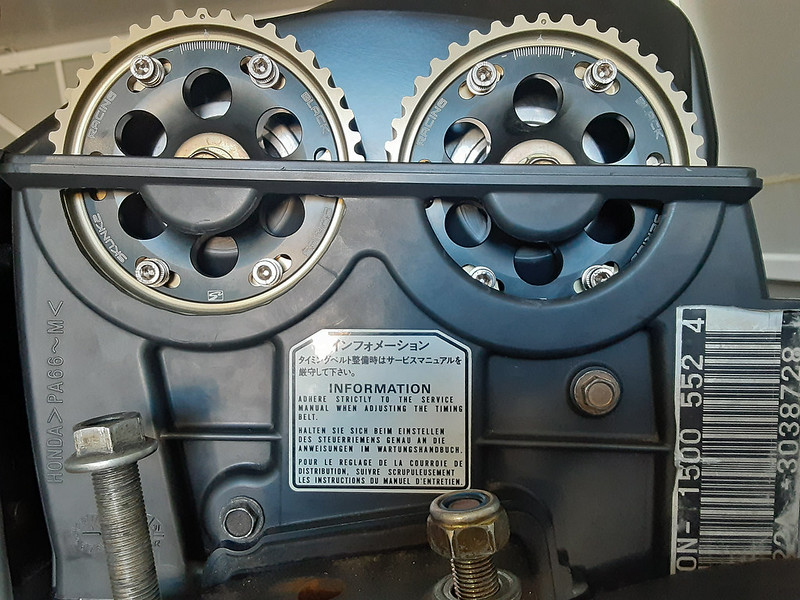
- Skunk2 Pro 2 cams
- Skunk2 Pro Black Series cam gears
- OEM manual timing tensioner conversion kit
- Skunk2 cam seal
- "Skunk2 Inside" VTEC solenoid cover
A rundown of my full head setup, once running:
- Ishino/Stone (OEM) top-end gasket set
- Fel-pro MLS head gasket
- ARP head studs
- New OEM '97-'01 spring-style lost motion assemblies
- New OEM valve spring seats
- Supertech 79lb valve springs
- Supertech titanium spring retainers
- Supertech machine hardened valve locks
- Supertech black nitrided dish valves
- GSC Power-Division manganese bronze B-series valve guides
- Supertech valve seals
- Skunk2 Pro 2 cams
- Skunk2 Pro Black Series cam gears
- OEM manual timing tensioner conversion kit
- Skunk2 cam seal
- "Skunk2 Inside" VTEC solenoid cover


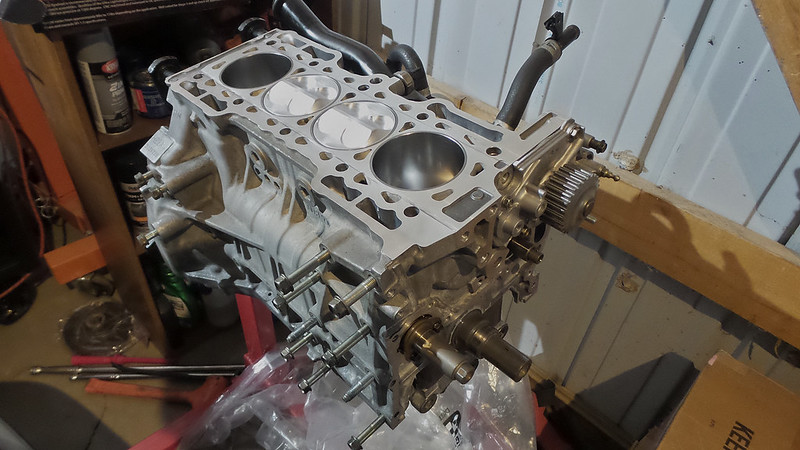
June 22, 2020
Here the engine is back from getting re-sleeved, bored, honed, and head surface smoothed over. I ended up taking it right back to a second machine shop for more work: the rotating assembly was balanced, the bore was re-checked against the pistons, the rings were gapped, the crank was polished, and they sourced new main and rod bearings.

July, 2020
I dug into the budget to pick up a much-needed tool box. The car is rarely out of the garage to allow me to step back and take in the aesthetic progress, so I took the opportunity to take some photos. This month then became dedicated to assembling the bottom end. There were some points where work had to halt to order small parts I was missing here and there, but this is my first attempt at building an engine, so I was all about taking my time and making sure every step was done right. You'll see in a couple photos below where I noticed that part of the piston oil squirter had bent a bit and was rubbing on a crank weight. I used ARP lube as a tool to detect that rubbing as I slowly bent the tube back out of the way, trying not to kink or tear the metal. I really got to know the tightening and loosening sequence for the crank cradle, making sure that thing sat right with everything torqued to spec! Eventually it all came together for good.


Here's a 'build sheet' for the bottom end:
- Wiseco 11.5:1 pistons
- Eagle H-beam rods w/ARP 2000 bolts
- ARP main studs
- ATI street dampers
- OEM S2000 (PCX) oil filter, helps maintain oil pressure past 8k rpm
- OEM block heater
- OEM balance shaft seal retainer added; the seal popping out was a common issue, and earlier engines didn't come with one from factory
- KS Tuned manual timing tensioner & walk blocker (the latter needed a spacer to work with a balancer pulley)
- K-Tuned oil pressure sensor adapter (needs a washer to seat properly on an H22)
- Powder coated oil pan w/DEI gold heat tape above exhaust downpipe
- Skunk2 magnetic drain plug


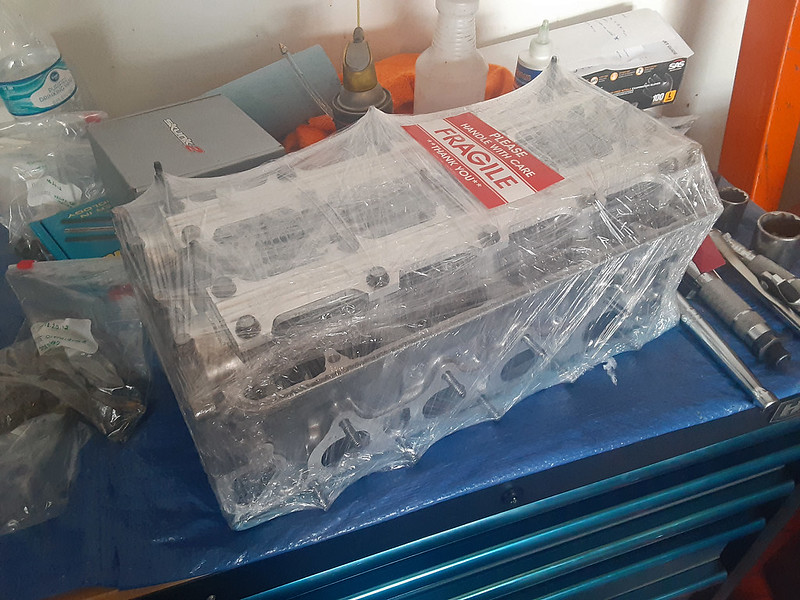
August 2020
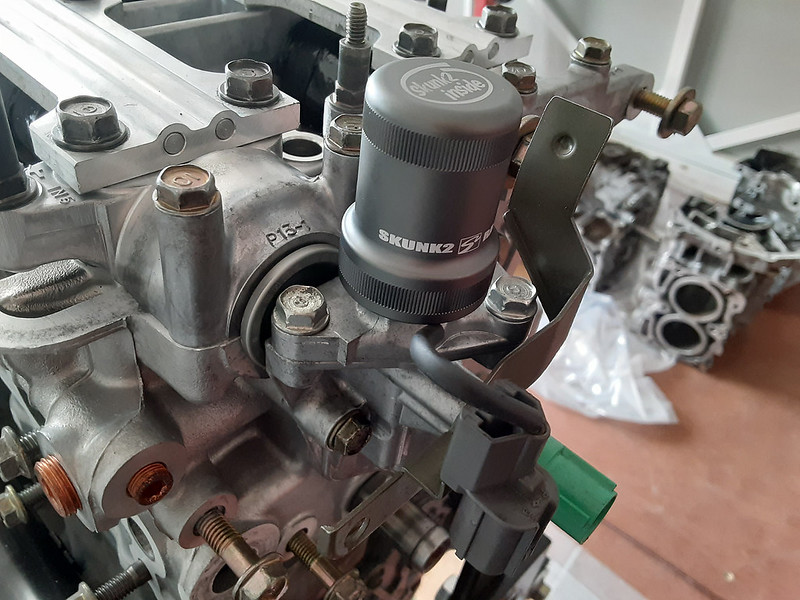
The head may look preassembled, but it definitely wasn't as simple as bolting it onto the block. Like with the crank, I had it disassembled, and the cams out and torqued back down several times before they were finally degreed and I was comfortable putting that valve cover on, sealing up the engine 'for good.'


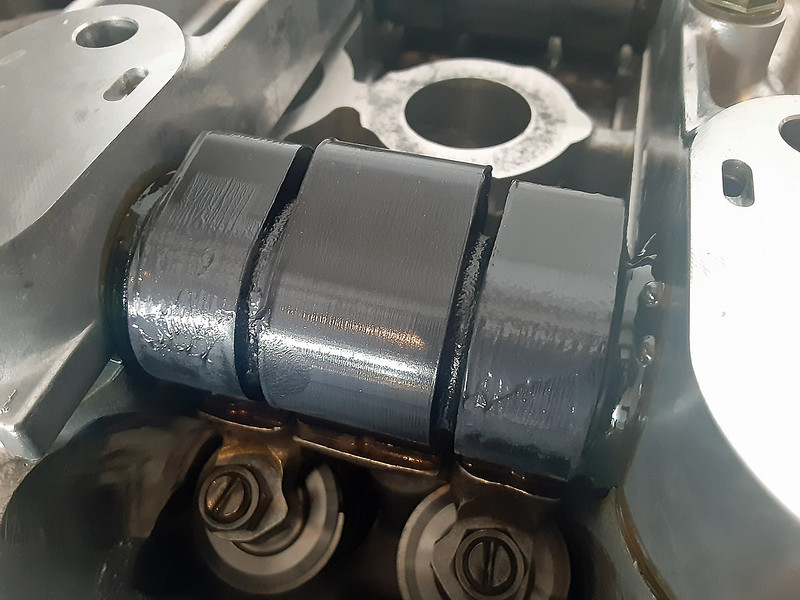


A couple Skunk2 dress-up pieces were added so you know what's in that head, with the VTEC solenoid cap and cam seal hidden behind it... yeah, I didn't think about that one before purchase. It's clearly only cool on a B-series where you can actually see the thing.
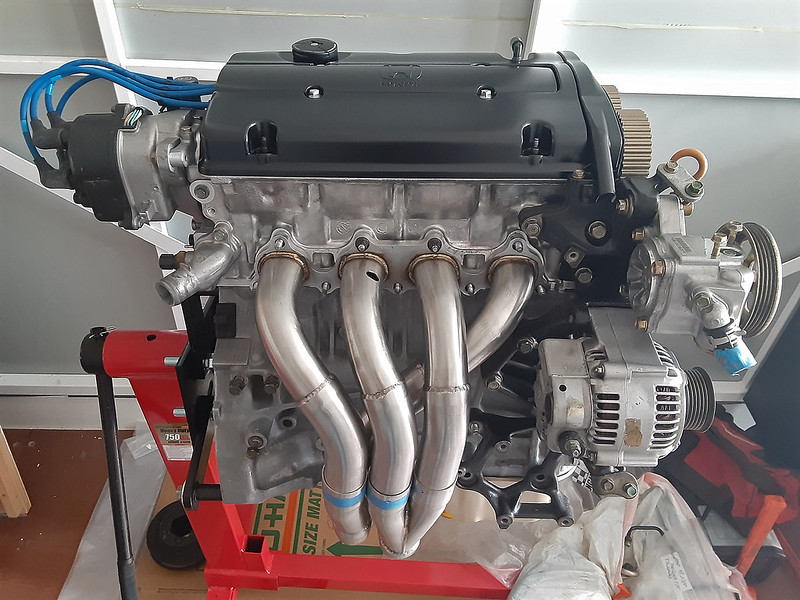
With everything together, I was able to shorten the PLM header a bit so it doesn't hang so low:


Here I am doing some mock-up to see what I have and what I still need to order, as far as the accessories are concerned. That power steering line is going to be a project, to mate the Prelude pump to the Accord rack:
September / October 2020
Took care of the JDM power folding mirror install. The mirrors themselves still need to be paint-matched to the car, but the system is wired in and functioning well!

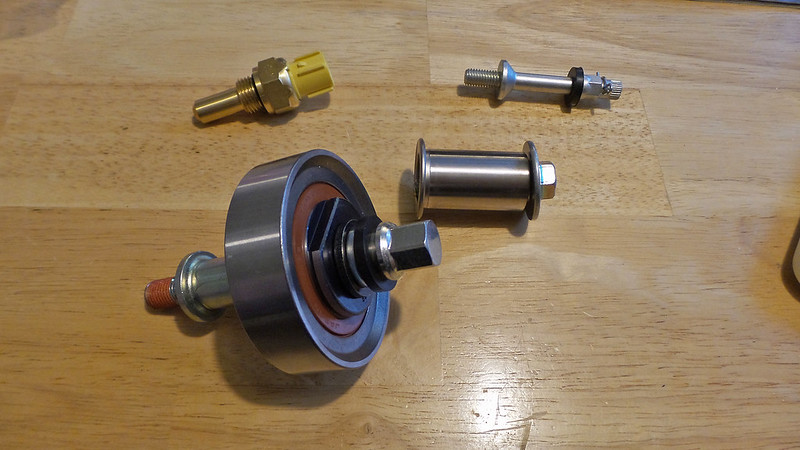
When I initially swapped the H22 into my old sedan, I converted to the popular H23 manual timing tensioner system to get away from the auto tensioner that's known to fail. The problem with it is that it over-tightens the belt, which causes its own problems. Since then, companies have come out with manual tensioners designed to work with the H22's timing belt tensioner components, so I bought everything I needed to convert back to the H22 system, switching out the auto tensioner for a manual piece from KS Tuned. I also upgraded to their "walk blocker" that installs onto the tensioner pulley to cure the H22's common problem of the belt walking a couple millimeters off of the cam gears. The sensor in the second photo below is just to replace a coolant temp reader that had broken during the engine's time in storage and being moved around.

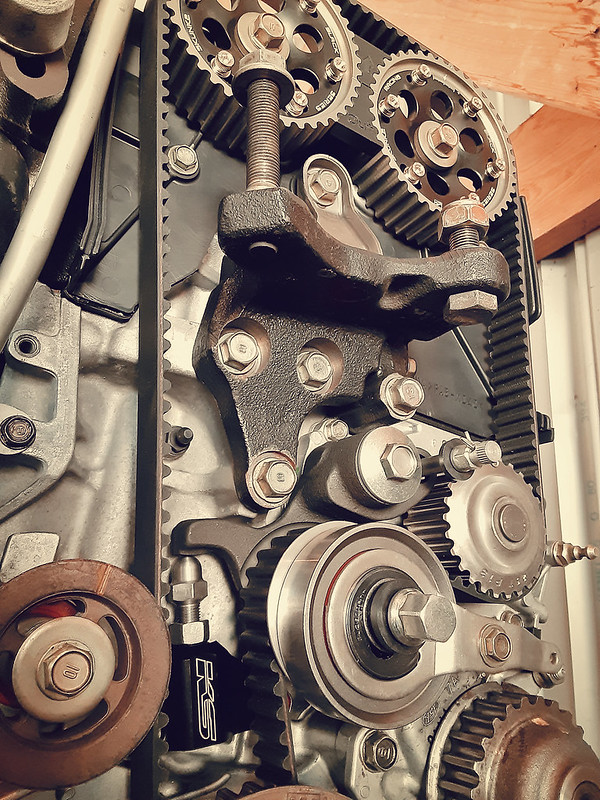
I ran into a problem with the KS Tuned Walk Blocker. KS sells delete kits for the balance shaft system, and their blocker seems to be designed around the assumption that you're getting rid of those balance shafts, as many high-performance builders do. I'm not doing that. Honda implemented the system to try and soften some of the engine's natural vibrations, and I'm all for doing whatever I can to keep this engine comfortable on the street. It's a small issue, though, and I was able to overcome it by finding a washer of the right size to act as a spacer between the timing and balancer belt pulley tensioners.


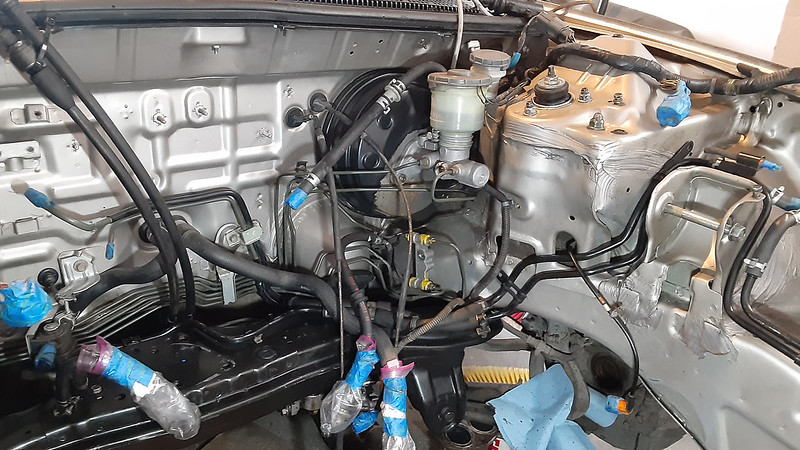
I picked up a K-Tuned adapter to T-in the oil pressure sensor mounted in the glove box. Again, a piece designed for B- and K-series fitment that had to be customized a bit to fit the H. But at least it was another simple matter of sandwiching a washer in there (this one I had to shave down for a cleaner appearance), just so the adapter's O-ring had something to seat against.


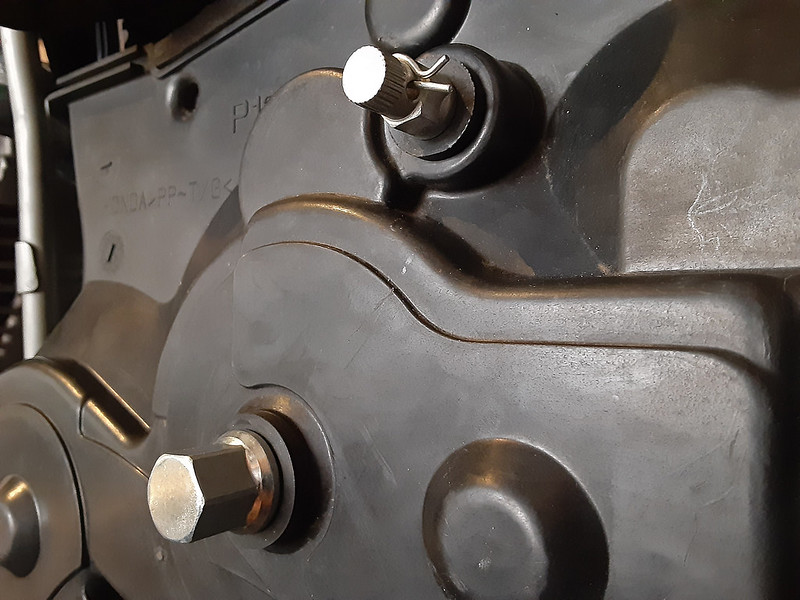
With the timing side of the engine dealt with, I went to install the plastic covers. Of course, the top cover didn't clear the adjustment bolts on the cam gears, so I had to cut a bit off... and then I had to cut a bit more off...


Small details make a big difference. When I ordered the timing reversion parts, I got everything new.

Late-night eBay browsing stole from the budget when I got suckered into picking up these turn signals from the Japanese-market Si-T model. Here's a before-and-after with the USDM signals. The front end's come together real well, even if the slight unevenness of some of the panel gaps still needs to be addressed. I think the only thing left to do, parts-wise, is to get a coupe/sedan bumper that doesn't stick out so far forward, and maybe a splitter. Although thinking about that, the wagon bumper would allow me to run a larger splitter under certain racing organization rules that limit splitter size to not sticking out from the car any further than the bumper does. I would like to get this car into autocross or maybe even road course events one day.


While the car came with a sunroof visor, I found one on a CB7 at the junkyard that fits a bit more low-profile to the roof:

October 2020 thru January 2021
A big undertaking in this first stage of the build was converting the automatic transmission to a manual, while first making sure that it functions properly with the F22A that I already know runs and drives well. Progress was dragged out a bit due to small upgrades and miscellaneous parts sourcing along the way...
I began by changing out the interior pieces, while holding out for a Prelude H22 transmission to show up in the junkyards. Installation of the clutch pedal stumped me at first, before I realized that the mess of electronics in the foot well are arranged a bit differently in manuals vs automatics. Some shuffling around, and a junkyard clutch pedal arm bolted into place. The automatic's wide brake pedal was also swapped out for a smaller one from a manual car.
I began by changing out the interior pieces, while holding out for a Prelude H22 transmission to show up in the junkyards. Installation of the clutch pedal stumped me at first, before I realized that the mess of electronics in the foot well are arranged a bit differently in manuals vs automatics. Some shuffling around, and a junkyard clutch pedal arm bolted into place. The automatic's wide brake pedal was also swapped out for a smaller one from a manual car.

For the shifter, I grabbed one from a fourth-generation Prelude. I'd heard they've got a bit of a shorter shift than the Accord's. Only slight modification was needed, since the holes in the base plate didn't quite line up with the threaded holes in the Accord's chassis. Taking a dremel with a grinding bit and elongating the holes so that the bushings could be slid inward was all it took.


To allow the car to start, the wires for Park (GRN/WHT and BLK) needed to be jumped, and until I get around to properly wiring in the neutral safety switch, those wires (the two thick BLK/WHT wires coming out of the brown connector, which I retained for later) were jumped as well. The automatic's transmission computer was also simply unplugged. Also seen installed in this shot are the shifter cables, complete with delrin bushings at either end to tighten up any slop in the factory gear change.
The interior was finished off with new OEM pedal pads, a Skunk2 weighted shift knob, Circuit Hero extender, and OEM Integra Type R boot.

The automatic cars just have a block-off plate where the master cylinder goes in the manual, so it was easy exchanging that plate for a new clutch master cylinder. New OEM reservoir with a cleaned up junkyard bracket were also installed.

I got tired of waiting for an H22 transmission to appear in the junkyards, and settled for this longer-geared H23 transmission. Only for, two weeks later, an H22 trans to show up. Just my luck. I wasn't about to spend another full day pulling a transmission in the cold, so I left it. Anyway, here's my M2K4 after a good cleaning:
I'm not a fan of those ugly aftermarket billet shifter assemblies, so I found other ways to tighten up the feel of the shifter. In addition to the linkage bushings I mentioned earlier, stiffer detent and shifter springs were installed.


A new slave cylinder was a must. Not pictured is a new OEM boot for the clutch release bearing fork, filling that square hole.

Out with the automatic...


More maintenance parts came in. ARP's B-series flywheel bolts are compatible with the F/H motors, and necessary because the manual bolts are longer than the automatic's flex plate bolts.


11.56 lb flywheel by Competition Clutch installed, along with an Exedy stage 1 clutch pressure plate - a generic Duralast friction disc was installed for this testing period.
This smaller, polyurethane-filled rear mount and low-profile bracket are much easier to maneuver in these tight confines:

After quite a lot of wrestling, and a few broken electrical connectors, the new transmission was eventually bolted into place.

This braided steel line connects the master directly to the slave, bypassing the factory clutch damper.

This old wiring was incredibly brittle, but was patched up for now. The H22 has its own harness and isn't so broken up. Reverse lights were left not wired up until they can be properly integrated into the H's harness.


And so the engine bay was able to be put back together:

The car had an issue with a parasitic drain that had already claimed one new battery, so I exchanged the very old-looking alternator with the known good one from the H22, hoping that cured it.
Underneath the car, since the factory front subframe had to be dropped anyway to allow clearance for the transmission swap, an aftermarket traction bar was installed. Like the rear mount shown earlier, it has been powder coated in a Toyota Quicksand-inspired tan that the entire engine bay will one day be painted.

The brackets for the ABS pump were cleaned up before reinstallation.

But, of course, aftermarket parts don't always fit 100% and once again some holes had to be elongated so the pump wasn't wedge up against the frame rail.

After it finally came time to fill and bleed the clutch hydraulics, the car was taken out for its maiden test drive with a manual transmission.

I ran into a slight snag when the junkyard clutch pedal arm I grabbed for this project had a few problems relating to the anchor pin for the master cylinder rod: 1) the bushing was missing, which I imagine was what eventually caused 2) the hole in the pedal arm to stretch out from the previous owner then compensating by pressing the pedal harder to disengage the clutch. That extra pedal pressure wore out the anchor pin as well, creating so much slack that the pedal couldn't be pushed down far enough to disengage the clutch... which was probably why the car I pulled it from was in the junkyard. A good pedal with a good pin was then pulled from another junkyard car and swapped in, along with a fresh bushing from Honda. No more slack. Clutch pedal feels great. Auto-to-manual conversion complete!

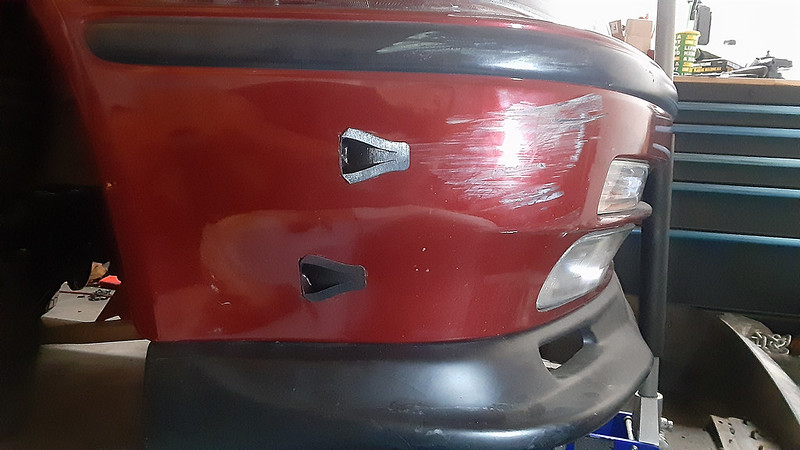
At some point during all that work, I managed to score a set of JDM fog lights, which I believe are from the Si-T sedan like the turn signals I got previously. You can see that these lenses have a curved face that match the contour of the bumper, while the JDM wagons got the same flat-faced lenses that were optional on the American-market wagons and SE models. I'll be installing these as soon as I get lucky enough to find a coupe or sedan front bumper in Seattle Silver at the junkyard. For now, since the whole car is in rough shape anyway, I'd rather have a similarly aged silver bumper than find a different-colored one and have it painted. Here they are getting some protective clear film:

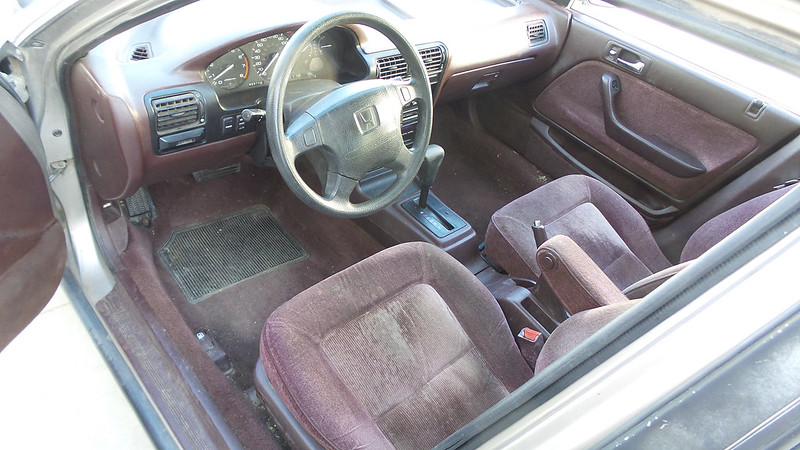
A wagon appeared in a local junkyard with a near mint blue carpet. My car's burgundy has completely grown on me, but there was just too much monotony in it. My ultimate plan for the interior is of a two-tone with black, but this carpet (especially with the black floor mats I have to put down over it) was dark enough that I felt it would serve well enough for now - and it has made a massive difference in how the car feels to sit in. The darkness is starting to compliment the black plastic of the dashboard and the shift boot very well. Now I'm even more excited to overhaul this car's interior.

April/May 2021
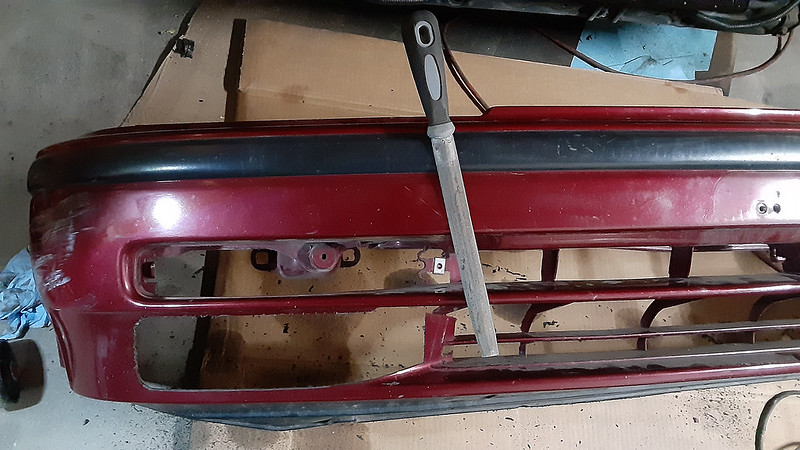
In some aesthetic moves, I picked up a coupe/sedan bumper (not silver, but it's in perfect physical condition for painting) and, thanks to a tip from a fellow forum member, a rear cargo privacy cover. The bumper was immediately cut into so I could install the fogs.


And after literally years of on-and-off getting the Euro R intake manifold polished, it's finally done. At least as done as I care to get it, at least. I couldn't figure out the right tooling to get into the tight spaces. But I'm happy with the result...

... which of course meant I could continue with engine assembly/mock-up to figure out what I'm still missing.

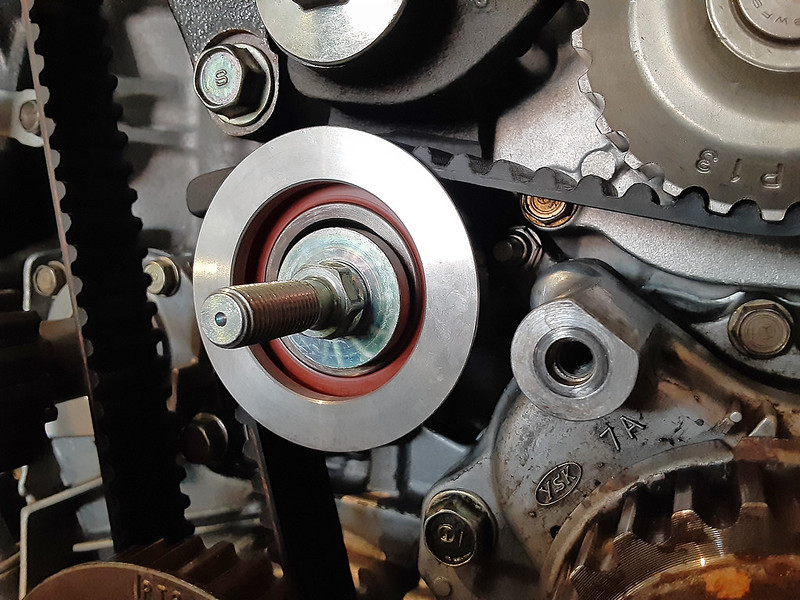
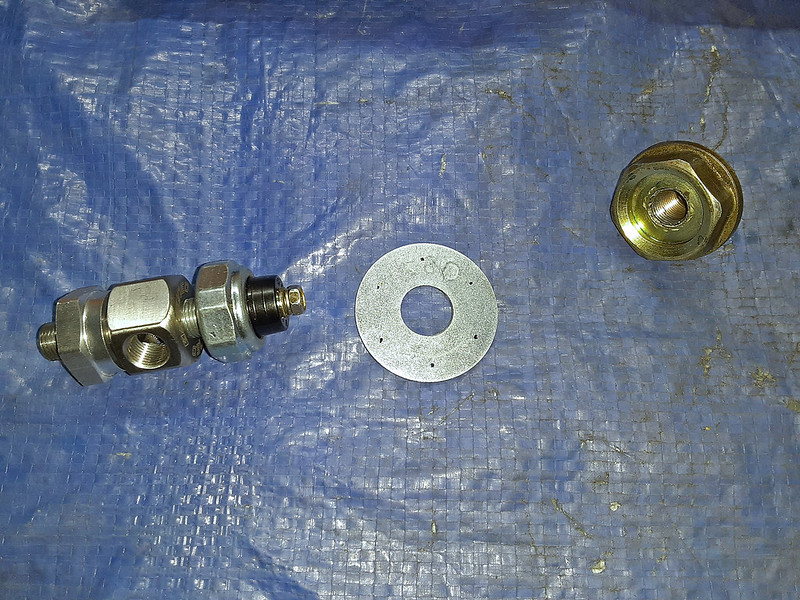
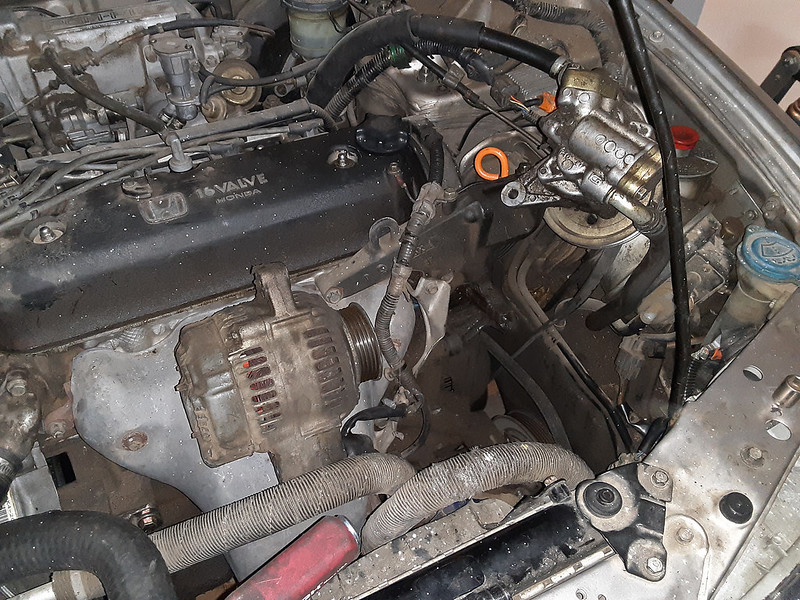
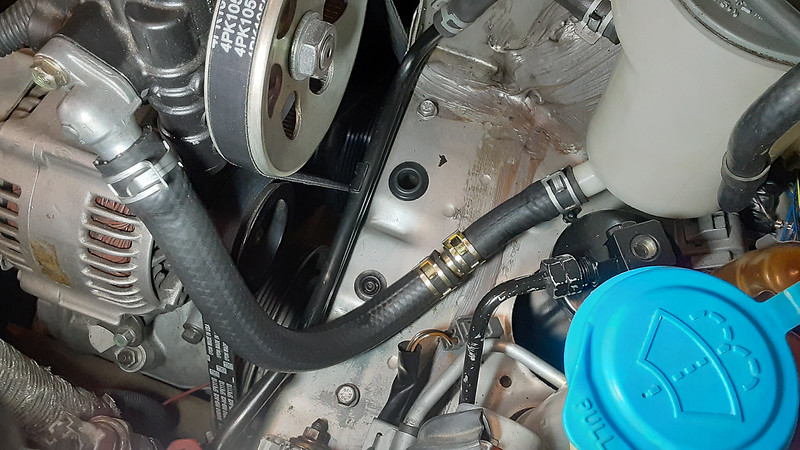
With regards to maintaining power steering, I chose to use a 5th-gen Prelude pump. I could have kept the Accord's for simplicity, but the Prelude's looks cleaner. The bracket holding it to the engine is much less bulky, and the hard line coming off of it isn't as long. I still need to figure out the low pressure fitting on the front, though, because the fitting I have (from what I'm guessing is a 5th gen Accord SiR pump) is too big for the hose coming off my reservoir. And of course the shaft that the pulley mounts to isn't reverse threaded like OEM, so an aftermarket nut had to be found for that.

I seemed to finally have all I need to get the engine in the car, and so was able to say goodbye to the tired old F22A.

Gotta love this clutch line! Bleeding that system is one less thing to worry about on reassembly.
When I performed the H swap in my old sedan, I did as little disassembly of the F-series before pulling it. This time, I took my time and completely stripped the block to make removal as headache-free as possible. It came right out, and I strapped it to a dolly. Maybe I'll do something with it one day.
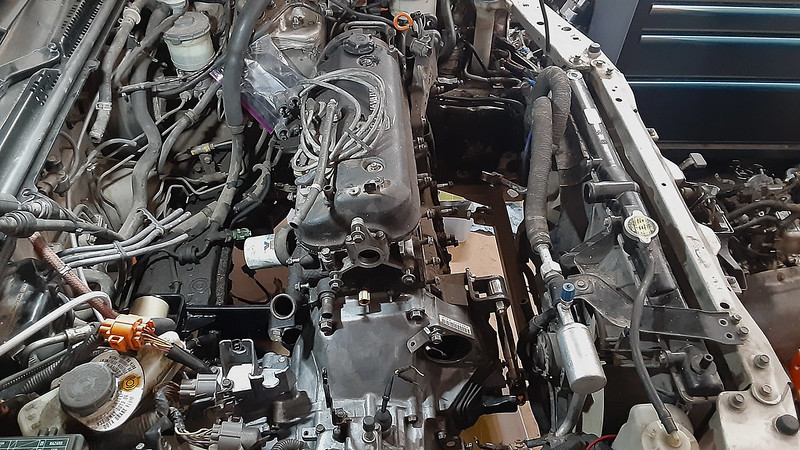

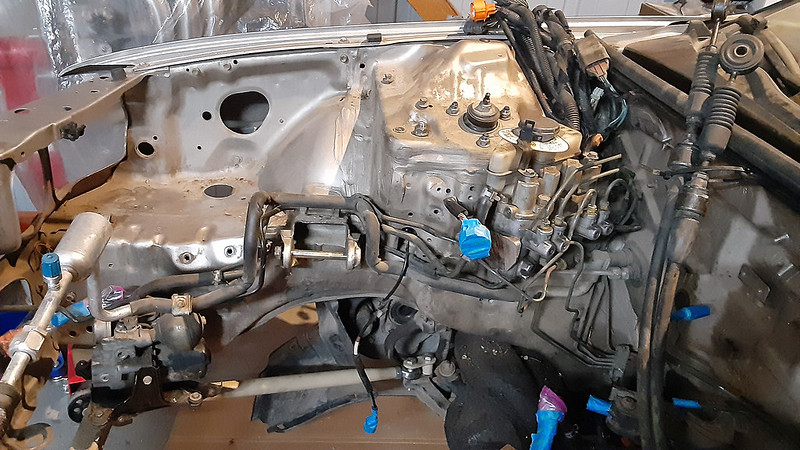
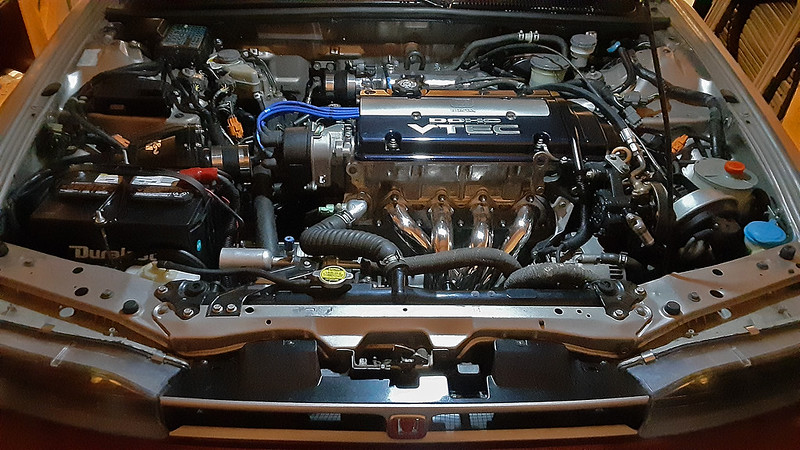
I wasn't about to put my beautiful new engine in this disgusting 300,000 mile engine bay, so it got a full detail. Every little piece was cleaned, bagged, and labeled for later reinstallation. I spent a few weekends on this.


I'm even working on replacing bolts to help freshen up appearances.

I'm keeping all the comforts this time around. Power steering, A/C, ABS, and this Cruise Control. Cruise is wired slightly different from auto to manual cars, so I still need to properly convert it to work, but that's a project for another day.
Yeah, the bay's a bit dirty. A leaking power steering pump, which was causing foaming and overflowing of the reservoir, was mostly to blame.

Here's a pan-around of the bay before cleanup...


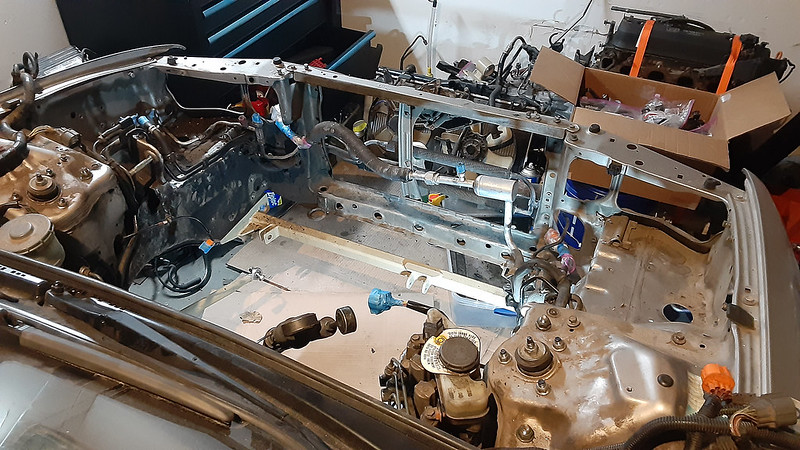
... and after:


Getting back to the H for a minute to double-check that my old swap harness still has everything. Just had to change in these RDX injector clips and extend the TPS wires.

Oil pressure sensor mounted, thanks to this K-Tuned T-bracket.
After picking up a 5th gen Prelude power steering line in the junkyard, I took both it and the wagon's stock line to an automotive hydraulics shop to have this custom line made up. Accord rack end, Prelude pump end, with new rubber in between and a swivel joint up top so I don't have to worry about clocking being an issue.

As with maintaining the P/S and A/C, I also decided to ditch the hard urethane engine mounts in favor of something softer for comfort. OEM mounts are discontinued, and aftermarket rubbers never last long, so I compromised by filling these aftermarket rubber mounts with the softest urethane I could find. Where the Explicit Speed engine mounts were 70A durometer, this 3M urethane (p/n 08693) cures to 50-55A.

Took advantage of the engine-free bay to run the wires through the firewall that needed to be. Gauges, fog lights, VTEC sub-harness, and reverse lights.

Clutch line and EGT wires secured to the firewall for tidiness.

Here's a tip to make installing an engine a bit easier: don't mount the transmission and lower them both in from above. First, only worry about the two side mounts, loosely bolting them into position on the frame rails so they can freely pivot. Start by bringing the engine (w/o manifolds) in from above, slide the trans in from below, mate them on the ground, then raise the whole assembly up into position as one to meet the engine mounts above. The trans mount may or may not benefit from bolting to the car first instead of the transmission since it doesn't stick out as much, but this method makes the driver side so much easier. You'll see in this photo that I was even able to put the radiator and fans in beforehand without them getting in the way.

The install still fought me, thanks in equal parts to me using two different brands of aftermarket mounts that weren't designed to work with each other and therefore don't quite center properly while mounted to the engine/trans, then me not noticing that I had torqued the transmission bolts with a couple wires pinched in between the trans and the block, and then again with the mismatched mounts and having to shave a tiny bit of metal off the rear mount's inner bolt sleeve to fit inside the Explicit Speed T-bracket... but eventually I wrestled it into submission, and my oh my, is it not a sight to behold:

A future plan is to run a K-series intake manifold to see if any gains can be found over the Euro R. I've had this RSX-S mani sitting around forever, and sat it in the bay just to see what kind of clearance I'm working with. Looks like plenty of room! You'll see here that I also have the Spoon header mounted. That's just for start-up; the PLM needs further modification to fit how I want.

Got the Euro R manifold mounted. I'm relieved to see that there's still plenty of firewall clearance with the IACV relocated around back. The coolant hose routing isn't going to be pretty, though.

The Rosko Racing fuel rail came with a couple pre-threaded holes for whatever you might need them for, but they don't come fully drilled through in case you don't need them. I drilled out one to mount an electronic fuel pressure sensor, which is wired to a gauge in the glove box.
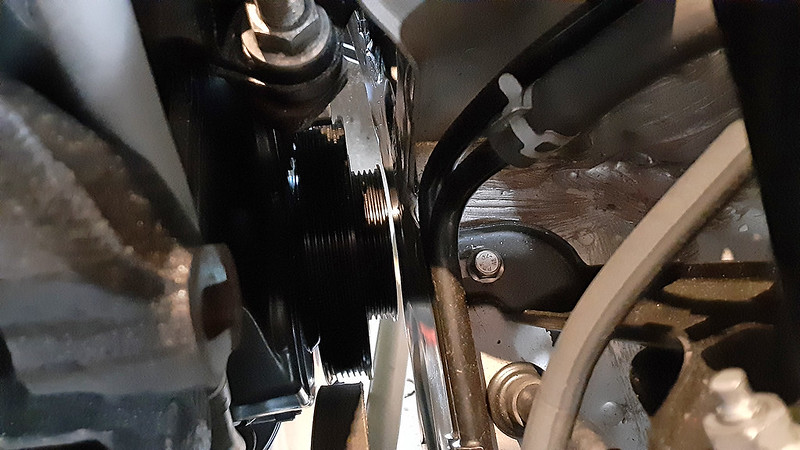
I'll be able to use OE-spec belts for this engine since I'm maintaining A/C and power steering, but the ATI damper is a bit bigger than stock and doesn't allow the clearance to change them out. Luckily the smaller power steering pulley unbolts from the main hub, so I won't have to lower the engine off its mounts to do a simple belt change. It's still more complicated a job than it needs to be, but could be worse...
June 2021
This engine's intake system is mostly custom, but follows the factory routing. The hole next to the battery just needed to be enlarged to allow for the K&N Apollo's larger-diameter tubing.

The edge of the hole was lined with vacuum hose to protect the flexible intake tube from tearing, and the filter assembly was installed - the aluminum tubing to connect it to the throttle body still needs to be cut and welded up.

I'm hoping this acts as a cold air intake without the hydrolock risk of the typical off-the-shelf CAIs. Air is sourced from outside the engine bay, but with the inlet mounted up high and pointed straight down, it should be difficult for it to suck up any water. The plan is to mount a couple mini NACA ducts on the side of the bumper to feed and pressurize this secondary 'air box.'

Of course I had to clean the underside of the hood before putting it back on, to help with the "new" appearance of the engine bay. These details make a difference.

The front end went back together...

Finally got the reverse lights wired up, from the manual transmission conversion.

Glove box gauge cluster finally got powered up as well. Wideband air:fuel, exhaust temp, fuel pressure, and oil pressure.

July 2021
Continuing work on my intake system from last month, I found these 3D printed NACA ducts on eBay and went about fitting them to the bumper. They arrived a bit smaller than I thought they'd be, but the manufacturer does offer custom sizing. For now, these will work nicely for a prototype. I'll order larger ones later and properly blend them into the bumper so that the flanges disappear when the car's painted. No hoses were connected to the inside of the ducts; they're simply there to let air more easily pressurize the empty space behind the bumper. I'll be careful not to drive through any puddles, but if I get caught in the rain, the idea is that if any small drops of water get in through these ducts, it'll fall straight down before reaching the intake's actual inlet up above...

Next, I wanted a coupe/sedan rear lip for two reasons: one, it opens up options for mufflers to also include those with attached tips; and two... it just looks cooler. I assume the wagon's tailpipe exit is offset further because Honda figures that with a tailgate, people will be spending more time hanging out there, and they wouldn't want to burn your leg or inhale more fumes than you need to. Me, I don't care so much. But thanks to the wagon bumper being slightly wider, it takes two coupe/sedan lips to make one fit the wagon, and here's how I went about doing it:
First, I roughly cut the lower half of a bumper off of a car at the junkyard, then took it home to spend the time finely trimming it:
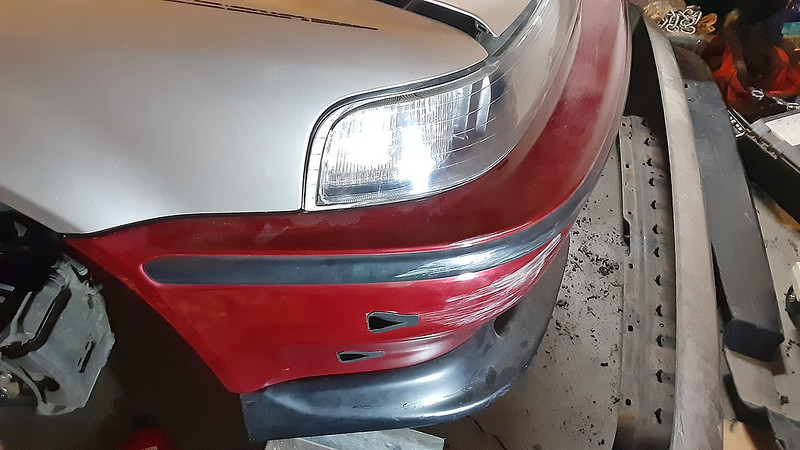
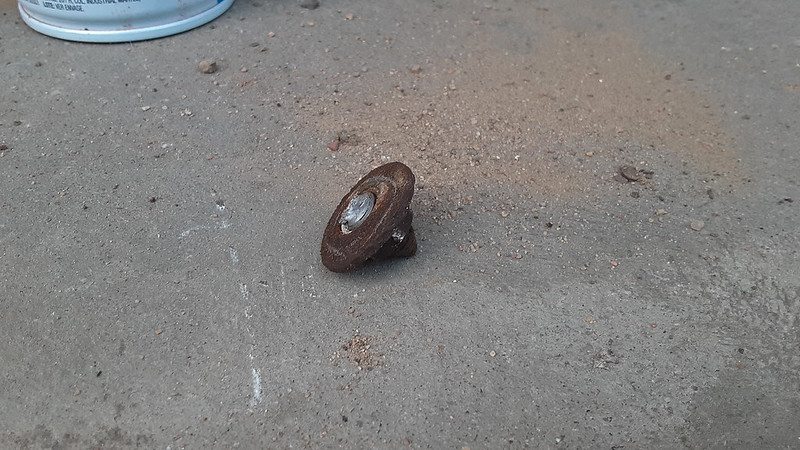
Removing the wagon's rear bumper cover was a frustrating ordeal. First, there are six nuts/studs holding the whole bumper assembly to the car. Two outside the car and therefore probably rusty (you'll see one of my studs snapped because the nut was seized on); and four inside, under the plastic cargo compartment. The two side cubbies will have to be removed to get to them.
One the bumper's off, the plastic cover should be removed to make handling the whole thing a bit less of a handful to deal with. Every one of those stupid plastic clips had to be removed with "chisel" and hammer. Replacements can be found on eBay. It's worth finding one of those Honda-specific multi-packs and stocking up on a few of them just to have extras around. You never know when you'll be removing this again, or the front fender liners, etc.

Although an insane amount of dirt fell out of my bumper (not surprising, considering how dusty the interior was, even under the carpet), I got super lucky with this car. It seems near impossible to find a rust-free early '90s Honda these days, and this car's cancer is pretty superficial.

My bumper cover has this bulge in it that I assumed was bent metal underneath as a result of being rear-ended. Sadly, the plastic itself somehow warped and hardened into this shape. With wagons being rare in the junkyards, I went ahead with the lip conversion. I haven't tried anything yet, but I'm hoping that simply taking a heat gun to it will allow me to shape it back. Otherwise, I'll be waiting for another wagon bumper to come along so that I can cut and plastic weld a straight section in its place.
Back to the lip work, I removed what I wanted to from the wagon's lip and cleaned up the edge. I left the end sections on just to simplify the work in a way. Just like the length of the 'rear' section of the lip, the 'side' sections are also longer on the wagon. It was either this, or splice in a short section on each side from a second sedan lip to make up the difference. This way also makes it easier to deal with mounting rear mud flaps, since the screw holes are exactly where they need to be. While the coupe/sedan lip is shaped differently, it should be easy enough to blend it in when I go to do the final body work before painting.
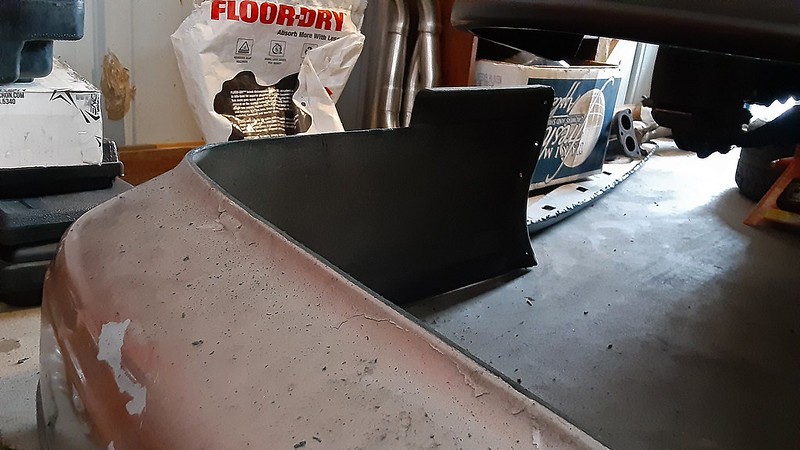
You'll see here that the wagon's lip has closer to a 90 degree corner versus the coupe/sedan's more rounded shape. I forgot to photograph exactly what I did, but it's basically just some very thin pie cuts that need to be made to pull the sides of the lip in to match the wagon's sharper curve.

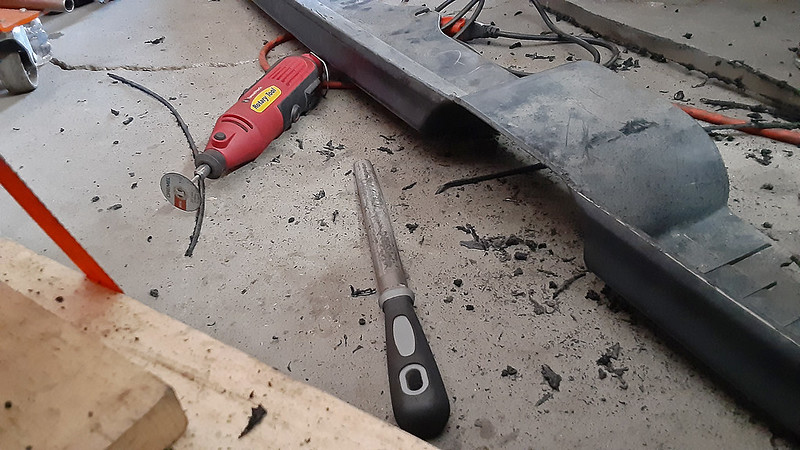
It was here that I realized that one lip isn't wide enough to fit the wagon bumper, so I cut this one in two... or rather three, by removing that exhaust gap. I made my cuts where the plastic on the underside flattens out immediately outside the gap. Here I am plastic welding the shorter passenger side of the coupe/sedan lip to the wagon bumper, cutting it just right to butt up against the wagon end sections:
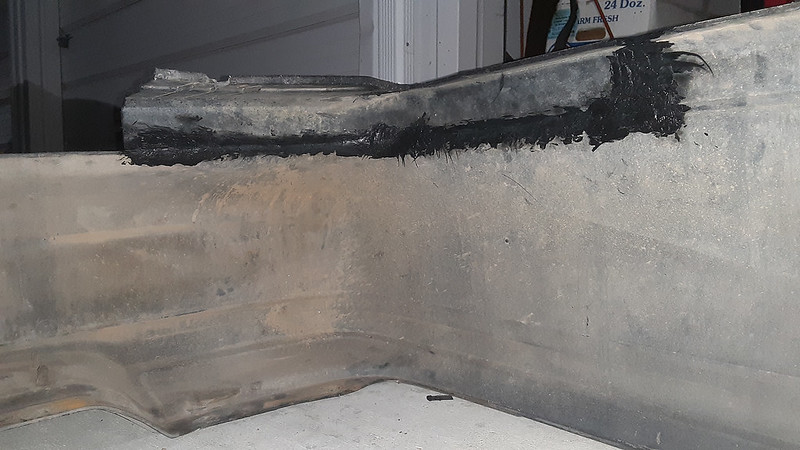
Similarly 'weld' the driver side piece on, hang the bumper cover back on the car (no need for a full bumper install), and you're left with a nice gap for the exhaust to pass through. The muffler itself was propped up centered within the heat shield already mounted under the car.

I then went back to the junkyard to roughly cut the exhaust section out of a second coupe/sedan lip - taking several inches more than necessary on both sides of the gap, just to be safe - then brought it home and cleaned up the top edge that meets the body-colored part of the bumper. With the bumper cover hanging on the car and the muffler propped up where you want it to sit, you hold your newly acquired 'exhaust gap' piece over top of the muffler tip(s), and use a marker to mark where to cut off the excess. It's kinda hard to explain the process in words, but with those marks made, you can actually then pull the bumper cover back off the car, set your new exhaust gap piece back in position where you wanted it to sit, and use your already-welded bumper to trace the exact shape to cut your exhaust piece into, like so. Lucky for me, my chosen muffler fits perfectly within the gap, so I didn't need to modify it any further:

Those vice grips worked great for holding the exhaust piece in place while I plastic welded it on from behind. It's looking a bit Frankenstein at the moment, but I'm very happy with the result. After these shots, I went around the outside with the plastic welder as well, for more strength. Body work and paint will come later, I just needed to get this done so the fabricator can place the muffler where I want it:


I forgot I still needed a battery tie-down. The aftermarket ones are ugly as hell, in my opinion. OEM for the CB is discontinued, but the 5th gen Accord's isn't yet and fits perfectly as long as you don't mind the "FRONT" arrow pointing in the wrong direction. Play-Dough confirmed, even with a bigger ball than shown, as long as you put the hooks on the right sides (they're different lengths) there's no contact with the hood.


In August, I finished wiring up the fog lights, only for one of the bulbs to explode inside of the housing. Little pieces of hot glass stuck to the plastic in there, along with a ton of glass dust, so now I've got to take it apart and clean up inside. I'm really hoping this was just a cheap bulb thing, and not a voltage issue that needs tracking down. In the second image, that's not cracking, by the way, but the edge of the protective film I wrapped them in.


The power steering has probably been the biggest headache of this entire project. Here's the belt about a millimeter or two from touching the body of the car, at the engine mount. That part of the body will probably get some trimming or hammering one day, when I eventually pull the engine back out to paint the bay. Luckily the other pulley that it wraps around unbolts from the crank, or replacing the belt would be a massive ordeal every time, because the gap is not wide enough down there for the belt to pass through sideways.

Holiday Season 2021
Here's a simple shot of the engine bay in its current state. When I go out to the car, I do sometimes spend a lot of time just sitting and looking at the thing, thinking about its future...
I finally got around to mounting the ECU in the factory location. I had hoped to come up with a proper bolt-in solution, but ended up settling for heavy duty zip ties. Eh, it's on there pretty snug. You'll see that I taped up the gap around the USB plug. If you have an ECU with a plug like this, whether or not you want to leave that plug in, do not leave any holes in your ECU case! I can't remember who it was, but one of the tuners on Instagram posted a photo of a spider nest on the motherboard of a customer's ECU. Apparently those little things can get in there and cause enough damage to affect the tune. Tape is awfully cheap and easy security...

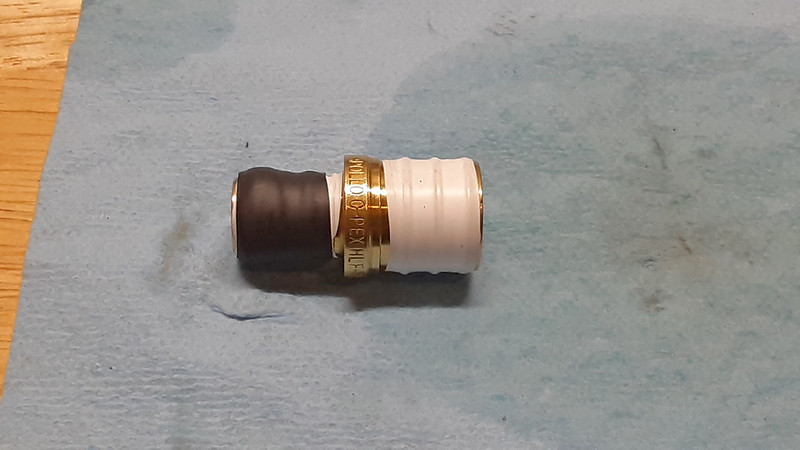
More power steering fun. Figured out how to connect the larger Prelude low pressure inlet hose to the smaller Accord reservoir outlet, using a 5/8" to 1/2" barb fitting. Thinking ahead when cutting the hoses to length, I was able to hide the unsightly connection under the cruise control diaphragm. The power steering system should now be complete. Here's to hoping there's no bottleneck in the custom high pressure line I had made earlier...


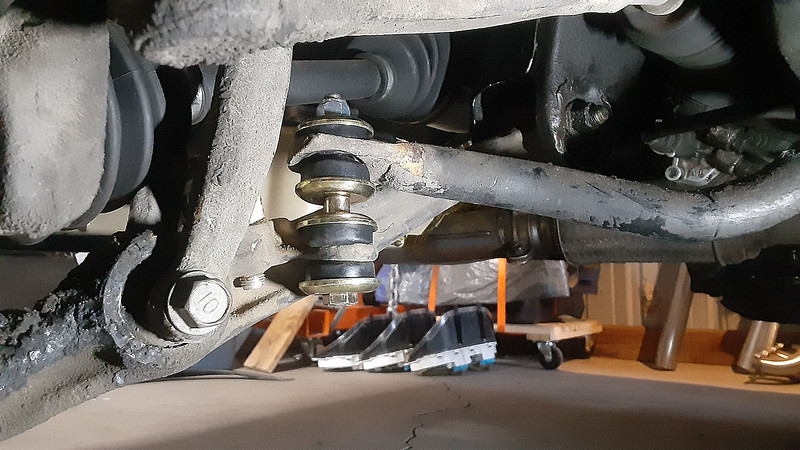
Picked up an ST rear sway bar. This had to be done now, because I planned to get one of these anyway, and I didn't want to have my custom exhaust mounted only for it to be in the way of this sway bar if I were to have installed it afterward. The ST bar doesn't mount in quite the same was as the stock one.

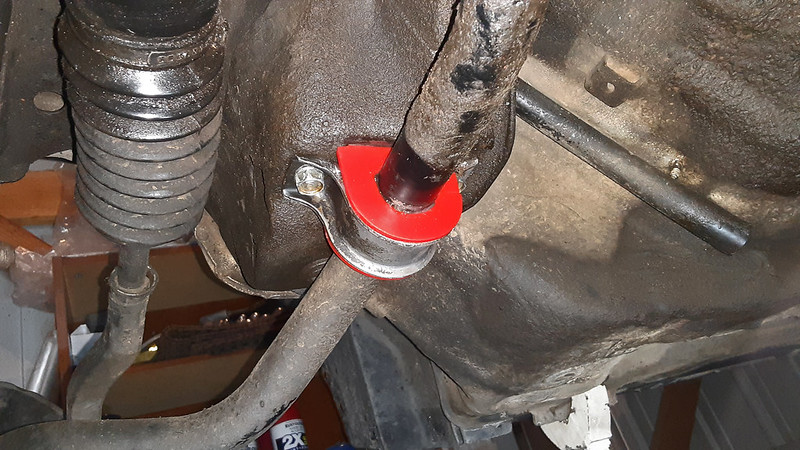
I'm all about the "while I'm in there" mentality, and bushings are cheap enough, so I decided to freshen up the stock front sway bar as well with urethane. Sadly, black D-bushings don't seem to be available anymore, so Ricer Red it is. Don't mind the grime for now, the chassis is the next big project with this car.
One little detail that's been bugging me ever since the manual transmission conversion is that the top of the shift boot wasn't securely attached to the lever. That was fixed with this super cool little collar from Hybrid Racing. They offer other colors, but I had to go with black, of course, to keep it somewhat stealth and "OEM+" looking. Acuity makes a collar as well that I almost grabbed, but after seeing this Hybrid piece, it was looking a bit too bulky for my taste.

February / March 2022
I heard about some local-enough Honda thefts, got scared, and immediately ordered these locking hood pins to accompany another, secret, security feature I'd already made in the engine bay. It's pathetic how easy these cars are to steal, so I am very far from done making this car cost a potential thief as much time as I can...


My traction bar looked to be causing some visible toe-out, so I picked up these inch-shorter radius rods to try to reign that in. Seems to be working, but we'll see if there are any issues when I get the car aligned.

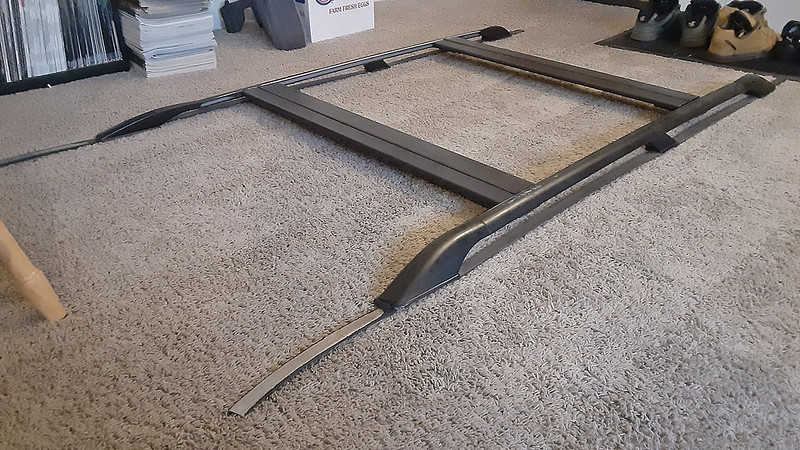
There aren't many exterior accessories I want for this car, but I managed to score one of the few remaining rare pieces I'm after from a forum/Instagram friend. This roof rack couldn't be more complete, either. Normally, it bugs me when I see people put roof racks on their car just for the sake of having one because they're trendy in some circles, or to use them just to put other decorative accessories on the roof (BMX bikes in particular, in the import crowd), but this is all function: I can't very well have a road trip build without one. I want to get it painted before mounting it, though. Now I need to shop for a roof box to keep the cargo area clear for sleeping in. And I kinda want to mount some "fuck you" light bars to it, for those morons who drive around in traffic with their high beams on... yes, I'm that much of an asshole.
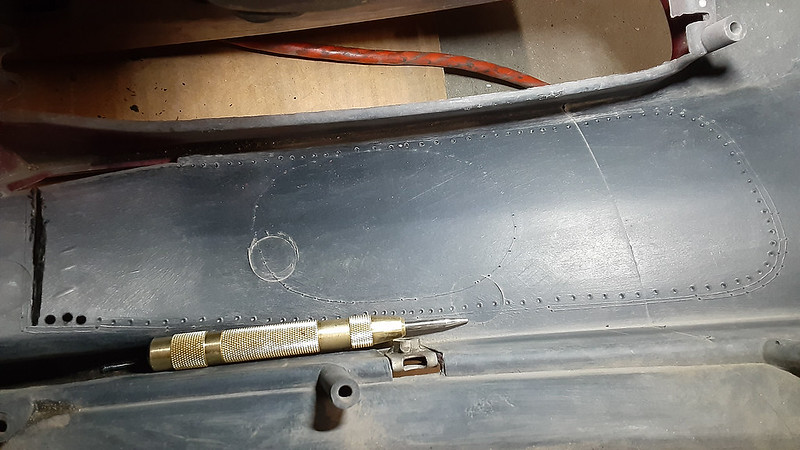
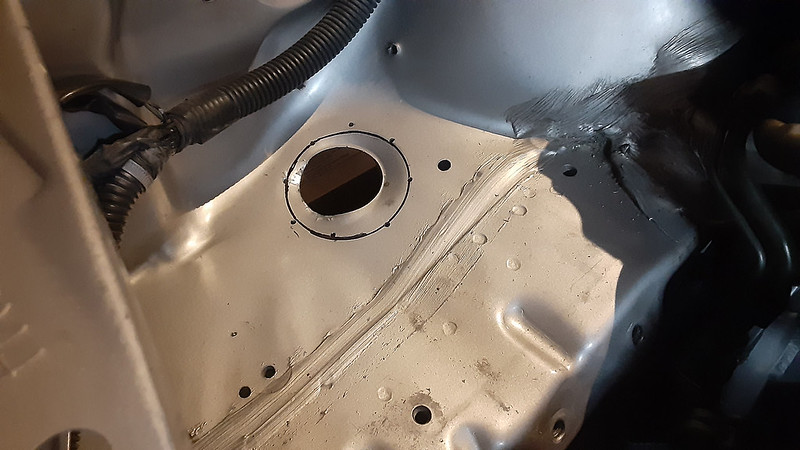
So, I really don't want to have to drop the tank to change the fuel pump. Not now, and not in the future when it inevitably burns out. It makes no sense to me that Honda gave the Civics an easy access panel under the rear seats, but not the Accord. So I made one myself, using the lid from a mid-'90s Civic sedan. If you want to try this yourself, be warned that this is a major potential fire hazard if the lines coming out of your pump are leaking fumes.
I started out by using a stepped drill bit to poke around, which doesn't create sparks, just to locate the pump hidden underneath the metal. I already had a pretty accurate idea of where to look, since I did this on my old sedan and others have documented this mod online with photos. Luckily, the hunt was simplified by the fact that the metal in this space is identical between the sedan and wagon. Not sure about the coupe, though. But the stepped bit is important, since it will keep you from accidentally drilling too deep and cutting a hole in a fuel or brake line.

I looked around under there with a flashlight, being very careful about widening the holes to get a better view, and marked a rough outline of where the fuel pump sat.

With a junkyard "EK" sedan access panel in hand, I cut a piece of paper into the shape of the gasket outline and traced it onto the metal, not quite centered over the 'pump circle' I had drawn - you do need to take into account ease of bolting the thing down.

Now that you've found where the pump sits, and where the access lid will sit, decide where to cut the hole and how big. It needs to be big enough to allow you to maneuver and pump out without too much trouble(and it doesn't lift straight up, it takes some finagling), but also small enough to leave metal to allow the lid to seal against the floor panel of the car. I picked my location, and went about VERY CAREFULLY poking holes along the perimeter with the stepped drill bit. Just under the straight part of the lid stencil I drew is a brake line almost right up against the metal, so you need to be very careful there. Hence the relatively tiny holes I drilled up there. Always start out slow with the stepped bit, then peak around in there with a light to see if you can safely go deeper, and proceed as you can.


With a lot of closely-drilled holes, you can use tin snips to cut between them as another spark-free way of getting metal out of the way.
Here I decided to take the risk with sparks. I stuck my nose in there and wasn't getting even a faint whiff of gas fumes, so I shoved some plastic over the pump and lines just in case, and used a grinding stone on a dremel to clean up the hole's edge.
The riv-nut, I think, is one of the greatest inventions ever. The Civic lid had to be bent to conform to the Accord's body, and chose to use the common 10mm M6 bolt to hold it in place. One of the lid's ears had to be shaved a bit for a cleaner appearance. I got neoprene (wet suit material) with an adhesive backing off good ol' eBay to provide a weatherproof seal, and just taped up the hole in the Civic's wire grommet with woven electrical tape.


As I was looking down onto the top of that filthy gas tank, I realized I never thought to get a new gasket for the pump, so I went back to eBay and grabbed a cheap-o pump assembly to mount the Walbro 255 to, rather than mounting it to the existing assembly.

April / May 2022
I can't believe it has taken more than two years of work in this cramped storage unit to get the car running. In my naivety I thought I'd have it registered and on the road the summer after I bought the car in January 2020. But I ended up blowing my expected budget clean out of the water with my need for small parts I didn't think about in the planning stages, and got financially distracted with things I really didn't need, like the JDM fog lights and turn signals, upgrades during the manual conversion, and on and on and on. On April 20th, 2022, I was finally able to crank the engine over for the very first time since it was stock and running in my old sedan, nine and a half years ago. And it started right up! Am I good, or am I good? The issues were small: 1) It was making a clattering kind of noise, which turned out to be the dry power steering pump. I think I just need to figure out how to fill the low pressure line with fluid so it has something to begin that draw from the reservoir and then fill my custom high pressure line to the rack. 2) There was an oil leak where I teed the AEM oil pressure gauge into the stock pressure switch. It was an easy fix, but while I was under there, I discovered that 3) the coolant hose going from the block to the oil cooler (where the filter screws on) has a small leak. No coolant hit the ground during either of the two times I brought the engine up to temp, but there was a drop hanging from the block end of the hose. That may be exacerbated when the engine is hot and revved up. Fortunately, those formed hoses are still available from Honda, so both of the hoses coming out of the oil cooler will be ordered soon just so I don't have to go back there for a while.

Have a listen! The rattling noise is the mentioned p/s pump, so ignore that:
Finally, the day has arrived! With the help of a friend, the car was loaded up onto a trailer and taken down to the tuner in Denver to get the intake and exhaust welded up before it hits their dyno.

July - October 2022
Well, that was a bust. The car just sat for two months, through four missed appointments, because the shop owner was having trouble holding onto employees and was left to his list of clients himself. I finally got impatient and took the car back. I felt like it might never get done, and the longer it sat so far from home - in an industrial area of Denver, of all places - the more I felt like the car was at risk of being stolen. The latter fear was unfound, as the the guy ended up putting the car in a gated & locked area and under a cover, but while the car was there I was collecting parts to get it ready for the road trip I had planned for it. Sadly, that scheduled vacation from work went to waste, but the build must continue. I'll get some things done before approaching another shop...

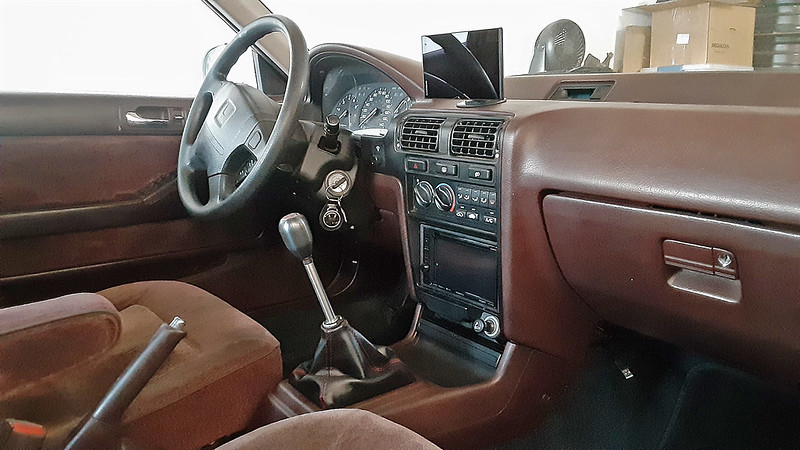
The first issue to tackle is the stereo system. The single-DIN deck the car came with worked but was well worn, and the speakers were all pretty much blown. I can't have a road trip car without music to listen to, so everything was replaced. My reasoning to go with a stand-alone GPS unit is twofold: 1) the stereo is mounted very low in these cars, it's really not a comfortable way to glance at a map; and 2) this way I can move the GPS to another car, and I do love to explore the mountains with the RSX.

Frustratingly, whoever installed the old deck took a harder route than using a simple aftermarket adapter, and instead cut the stock connector off of the harness and crimped the stereo harness in place. That didn't leave me with much wire to work with once I cut this mess out, so after I got a factory connector from a junkyard, I had no choice but to crimp it in place as well. Soldering in there would have been too much of a pain for me to want to deal with, sorry. Here's what I opened the dash to find:

... but at least I did the job halfway correct? I had to have the factory connector in there for the sake of future stereo swaps, but I soldered the new stereo's harness to the aftermarket adapter harness. I'm getting better with soldering, too, the end result didn't turn out too bulky!

Installing the speakers I found more crimp connectors that I did replace with solder joints, but that job otherwise went smoothly. You'll see here that I decided to get a suction cup mount for the dash rather than stick the GPS to the windshield. Arguably a dumb decision (I do plan on picking up a couple spare dashboards at some point just to have for future possibilities), but I just really like this positioning of the screen from the perspective of the driver's seat. Having a double-DIN really elevated the feel of the interior, I'm loving this mod. That shift knob extender... it sure does look goofy, but I like the closer proximity to the steering wheel. It feels good moving my hand back and forth more quickly between the two. I wonder if painting it a flat black would be a bad idea.
It's a little detail, but I live for the little details. I swapped out the stock "Unleaded Fuel" reminder decal for a Premium one to match my hot-rodded engine. Not that anyone else will be driving the car to ever see it, but I'll know it's there and it's one of those little touches that helps the car feel more complete.


You may hove noticed these horns perched up in the parts collection photo above. This car's horns weren't working, and I wanted something louder, so I picked up these Hella Sharptones. After much fiddling, because of their size, I just couldn't fit them anywhere behind the front bumper except in plain view behind the grille. I'm not a fan of seeing them on every other Subaru, and I don't like it here, but I did what I could to hide them and painted the stock yellow cages with some truck bed liner I had laying around, and then grabbed a cheap-o Impreza bracket off eBay to mount them with. Not horrible, I suppose. But, alas, they still don't work. When I press the buttons on the steering wheel, I can hear the relay clicking, so I'm guessing that means the clock spring inside the wheel is the only part of the system left to replace; I still need to get to a junkyard for that (Future edit: The problem actually turned out to the the horn relay under the dash, above the driver footwell. At least now I've got a couple spare clock springs in case mine goes bad one day. Horns are working great).


I also attempted to get the A/C ready for a recharge, but that didn't work out so well. I got the drier I needed, but the condenser I ordered didn't fit like it was supposed to. This little elbow of pipe interferes with the radiator support. I have since discovered that Denso, the OEM for this part, still makes theirs, so that's something else I've noted to pick up later.
 >
>A minor leak had appeared in my stepped adapter for the low pressure side of the power steering. The hose wasn't as tight of a fit on the adapter itself (thanks to the fitting being between available hose sizes), and I poorly chose worm gear hose clamps to tighten it down. The first issue was addressed by bulking up the fitting with plumber's tape and heat shrink, and picking up a pack of OE-style constant tension clamps. The fix seems to be working, fingers crossed...

Another slow, but much more annoying leak was of coolant coming from a fitting on the side of the head. Damn, but I hate dealing with coolant - especially now, before the engine is broken in and I'm hesitant to run it to burp the system. Simply draining the radiator wasn't enough to get the water level in the head below that row of fittings, I had to just rip the proverbial Band-Aid and unscrew the sensors to create a mess all over the transmission. I had used the trusty ol' teflon tape on them, and apparently not well enough on that one sensor. I took all three out just to be safe and replaced the tape with Permatex high-temp thread sealant hoping for a better seal.

The big chassis/brakes/suspension build with its expensive coilovers is probably many years off, given my current budget, but in the meantime there is no way I'm driving this car around at stock ride height. A cheap setup that served me well on my old sedan was Tein S-tech springs on stock struts, so that's what I did here, again crossing my fingers hoping for the heavier rear end of the wagon to not sag. I had seen photos online of a wagon using this same setup, though, so I think it'll be fine. I'll just be careful not to carry too much weight in the back until I get the coilovers with proper spring rates. Except for the rear strut boots and all four bump stops (which had to be cut shorter, per Tein's instructions), these are 100% brand new strut assemblies right down to the little bushings in the top hat. Installing the fronts went smoothly, but I ran into a fairly major snag when I tackled the rears. The bolts passing through the lower strut bushings in both spindles were seized in place, and the bushings themselves looked like they were probably 100,000 miles past their expiration date, so I had to take a significant chunk out of my dyno savings to get the tools to cut them out and replace them. But at least these bushings are now brand new (and OE Honda, which is always nice!), and I also replaced the worn upper camber arms with adjustable Megan Racing units, so I believe the only bushings on the back of this car that aren't brand new are the big ones in the trailing arms. Combined with the wear items replaced up front, and all of the upgrades to the suspension so far, the car should be feeling pretty tight in the handling department and it's making me even more excited to finally drive it.
So now, thanks to the damage to the savings, I'll be spending the winter slowly saving that money back up while I also collect the large amount of parts that my daily driver needs to stay reliable. I've finally learned my lesson and will not be tinkering with anything else mechanical on the wagon before it heads back to a shop for fab & tuning in early spring.
So now, thanks to the damage to the savings, I'll be spending the winter slowly saving that money back up while I also collect the large amount of parts that my daily driver needs to stay reliable. I've finally learned my lesson and will not be tinkering with anything else mechanical on the wagon before it heads back to a shop for fab & tuning in early spring.


November 2022
In my downtime, I got bored and decided to test fit the roof rack I picked up earlier in the year, mainly to see how it mounted to the car. Underneath the factory black roof strips, there are threaded studs welded to the metal, which was a pleasant surprise after seeing how my friend's Tahoe has bolts that pass through the roof. The rack isn't painted like I had planned to before mounting, but... meh. Later. I was surprised at how rigid the whole assembly felt once mounted, which got me to thinking about the underbody frame braces that Ultra Racing makes for these cars. I wonder if there's any structural benefit to having this on. Now to find the right size of roof box before I hit the freeways...

Nearing completion with the body modifications for this car, there are two different sets of side skirts I want: Sigmas, and these. What VIS Racing calls their "Evo style" skirts. I'm not sure which Evo they might be referring to, but they are actually very similar to the factory skirts found on the E36 M3... which I suppose did have an Evolution trim with the same skirts. These are unfortunately fiberglass and will need some real body-working before install (I have been meaning to learn how to lay fiberglass for a while, so I'm excited for that), but I am so happy to have found that these are still in production. I will be mounting them backwards from how they're intended to be installed, just because I think it makes the car visually less tail-heavy, and more balanced. I set them on the ground under the car to give you an idea of what I mean. The first photo has them laid out like they'd be mounted on the M3, and the second is how I will be mounting them. Sorry for the poor photo angle, but I'm working with very tight confines in my storage unit...


April 2023
I feel like another major milestone has been hit here. Getting the intake and exhaust tubes welded up has been delayed so many times already, and it's finally done!

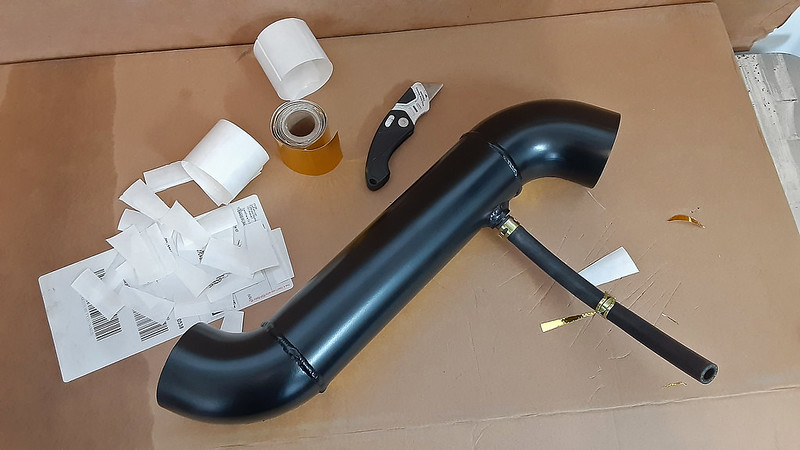
70mm aluminum intake. Simple section with just a couple bends to connect the 68mm throttle body to the K&N Apollo enclosed filter. The fabricator even made up a beautiful little bracket to bolt the filter to the body and keep the whole intake assembly from bouncing around. I love when people put in the effort even for little pieces that aren't really seen. A bung was welded in place as well to maintain the factory PCV system.

I color-matched the tube to my custom valve cover with some matte black brake caliper paint from the auto parts store. I thought hard on whether I wanted the color match or to wrap the intake in DEI gold heat tape in case it actually helps with intake air temps, but since I wasn't crazy about having all that shiny gold in my bay, I settled on a best-of-both approach. After painting the whole tube black, I put heat tape over the bottom half to at least try to protect it from heat soak from below. Trying to research whether that tape actually makes a difference even for a fully-wrapped intake, the results seem 50/50 depending on the specific application, but just in case, I had the extra tape lying around and something should be better than nothing. I also painted the bracket, both to protect from rust and to make it disappear a bit from view... only to immediately scratch it on install when the wrench slipped.


The complexity of the exhaust system, on the other hand, was where the money had to be spent. First, let's start with the header. It started out as a 4-piece PLM 4-2-1 manifold that you may remember I had to shorten the runners on so the downpipe wouldn't hang so far below the oil pan. It has now been further modified with the addition of an EGT bung, springs to hold together the now 2-piece design (the downpipe was welded to the two middle 2-into-1 sections), a flex pipe, and the original 2-bolt flange was swapped out for a V-band clamp. All header welds are TIG, but the rest of the exhaust system was MIG welded.
To explain the use of a single EGT gauge, I am aware that ideally you want one for each cylinder. But I don't feel that my engine is a serious enough build to justify that cost and individual cylinder tuning, so I'm hoping that this information is better than nothing in helping my tuner make me a safer map. Cylinder #3 is at least the hottest on these engines.
I was originally hoping to make this into a one-piece header to avoid the likely leakage from the slip joints, but for the sake of practicality I decided a two-piece design was the best way to go. If it was one piece, and I ever needed to remove the header from the car for whatever reason, I would have to also remove all of the accessories on the front of the engine and probably the traction bar just to make the necessary room to get it out. PLM makes the header with loops for bolts to pass through to tighten the different sections together, but after I shortened the primaries things were no longer lining up. So I ordered exhaust springs and their weld-on hooks online.


Continuing on down the line, the header ends with a 2.5" collector to feed a cat (this is a street car after all, and needs to pass emissions) and two Vibrant bottle resonators. Originally I ordered one bottle-style as well as one of Vibrant's Ultra Quiet resonators so I could see if it would fit, but it was looking a bit big for the exhaust tunnel unless I wanted it to hang low (which I didn't), so I ordered a second bottle-style. V-bands make it possible to remove the cat by itself for future replacement, and the two resonators as one unit. I'm sure I'll be experimenting with different resonators in the future to dial in the sound to my liking.

After the resonators, the exhaust steps up from 2.5" to 3" using a pre-mandrel-bent exhaust system from Kteller. My thinking here - and I don't know if it has any realistic merit - was in going with the saying that "everything after the header is a restriction." A bend isn't going to flow as well as a straight of the same size, so by increasing the diameter of the tube, I'm hoping that at this distance in the exhaust system, equal flow will more likely be maintained throughout the entire system. In the end, my exhaust turned out to be louder than I had hoped, so I'm wondering if this 'megaphone' of an expansion is to blame. In the future (timing dependent on how annoying this is to drive on), I'll have a duplicate back section made in 2.5" to see how it affects things.

Here is where things get truly annoying. The back section hangs worryingly low, and that is because of the combination of a 3" exhaust and the fact that I am still on essentially stock suspension, which means when the car is lifted into the air, the control arms droop and run the risk of damaging something if the exhaust were to be tucked up as tightly as it should be. This is something I can't address until I get coilovers that do a better job of preventing suspension droop. Proper coilovers have become a priority mod moving forward so I can get this taken care of and end my worries of smashing my exhaust into the ground when I hit a dip. Anyway, the muffler is a Vibrant Street Power with dual 3.5" tips. I wanted this muffler for its polished tips (vs the all-black muffler they also offer), but painted the body matte black so that a giant canister wasn't visible from behind the car.


With the wagon back home, I took care of something I got lazy on before and wired the aftermarket gauges to the ECU. I had wired them up to function, but not to actually allow the tuner to make proper use of them through Hondata. With the glove box out, I took the opportunity to do a cleaner job of routing the mess of wires behind it, and also ran an AUX wire from the back of the stereo to the glove box to join the USB input wire that came with the stereo.


August 2023
Finally, the car is ready to leave the storage unit and dyno day has arrived!

Before the tune, a change already had to be made to the fresh exhaust system. It's taken me so long to collect parts and assemble this car that laws have changed in the years since I began, and now Colorado requires cars to have California-compliant catalytic converters. I have a feeling this car would have passed emissions anyway, but I'm not against cleaner-burning engines and less pollution, so I picked up a Magnaflow universal (and CA-approved) cat, and my tuner was able to knock out that swap the day I dropped the car off.
Communicating over text afterward, he was very complimentary about the engine, saying it sounded great and seemed to be well set up. Considering this is my first-ever build, I was obviously extremely happy and relieved to hear it. It's nice to see my natural patience and attention to detail pay off. The tuner was in the middle of finding a new shop for himself and his partner, so after the cat swap and some baseline tuning to get the car idling well, we waited for a time slot to open up at another local shop for proper dyno tuning. For better or worse, a couple days later that slot appeared at PFI Speed. Honda heads will no doubt be familiar with their YouTube channel. It was cool because PFI are kind of a big deal, so it's always interesting to see what they've got going on at the shop. But on the other hand, I really don't like their dyno. It's a Dynojet, which is great, but for whatever reason they just don't care to hook up the sensor to display torque curve, and their graph displays wheel speed along the horizontal axis rather than RPM. Maybe it's a drag racer thing, I don't know, but I'm more into road course stuff where RPM is far more relevant.
Communicating over text afterward, he was very complimentary about the engine, saying it sounded great and seemed to be well set up. Considering this is my first-ever build, I was obviously extremely happy and relieved to hear it. It's nice to see my natural patience and attention to detail pay off. The tuner was in the middle of finding a new shop for himself and his partner, so after the cat swap and some baseline tuning to get the car idling well, we waited for a time slot to open up at another local shop for proper dyno tuning. For better or worse, a couple days later that slot appeared at PFI Speed. Honda heads will no doubt be familiar with their YouTube channel. It was cool because PFI are kind of a big deal, so it's always interesting to see what they've got going on at the shop. But on the other hand, I really don't like their dyno. It's a Dynojet, which is great, but for whatever reason they just don't care to hook up the sensor to display torque curve, and their graph displays wheel speed along the horizontal axis rather than RPM. Maybe it's a drag racer thing, I don't know, but I'm more into road course stuff where RPM is far more relevant.

Watching the tach from outside as the car went through tuning, it looked like VTEC was moved up to about 6,500 rpm to smooth out the transition, and fuel cut happened right around 8,000. The graph then showed power dropping off in the mid- to high-7,000s (guessing here because, as I said, RPM wasn't displayed), so revving any higher would have been pointless.

As the graph shows, the engine netted 202 whp at I'd guess somewhere around 7,000 rpm. Keep in mind that this is at an elevation of 4,900 ft, so I would guess that at sea level I'd be making at least 20 more whp. It's a bit of a bummer because researching almost identical builds online (my H22 having 11.5:1 pistons, Skunk2 Pro 2 cams, Euro R intake, full exhaust, plus all the supporting mods), I was seeings cars make 230 to 240, with a couple even nearing 250 whp. Still, ending up with what amounts to a healthy stock S2000 near sea level - in an old station wagon at 5,000 ft - is nothing to shrug at. The car should still be great fun at what it's made for: tearing up good driving roads as I road trip around each of the 49 continental United States.
And with that, it's a wrap for "Stage 1" of the wagon build. The car now just needs to get through an emissions test and then I can finally get plates for it. I'm both confident that it will pass just because the '93 emissions standards it's required to meet weren't all that tight, and also naturally nervous because it's a hot-rodded engine. Whether it passes or fails and requires further work to be road legal, it won't be worth reporting on here. I'll touch on that briefly in Stage 2, which I'll try to keep much shorter. I'll close this out with a recording of one of the final dyno pulls...
And with that, it's a wrap for "Stage 1" of the wagon build. The car now just needs to get through an emissions test and then I can finally get plates for it. I'm both confident that it will pass just because the '93 emissions standards it's required to meet weren't all that tight, and also naturally nervous because it's a hot-rodded engine. Whether it passes or fails and requires further work to be road legal, it won't be worth reporting on here. I'll touch on that briefly in Stage 2, which I'll try to keep much shorter. I'll close this out with a recording of one of the final dyno pulls...
