Grand Theft Auto: San Andreas
My complete guide for San Andreas is on
this one page. To jump to a certain section of the guide, simply click
on it in this contents list.
- Guide Update History
- New Features to the Series
- Controls
- The Introduction (movie)
- Story Missions
Los Santos
In the Beginning
1) Big Smoke / Sweet & Kendl
2) Ryder
Sweet
1) Tagging Up Turf
2) Cleaning the Hood
3) Drive-thru
4) Nines and AK's
5) Drive-by
6) Sweet's Girl
7) Cesar Vialpando
Cesar
1) High Stakes, Low-rider
Ryder
1) Home Invasion
2) Catalyst
3) Robbing Uncle Sam
Big Smoke
1) OG Loc
2) Running Dog
3) Wrong Side of the Tracks
4) Just Business
OG Loc
1) Life's A Beach
2) Madd Dogg's Rhymes
3) Management Issues
4) House Party
C.R.A.S.H.
1) Burning Desire
2) Gray Imports
Sweet (Finale)
1) Doberman
2) Los Sepulcros
3) Reuniting the Families
4) Green Sabre
Badlands
1) Badlands
2) First Date
3) Tanker Commander
4) Body Harvest
5) King in Exile
6) First Base
7) Against All Odds
8) Gone Courting
9) Local Liquor Store
10) Made in Heaven
11) Small Town Bank
12) Wu Zi Mu
13) Farewell, My Love...
14) Are You Going To San Fierro?
San Fierro
Big Smoke's Courier
1) Big Smoke's Cash
2) Yay Courier
Garage
1) Wear Flowers in Your Hair
2) 555 WE TIP
3) Deconstruction
Syndicate
1) Photo Opportunity
2) Jizzy
3) T-Bone Mendez
4) Mike Toreno
5) Outrider
6) Snail Trail
7) Ice Cold Killa
8) Pier 69
9) Toreno's Last Flight
Zero
1) Air Raid
2) Supply Lines
3) New Model Army
Woozie
1) Mountain Cloud Boys
2) Ran Fa Li
3) Lure
4) Amphibious Assault
5) The Da Nang Thang
Syndicate (Finale)
1) Yay Ka-Boom-Boom
Wang Cars
1) Back to School
2) Zeroing In
3) Test Drive
4) Customs Fast Track
5) Puncture Wounds
Desert
Mike Toreno
1) Monster
2) Hijack
3) Interdiction
4) Verdant Meadows
Airstrip
1) Learning to Fly
2) N.O.E.
3) Stowaway
4) Black Project
5) Green Goo
Las Venturas
The Four Dragons
1) Fender Ketchup
2) Explosive Situation
3) You've Had Your Chips
The Truth
1) Don Peyote
Ken Rosenberg
1) Intensive Care
C.R.A.S.H.
1) Misappropriation
Ken Rosenberg (Cont'd)
1) The Meat Business
The Four Dragons (Cont'd)
1) Fish in a Barrel
Madd Dogg
1) Madd Dogg
Salvatore Leone
1) Freefall
C.R.A.S.H. (Cont'd)
1) High Noon
Salvatore Leone (Cont'd)
1) St. Mark's Bistro
The Heist
1) Architectural Espionage
2) Key to Her Heart
3) Dam and Blast
4) Cop Wheels
5) Up, Up, and Away!
6) Breaking the Bank at Caligula's
Return to Los Santos
Home in the Hills
1) A Home in the Hills
2) Vertical Bird
3) Home Coming
4) Cut Throat Business
Grove Street Families
1) Beat Down on B-Dup
2) Grove 4 Life
Riots
1) Riot
2) Los Desperados
3) End of the Line
Required Odd Jobs
1) Ammu-Nation Challenge (12 out of 12)
2) BMX Challenge
3) Chiliad Challenge (3 races)
4) Collection: 100 Los Santos Spray Tags
5) Collection: 50 San Fierro Photo Ops
6) Collection: 50 Las Venturas Horseshoes
7) Collection: 50 San Andreas Oysters
8) Courier: Los Santos
9) Courier: San Fierro
10) Courier: Las Venturas
11) Exports and Imports (30 vehicles)
12) Firefighter (level 12)
13) Freight Train (level 2)
14) Gym (learn fighting moves in each city)
15) NRG-500 Challenge
16) Paramedic (level 12)
17) Pimping (level 10)
18) Purchase All Safehouses
19) Quarry
20) Race Tournament: Los Santos
21) Race Tournament: San Fierro
22) Race Tournament: Las Venturas (street)
23) Race Tournament: Las Venturas (airplane)
24) School: Driving
25) School: Motorcycle
26) School: Boat
27) School: Pilot
28) Stadium Event: 8-Track
29) Stadium Event: Bloodbowl
30) Stadium Event: Dirt Track
31) Stadium Event: Kickstart (26 or more points)
32) Taxi (50 fares)
33) Trucking (8 missions)
34) Valet Parking (25 cars)
35) Vigilante (level 12)
Maps
1) Unmarked
Unrequired Pastimes
1) Burglary
2) Criminal Ranking
3) Gang Territories
4) Girlfriends
5) Video Games
Master Save File guide
Vehicle Database
Upload Your Photo Gallery!
Cheats
Button
Action Replay MAX
New Features to the Series
*UNDER CONSTRUCTION*
- Bicycles.
- Swimming.
- You can climb onto low walls (including rooftops, fences, ledges, etc).
- Food: you're required to eat every 48 game hours or you start to lose energy, muscle, and fat.
- More character customization: clothes, tattoos, hair, facial hair, body type (work out in gyms to build muscle, eat burgers to get fat, skip meals to get skinny...).
- No loading between cities; only when entering a building.
- You can close an open passenger door while driving by swerving.
- New vehicle types, including a hovercraft, go kart, Harrier jet, and a jetpack.
- Parachuting.
- Pool/billiards, including gambling.
- Gambling: in casinos, you can play roulette, video poker, black jack; there's also video horse race betting.
Controls
*UNDER CONSTRUCTION*
On Foot
X: Hold while walking to run (tap fast to sprint)
Circle: Punch/kick or use weapon*
Square: Jump (or grab onto low ledge when near one)
Triangle: Enter a vehicle/action button (interact with things like video games)
Up: When you have enough respect, auto-target (R1) a Grove Street Famlies member and press Up to recruit them. They will then follow you around and kill any cops or rival gang members you come across.
R1: Auto-aim (with target in range)
R2: Cycle through available weapons
L1: Hold for mini Stats menu
L2: Cycle through available weapons
L Stick: Move CJ
R Stick: Pan camera
L3: Crouch
R3: Look behind CJ
Start: Bring up Pause menu
Select: Change camera view (three options)
* Can be used in conjunction with the R1 button (auto-target). More advanced fighting maneuvers can be learned in gyms. The more you use a gun, the greater your skill becomes. Reaching Hitman level with certain weapons (check level: pause game > Stats > Weapons) will give you the ability to wield and fire two guns of the same type at once.
===========================================================
First-Person Shooting
When aiming (R1) with a sniper rifle, rocket launcher, and camera, the screen will switch to a first-person view.
X/Square: Zoom out/in
L2/R2: Zoom in/out
Circle/L1: Shoot*
R stick: Move aiming reticule
L3: Crouch
* With a camera, press Circle to take a snap a quick picture (useful if you just want to get through the tags odd job). Press L1 to take a picture that you can save to your memory card (see the section on uploading pictures to learn how to get them onto your computer).
===========================================================
Swimming
X: Paddle (hold to 'sprint', tap to 'super sprint')
Square: Jump (to grab low ledges)
Circle: Dive under water
Triangle: Enter boat (you may need to climb onto it first)
L Stick: swim direction*
*While under water, hold L stick up to go down, and down to go up towards the surface. CJ will automatically swim slowly towards the surface unless you're fairly deep, so you'll need to keep tilting the stick up to stay under. Keep an eye on your oxygen meter. If it empties, you'll start to lose health. If your health bar empties, you'll drown. The more you swim under water, the greater your lung capacity will get.
===========================================================
On Bicycle
X: Pedal (hold to cruise, tap fast to sprint)
Circle: Fire sub-machine gun forward or sideways (hold L2 or R2 for latter)
Square: Front brake (once stopped, hold to reverse)
Triangle: Get on/off bike
R1: Rear brake (use while steering to skid, pull 180s, etc)
R2: Look right (hold with L2 to look behind you)
L1: Jump (hold to increase height; steer while jumping to spin)
L2: Look left (hold with R2 to look behind you)
L Stick: Steer, lean forward/backward**
R Stick: Pan camera
L3: Ring bell
R3: No function.
Start: Bring up Pause menu
Select: Change camera view (three options)
* The more you ride a bike, the higher your Cycling skill becomes. A higher skill means you'll be able to pedal faster, jump higher, and jump-spin with more rotation. CJ will also be less likely to fall off the bike when he crashes.
** Lean backward while pedaling to pull a wheelie. Lean forward while braking hard with Square to perform a stoppie.
===========================================================
In Automobile or Motorcycle
X: Accelerate
Circle: Fire sub-machine gun while holding L2/R2 (you can shoot forward on a bike)
Square: Brakes (once stopped, hold to reverse)*
Triangle: Get in/out of vehicle
Up/Down: Cycle through radio stations (if available)
Left: Decline a prostitute's offer (automobile only)
Right: Accept a prostitute's offer (automobile only)
R1: Hand brake (use while steering to powerslide, flip 180s, etc.)*
R2: Look right (hold with L2 to look behind you)
L1: Same as Circle.
L2: Look left (hold with R2 to look behind you)
L Stick: Steer, pan camera up/down
R Stick: Pan camera or use special features**
L3: Honk horn/activate sirens***
R3: Activate odd jobs (aka "R3 Missions") in certain vehicles
Start: Bring up Pause menu
Select: Change camera view (five options)
* In a rear-wheel drive or all-wheel drive vehicle, hold Square and X at the same time to do a burnout with the rear drive wheel(s). In a front-wheel drive or all-wheel drive vehicle, hold R1 and X at the same time to do a burnout with the front drive wheels.
** Some vehicles, such as the Packer, Forklift, and Towtruck, have special features that you can activate by moving the right stick up and down, replacing the ability to pan the camera up and down with that particular vehicle using the right analog stick (there's still the left stick you can use for that).
*** With most cars, pressing and/or holding L3 will sound the horn. But in emergency vehicles, such as police cars and ambulances, you also have a siren. Quickly press L3 to turn the sirens on and off. While the sirens are on, hold L3 to quicken the siren's speed. While the sirens are off, hold L3 to honk the car's horn.
===========================================================
Helicopter
X: Ascend
Square: Descend
Triangle: Enter/exit helicopter*
L1: Fire primary weapon (if available)
R2: Rotate clockwise
L2: Rotate counter-clockwise
L stick: Change pitch/angle of helicopter
R stick: Pan camera, move up/down to change angle of thrust (Hydra only**)
L3: Hover (hold)
*Any time you enter an aircraft, you'll automatically be equipped with a parachute. So if you were to jump out of the plane/helicopter in mid-air, you'll still be able to land safely. Just make sure you're high enough that you can open the 'chute.
** The Hydra can fly both like a helicopter and a normal airplane. With the thrusters angled down, it flies like a helicopter (this is its default setting). Hold Up on the D-pad and they will angle towards the back of the jet so it flies like an airplane. Hold Down on the D-pad to put it back in 'helicopter' mode.
===========================================================
Airplane
X: Thrust/accelerate
Square: Reverse thrust/decelerate
Circle: Fire secondary weapon (if available)
Triangle: Enter/exit airplane
R1: No function
R2: Adjust rudder to turn right
L1: Fire primary weapon
L2: Adjust rudder to turn left
L Stick: Adjust pitch/angle of airplane
R Stick: Pan camera
R3: Raise/lower landing gear
The Introduction
This 21-minute film telling the story of
the events leading up to CJ's return to Los Santos can be purchased on
DVD with the game's soundtrack. Or you can just watch it here! Beware of slight plot spoilers if you haven't completed the storyline yet.
Storyline
Los Santos
In The Beginning
You're Carl "CJ" Johnson, living in Liberty
City. You get a call from your brother, Sweet, who tells you your mom
is dead. You hop a flight to your hometown of Los Santos, San Andreas to
attend her funeral. On your way home from the airport, you're stopped
by two cops; officers Frank Tenpenny and Eddie Pulaski. They frame you
for murdering another officer, then drop you off in a rival gang's
territory. The first thing you might want to do is pause the game to
look at your map. Your current goal is to head to the 'CJ' icon; there's
a bike nearby, so get to it.
Recognize that voice? Frank Tenpenny is voiced by actor Samuel L. Jackson.
1. Big Smoke / Sweet & Kendl
Walk into the red marker
to go inside your house. An old friend, Big Smoke takes you to meet
Sweet, your sister Kendl, and another friend, Ryder, at the cemetary.
Just when you're about to leave, a rival gang does a drive-by, blowing
up Smoke's car in the process. Jump on one of the bikes across the
street and follow Ryder and Smoke back to Grove Street. Watch out for
the other gang; they'll shoot at you the whole trip. Ride into the red
marker to finish the mission.
Reward: Respect +
*You can now save your game. If you
ever find a car you want to keep, you can store it in your garage. This
particular garage can hold two cars. The BMX
Challenge odd job is now available. This is not required to complete
the main story, but is for 100%. Check out the 'Odd Jobs' section for
details.
Walk into your house to learn how to save
your game. When you exit the house, you'll get a call from Sweet
explaining that your gang, the Grove Street Families, is no longer in
control of the city, so be cautious when exploring. Go next door to
Ryder's house for your next mission.
2. Ryder
Get into Ryder's car and drive to Reece's
barber shop. Walk into the yellow marker at the door to go inside. Walk
into the red marker and choose a hair style. When you get outside, Ryder
tells you to get something to eat at the pizza parlor across the
street, so walk into the yellow marker. After you order, Ryder tries to
hold up the place, but the clerk pulls out a shot gun and you run for
it. Head back to Grove Street.
Photo Op: The license plate on Ryder's car says, 'SHERM'.
Reward: Respect +
*Eating is essential in this
game, will get a little tedious over time, and you need to be smart
about it. Eat too much fatty food and you'll gain weight, slowing you
down. On the flipside, missing meals will cause you to lose both weight
and energy. Each restaurant offers a salad that won't gain you any fat.
===========================================================
Sweet
1. Tagging Up Turf
Walk into the red marker in front of
Sweet's house to start the mission. Get in the car and drive to
Idlewood, into the red marker. Sweet shows you how to tag. Go across the
street and spray over the Ballas' tag on the front of the blue house.
For the next tag, go behind the house and into the alley. The tag is on
the east wall. Get back into Sweet's car and drive to the next group of
tags in East Los Santos. The first tag is on the west side of the
red/orange building next to you. The next tag is in the alley on the
north side of the Cluckin' Bell; watch out for the Ballas. Now follow
the blip on the radar to the red marker near the fence. Follow the path
around and climp up onto the building. The final tag is to your right,
on the front of the building. Get back in the car and drive to Sweet's
house.
Photo Op: Notice the license plate on Sweet's car reads, 'GROVE4L'.
Reward: $200, Respect +
*You now have six of Los Santos' 100
tags sprayed. Check out the 'Tags' section in 'Odd Jobs' to find the
rest. They are not required to complete the main story but are for 100%.
You can get more spray paint by picking up the can in your room in your
house on Grove Street.
*You'll get a call from officer Hernandez, warning you not to leave town.
2. Cleaning the Hood
It's time to let your enemies know the
Grove's on it's way to the top again. Get in a car and drive to B-Dup's
place. A former Grove Street Families member, Big Bear, is now a base
slave. Take Ryder around the block to eighty-six a drug dealer, then
it's off to nail some Ballas. After you empty the crack den, head back
to Grove Street.
Recognize that voice? B-Dup is voiced by rapper The Game.
Reward: Respect +
3. Drive-thru
Walk into the marker in front of Sweet's
house to start this mission. Get in the car and drive to the Cluckin'
Bell in Willowfield. When you're pulling out of the drive-thru, some
Ballas decide to try another drive-by. If you don't have a gun you can
do drive-bys with, just ram the other cas as much as you can. The sooner
this mission ends, the better; you don't want your car exploding from
all the gunfire. Head back to Grove Street to drop off Ryder and Sweet,
then drive Smoke to his house.
Reward: $200, Respect +
*You'll get a call from Sweet, telling you you're too skinny. Go to the gym to pack on some muscle - this is not required.
*The gym odd job is now available. You can go there to build muscle and learn new fighting moves, which are required for 100%.
4. Nines and AK's
Walk into the marker in front of Sweet's
house to begin this mission. It's time to get strapped. Drive Smoke to
Emmet's house in Willowfield to pick up some weapons and learn how to
aim a gun. This is pretty easy, as all you need to do is hold R1 while
pressing R2 to change targets, and shoot. When you're done, drive Smoke
home. You'll get a call from Sweet, telling you to get dressed in some
Grove Street colors. Head over to Binco and suit up. When you exit the
store, the mission is finished.
Reward: Respect +
*Any time you need a gun, Emmet's is always open.
*Big Smoke's mission strand is now available. Go to the 'BS' on the radar.
5. Drive-by
Walk into the marker in front of Sweet's
house to begin. Drive your crew into Balla territory to repay some
drive-bys. The easiest way to beat this mission is to run over the
Ballas; slowly driving by and waiting for your gang to kill each Balla
will take too long, resulting in your car exploding. Your little outing
ends up attracting the cops' attention, so head to a pay-n-spray to get
rid of the heat, then head back to Sweet's.
Reward: $500, Respect +
*Ryder's mission strand is now available.
6. Sweet's Girl
Sweet's at his girl's house, but the
Seville Boulevard Families have him surrounded. You need to rescue him.
Grab a car; it's your most useful weapon yet again. When you get to
Playa del Seville, run over the guys with green clothes and red markers
over their heads. Try not to get shot at too much, or you'll lose your
car. When everyone's dead, drive a four-door car into the marker. When
Sweet and his girl get in, the other gang will chase you, but back off
once you get near Grove Street. Drive into the marker to finish the
mission.
Reward: Respect +
7. Cesar Vialpando
Walk into the marker at Sweet's house to
begin. Your sister's dating a member of another gang. You'll need to
follow her to the car club, but go to Loco Low Co first, to get a
lowrider. When you're done customizing it, head to Unity Station to meet
up with Kendl and show off your lowriding skills. If you're confident
you can move the analog stick in the right direction at the right time,
bid high.
Reward: Twice what you bid; up to $2000
*Loco Low Co is now open for business. This is the only place in the entire game you're able to customize lowriders.
*Cesar will call about a race, opening up his mission. Go to the 'CV' on the radar.
===========================================================
Cesar
1. High Stakes, Low-rider
Before starting this mission, check out
'Things to try' to find out how to steal Cesar's bulletproof car. I also
recommend raising your car-driving skill, as most lowriders have a
tendency to fishtail easily. To do this, just drive around. Over time, a
meter will pop up, showing you how high your driving skill is. The
higher your skill, the better the cars will handle. However, this can
take a long time, so atleast get used to driving the different
lowriders. Drive into the marker at Cesar's
house in El Carona (the CV icon on the radar). The only advice I can
give you now is to drive carefully, but not too slow, and follow the
checkpoints. I used a Tahoma (see here), and it handled well enough.
Things to try:
-Steal Cesar's bulletproof lowrider: Save
the game before starting this mission (you don't need to, but it can
save you a lot of time if you ever need to reload). Also make sure you
have a melee weapon (bat, night stick, etc) and $30,000 (kill drug
dealers, they usually have a couple thousand on them) to buy the house
in Santa Maria Beach, right next to the pier the finish line is on.
Before you cross the finish line, wait there until Cesar shows up in his
red lowrider. Once he stops, go through the finish marker and hit his
car with the melee weapon. He should come out. Kill him. The car's
locked, so push his car down the pier, down the set of stairs, and down
the street, into the garage at the beach house. DO NOT LET THE CAR OUT
OF YOUR SIGHT OR GET TOO FAR AWAY FROM IT - IT WILL DISAPPEAR. Now go
back to Cesar's to start again, so you can win this time.
Reward: $1,000
===========================================================
Ryder
1. Home Invasion
Walk into the marker at Ryder's house on
Grove Street between 12:00 and 20:00 to start this mission. You have
eight minutes to drive to the yellow blip on the radar, and rob the
house. When you get in the house, crouch by pressing L3 (left analog
stick); this makes creeping around a lot quieter. You need to steel
three crates of weapons. The first one is next to the cannon in the room
you're in now. To find a second one, go through the door next to the
crate you just got. A third crate is at the top of the stairs. You can
look for more crates, or you can leave. Head to the lockup in Playa del
Seville to stash the loot.
Photo Op: The license plate on the truck says 'SWAG'.
Reward: Respect +
*You can now perform Burglary missions by night, but they are not at all required. See the 'Pastimes' section for details.
2. Catalyst
Walk into the marker at Ryder's house to
start this mission. Drive to the yellow blip on the radar and shoot the
Vagos. After they're all dead, Ballas will come, so kill them too. When
you're done, walk into the red marker to get on the train. The train
will start moving, and Ryder will follow you in his car. Throw boxes off
the train so he can catch them. Just keep the car in the center of the
screen and you should be fine. After Ryder has caught about half of the
boxes, the ones you throw become explosive, but you should be okay
though. After Ryder's caught enough boxes, get into the car and drive to
the pay-n-spray to lose the cops, then back to Grove Street.
Reward: Respect +
3. Robbing Uncle Sam
Get in the van, drive to the compound at
Ocean Docks, and park in the marker. Jump over the wall and kill the
guard, but DO NOT open the gate yet. Follow the road, and at the curve,
there is a garage. Shoot any guards on your way, then shoot the key pad
by the door to open it. There are two guards inside, so kill them. Get
in the fork lift and move six boxes to the space between the garage door
and the shelf (the x's in the sketch below - use the right stick to
move the forks up and down). Becareful not to break them. There are four
boxes inside the garage, and five outside nearby. Leave the forklift in
the garage, and go open the gate for Ryder. Run back to the garage and
get in the forklift. Ryder will park the truck in front of the garage,
with the back facing in, so you can put the boxes in there. Don't mind
the guards shooting at Ryder, unless he starts loosing significant
health. When the van's loaded up, get in and drive to the lockup in
Willowfield (yellow blip on radar; it's Emmit's place). Soldiers in
Patriots will start chasing you, and Ryder will tell you how to throw
explosive boxes at them for when they get close.
______ door ______
| xxx |
| xxx |
|______ ______| <-- shelf
| |
|______ ______| <-- shelf
| |
~~~~~~~~~~~~~~~~~
Reward: Respect +
===========================================================
Big Smoke
1. OG Loc
Go to Big Smoke's house in
Idlewood and walk into the marker to start the mission. After the
cutscene, drive Sweet and Big Smoke to the police department in Pershing
Square to pick up Jeffrey. Jeffrey's gay friend, Freddy, has stolen his
rhymes, so drive to his place in East Los Santos and walk into the
marker to ring the doorbell. Freddy tries to escape on a motorcycle, so
go after him. Be careful not to miss any turns, and keep an eye on the
radar if you can't see him. You don't need to use any bullets unless you
want to end the chase quickly. The chase ends back in East LS at the
basketball courts. When you get there, kill Freddy and the other
gangsters.
This part can be a little glitchy. After
the cutscene where you offer Loc a ride to work, he'll sometimes
disappear from view. Look around the basketball courts before heading to
his job. Ride into the marker at the Burger Shot in Marina to end the
mission.
Photo Op: I don't know what it stands for, but the license place on Smoke's car always says, 'A2TMFK'.
Reward: Respect +
*OG Loc's mission strand is now available.
*This mission should raise your biking skill atleast once.
2. Running Dog
Walk into the marker at Smoke's house to
start the mission. Get in Smoke's car and drive to the meet in East Los
Santos. After the cutscene, chase after the gangster. If you have a gun,
wait until you have time to shoot him. If not, just catch up to him and
beat him to death.
Reward: Respect +
3. Wrong Side of the Tracks
Walk into the marker at
Smoke's house to start the mission. Drive Smoke to Unity Station and
into the red marker. Get on the dirtbike with Smoke and chase after the
Vagos on the train. Ride along side the train while Smoke shoots at
them, and watch out for oncoming trains and crossing traffic. When you
get out of the far side of the tunnel, ride up onto the dirt road on the
right and follow it around. At one point, the path will bridge over the
train tracks. Stay on the right side of the tracks; it will be easier
to get into the next tunnel. After the Vagos are all dead, drive Smoke
back to his house.
Reward: Respect +
*This mission should
raise your biking skill by atleast one, especially if you drove the bike
from the last mission straight to Smoke's house to start this one.
4. Just Business
Walk into the marker at
Smoke's house to start the mission. After the cutscene, drive him to
Downtown. This mission is a big shootout, followed by a tough car chase.
When you're inside the building, just shoot the people as quick as
possible. Make sure to pick up all the money, guns, and ammo you find.
There's also an armor vest behind the short wall to the right of the
bottom of the stair case.
This is the tough part. You're
on the back of a bike, while Smoke drives. Try to kill the drivers of
the motorcycles to make them crash. After Smoke turns a corner, a truck
will chase after you. Dont worry about it, it will crash soon. Keep
shooting at the bike drivers. Smoke will stop soon, and you will need to
shoot the gangsters standing outside of their cars. Kill them, and
Smoke will continue driving. In the spillway, more bikers will show up.
After you turn a corner, cars will join the chase, along with another
truck. Go after the bikers first, then shoot the passengers of the cars;
they're the ones with guns. At the jump, I had slightly over 50%
health. Shoot out the fence blocking the next tunnel to avoid extra
damage, and shoot the barrels to kill the last bikers. Smoke stops and
you get off, finishing the mission.
Photo Op: Notice
the license plate on the bike says 'I MY AK'. I usually take pictures of
all the vanity plates, but I haven't found a way to get this one yet.
Reward: Respect +
*This mission should raise your Machine Pistol skill atleast twice.
===========================================================
OG Loc
1. Life's A Beach
Check out 'Things to try' before starting
the mission if you want to steal a van with a sound system in the back.
Walk into the marker at the Burger Shot in Marina between 22:00 and 6:00
to start Loc's first mission. Loc wants to put together a party to show
off his, er, "rhymes". Drive down to the beach party and walk into the
marker to talk to the DJ. Answer 'yes' to both of her questions by
pressing the right d-pad button. This next dance part is kind of like
the low rider challenge you did a while back, except this time, you have
to press the face buttons at the right times. Get a score of atleast
4000 to be able to continue with the mission. Answer yes to her next
question and she'll let you in the van. Get in and drive to the garage
marked on the radar. Soon after you get onto the street, guys in Voodoos
will start chasing you, but they'll back off once you get near the
garage. Drive into the marker to finish the mission.
Things to try: Steal the van!
It has an awesome sound system in the back...even though it doesn't
improve your in-game sound. Instead of delivering the van to the garage,
park it in a safe-house garage and kill yourself to fail the mission.
The car will still be in your garage when you get back. Repeat as many
times as you like.
Reward: Respect +
2. Madd Dogg's Rhymes
Walk into the marker at the
Burger Shot to start this mission. After the cutscene, get into a car
and drive to Madd Dogg's house in Mulholland. When you enter the
mansion, you will lose all of your weapons and be equipped only with a
knife. Crouch down using L3. Target the guard and slowly move toward
him. When you see CJ's arm raise (when you're close to the guard), press
circle to perform a stealth kill, and follow the hallway into the pool
room. While the guard is circling the pool, crouch-walk into the
shadow. Your center marker on the radar turns blue to indicate that you
can't be seen by anyone. Head right, into the next shadow, following the
path around the pool. Get into the shadowy corner by door and wait for
the guard to come around. Make sure you're in the very corner, so the
guard doesn't run into you. When he comes by, he'll stop, face you, then
turn around and continue his route. Perform a stealth kill right when
he turns around.
When you walk into the next
room, a scene shows that a guard is coming. There are two doors on the
southern side of the room. Go into the room on the left. The guard will
stop by the door you just entered. Sneak up on him and perform another
stealth kill. Sneak into the next room, go left, and follow the hallway
to the end. A cutscene will play, prompting you to sneak by the barman
by crouch-walking in front of it.
*The cutscene showed
one of Rockstar's many ways of poking fun at its competition. Madd Dogg
was playing DRIV3R, saying 'Refractions' (the developer is actually
named Reflections) did a horrible job with the game, and that Tanner,
the main character of the Driver series, "sucks ass".
After the cutscene, sneak past
the barman and behind Madd Dogg's couch, into the next room. When you
go around the hallway, go into the first, dark, room on your left; get
the armor vest if you need it. Go to the door on the other end of this
room and look to your right. Perform another stealth kill on the guard.
You'll see a room across the hall with a brown floor, and a white book
floating in it. That's Madd Dogg's rhyme book. Grab it. Right away,
guards will appear on the radar.
You get your weapons back now,
but I recommend you dont use them. Hide behind one of the counters in
the dark room you were just in. A guard will come in and stop in the
doorway you first entered. Perform a stealth kill and take the silenced
gun he drops. Go through that door and head right, back the way you
came. Go into the first shadowy corner and look at your radar. You can
see which way the guards are facing. Look at the guards in the bar.
There are two red blips staying still; those are Madd Dogg and the
barman. The other two, northern, blips are moving around. Get into the
shadowy corner just outside the bar. Sneak past Madd Dogg and the barman
and into the shadowy corner just outside the door; make sure the guard
in the hallway doesn't see you. Shoot this guard with your silenced
9mm. Go to the end of the hallway and shoot the last guard in the pool
room. When you exit through the door, get on the bike and drive back to
Burger Shot (your car and Madd Dogg's cars are all gone) to finish the
mission. If you were to jump straight down the hill, there's an AK-47
behind Roboi's Food Mart if you want another weapon.
Reward: Respect +
After the mission, you'll get a call from Tenpenny, who wants you to do some missions for him.
*The C.R.A.S.H. mission strand is now available, marked by a 'C' on the radar.
3. Management Issues
Walk into the marker at Burger
Shot to start this mission. After the cutscene, get in a car and drive
to the Burger Shot in Temple. Steal the car with the marker over it and
meet Madd Dogg's motorcade security in Market. Stay in between the two
other cars as you drive to the awards ceremony. Quickly drive Madd
Dogg's manager to the docks and throw him into the ocean, but jump out
of the car before it reaches the end.
Reward: Respect +
*There should be a bike nearby for you to get back to the street quicker.
4. House Party
Loc's having his party to try
to kick off his rapping career, so get a haircut and some new clothes.
There's a barber shop right across the street from Burger Shot. You dont
really need to change your look at all to continue with the mission
though. Next time you get out of your car, Loc will call, so walk into
the marker at his house on Grove Street. You and Sweet go outside to
avoid Loc's rapping, and another Grove Street Families member shows up,
saying the Ballas are on their way to ambush your gang. There are
about 3 waves of them, and they'll appear on the bridge and come in
through the alley next to your house. Just keep yourself covered behind
cars, pick up all the ammo you can, and you should do fine.
Reward: Respect +
===========================================================
C.R.A.S.H.
1. Burning Desire
Go to the 'C' icon on the radar and walk
into the marker at the donut shop to start the mission. Head Downtown
and pick up the molotovs Tennpenny hid for you. Now go to the gang house
in East Los Santos and burn it down. When you get there, Vagos are
waiting outside, so kill them. Then throw the molotovs into the windows
with the markers over them. There are two windows on the front of the
house, and three on the back. Be careful and keep a safe distance from
the windows, or you'll catch fire and loose a lot of health.
It appears you've trapped a girl inside, so
go in and rescue her. When you get inside, crouch so you can see
better. The first thing you need is a fire extinguisher. Go straight
down the hallway and, just before you reach the room at the end, take a
right, go down the short hall, and go left into the kitchen. Grab the
extinguisher and go into the room on your left. On the right side is the
entrance to a stair case. Follow that up, and follow the hallway to the
end. The last door on the left is blocked by fire. Put it out to reach
the girl. The hallway you just came down has collapsed, so go into the
room across the hall, and put out the fire blocking the doorway on the
right. Go through the door on the right and head back downstairs, and
out the way you came, putting out any fires along the way, and going
around any parts of collapsed ceiling. Drive Denise back to her place
just outside of Grove Street to finish the mission.
Reward: Denise is now your girlfriend. Check out the 'Girlfriends' section for details.
*More of Sweet's mission strand is now available, marked by an 'S' on the radar. Check out 'Sweet (Finale)' for details.
2. Gray Imports
Walk into the marker at the donut shop to
start the mission. After the cutscene, drive down to Ocean Docks where
the Ballas and the Russians are making a deal and drive into the marker
across the street. Walk into the docking area and kill all of the
guards. Watch out for the forklift carrying the red barrels; it's
basically a bomb on wheels. There should only be one, but shoot the
barrels from a distance. When all the guards are dead, go forward and
you'll see a short yellow barrier with shipping crates behind and to the
right of it. On top of the left-most, green, crate is an armor vest.
Climb onto it and pick up the vest if you need it. Now go to the garage
you saw opened in the cutscene and shoot the red control box on the
left. You'll immediately see two guards inside, with a third close by.
Follow the path around, killing any guards. When you get to your first
left turn, you'll see two boxes that look like they have Saran wrap
wrapped around them, and small crates on top of them. There's a health
pickup behind there. Continue along the path to the fork. On the left is
two guards and on the right is an armor vest. Kill the guards and move
on.
Before the red barrel, go right and kill
the guards.There are four on your level, and one above. Collect any ammo
and money then go upstairs and kill the guard, but DO NOT ENTER THE
ROOM. There's a Russian arms dealer and another Balla in this room. If
you go inside, the Russian will make a run for it, get in a car, and
possibly escape. I found that if you go left when you get to the top of
the stairs and get the right distance from the door, you can auto-target
the Russian and kill him from there. There's a handrail blocking you
from falling to the floor below. When you're at the southern corner of
this rail, move CJ two vertical poles towards the door, and be in the
middle of the hallway. You should be able to use the auto-target now. If
not, keep moving around that area and trying the auto-target and kill
the guy. When he's dead, run inside and collect the money, and the armor
vest if you need it.
Reward: None
===========================================================
Sweet (Finale)
1. Doberman
Walk into the marker at the AmmuNation in
Market to begin the mission. The game will explain that you need to take
over Glen Park, which is Ballas turf. If you need a gun or ammo, go
into AmmuNation. Now go to Glen Park, which is marked on the radar by a
green body with a purple head, and kill some Ballas. Anywhere inside the
purple area on the map is Ballas territory. Kill 3 gangsters to start a
gang war. The radar will now blink red in your area, meaning there is a
war going on. Three more waves of opposing gangsters will come and try
to kill you. Survive them all and the Grove Street Families will own
that territory. After you've taken over the territory there's one more
Balla that you have to kill to finish the mission. He's marked on the
radar, incase you can't find him.
Reward: Respect +
*You can now take over gang
territories. Don't bother trying to take them over now, because the
Ballas will automatically gain back more territory after Sweet's last
mission, 'Green Sabre'.
*The AmmuNation shooting range odd job is now available. Check out 'AmmuNation' for details.
2. Los Sepulcros
Before you can start this mission, you need
your Respect stat filled to atleast 10%. If you walk into the marker
and it says you aren't there yet, you can raise the stat by killing
rival gang members, taking over territories, spraying tags, or
completing other mission strands. I also recommend making sure you have
full health and armor before starting. You can buy armor at AmmuNation
for $200.
Walk into the marker between 9:00 and 17:00
to start the mission. The Ballas are at a funeral, and the Grove is
going to attack them. Get some other gangsters to join you by targeting
them (R1) and pressing the 'Up' button on the d-pad. Hire two gangsters
and get in the car with Sweet. Drive the gang to the back of the
cemetary in Vinewood. Climb over the wall for instructions from Sweet,
then attack the Ballas. If Kane isn't killed by your gang before you get
to him, take him out. When all of the Ballas are dead, get into the car
with Sweet and the gang and head to the nearby Pay-N-Spray to disguise
your car. Now drive the gang back to Grove Street.
Reward: Respect +
*You can now hire fellow Grove
Streeet Families members into your personal gang. Target them and press
'Up' to hire them. Press 'Down' if you want them to stay where they are,
press 'Up' if you want them to follow you, or hold either one for a few
seconds to dispand the group (this happens automatically if you get too
far away from your group).
3. Reuniting the Families
Before starting this mission, you need to
finish the mission strands for Sweet, Ryder, Big Smoke, Cesar, and OG
Loc. And again, I recommend full health and armor, and plenty of
ammo before starting the mission.
Walk into the marker at Sweet's house to
begin the mission. Drive the gang down to the Jefferson Motel. After the
cutscene, quickly get into the motel to avoid getting shot. Take it
slow and keep yourself covered. There are a lot of cops you need to
kill. When you head up the stairs, a wounded Grove member tells you
Sweet's in the back of the hotel. Continue up the steps and before you
get to the doorway, a cop will jump out; kill him. Continue down the
hallway, killing every cop. If you have the urge to make out with a
hooker, go into the first room on the left and walk up to the girl.
Otherwise, keep following the hallway. When you get to the area with the
red carpet, kill the cops that swing down from the ceiling, then go up
the stairs to get armor. Go back down and continue to the next hallway.
There's another hooker in the far open room on the left (these really
aren't required, just a little funny).
At the next red-carpeted area, there's a
cop on the left, two up top, one on the right, so be careful when
approaching the area. There are a few cops in the next hall, including
one that comes down from the ceiling, but right when you enter the
hallway, a cop will roll out of the first room on the right. Go further
down and another cop will roll out of the open room on the left. In the
room across the hall from where the cop rolled out is where you'll find
Sweet. After the scene, you'll be on the roof with Sweet. Shoot the
helicoptor down, along with the guards on it. After you've destroyed it,
follow Sweet around to the end of the roof and go down the stairs.
Smoke and Ryder will show up. Prepare for another, longer and more
difficult, car chase.
For the chase, just follow the same
strategy you used last time. Shoot at the passengers with the guns and
motorcycle drivers first, then shoot at the cars' hoods to blow them up.
I think just shooting at the hoods is quicker and more effective. When
the cops jump on your hood, they'll punch at you and throw off your aim.
Shoot them off. When you get in the second alley (which is almost
immidiately after the first), you're at the end. Just sit back and watch
the most gruesome scene in the game.
Reward: Respect +
4. Green Sabre
Again, I recommend making sure you have
full health and armor, and plenty of ammo. Walk into the marker at
Sweet's house to start the mission. After the scene, Cesar calls you
about something important. Meet him under the freeway in Verdant Bluffs.
Park in the marker, then get out and get in the car in the alley. After
the scene, get in a car and get under the Mulholland Intersection asap.
Drive into the marker and after the scene, kill all the Ballas. After
another scene, Tenpenny leaves you in Angel Pine.
Reward: Respect +
===========================================================
===========================================================
Badlands
1. Badlands - C.R.A.S.H.
You're going to need a machine gun you can
shoot while driving (SMG is the best), so get one first thing at the
AmmuNation across the street. You might want to get a silenced 9mm while
you're at it. Walk into the marker by your trailer to start the
mission. You need to kill a witness, and prove that you did, so get in a
car (there's usually a dirt bike parked on the other side of the
trailer, and this is the best vehicle you could use) and head to Mt
Chiliad. When you get close to the house, a cutscene will play. Get off
your bike and sneak around between the trees in a crouched position with
your silenced 9mm equipped. Take out the guards that get close.
Hopefully this wont raise any alerts. If you didn't buy the 9mm, kill
the guards anyway. The snitch will escape in a car. There's a dirtbike
in front of his house, so use that to chase after him. Follow him down
the mountain, shooting him with your SMG along the way. When his car
gets damaged enough, he'll get out and walk away. Kill him, take a
picture of the body, then take the camera to the drop to finish the
mission.
Photo Op: Notice the snitch's license plate says 'ASSMAN'.
Reward: Respect +
*After the mission, Cesar will call
asking you to meet his cousin in Dillimore, marked by a '?' on the
radar. Sweet will call after this to check up on you.
2. First Date - Catalina
Walk into the marker at The Welcome Pump in
Dillimore to meet Cesar's cousin, Catalina. She wants to rip off a
few places, so choose which one you want to go with first. Since the gas
station in Dillimore is closest, I'll start there.
3. Tanker Commander - Catalina
Before starting, read 'Things to try' to learn how to get a damage-proof Sabre. Drive
into the marker at the gas station in Dillimore to start the mission.
After the scene, get in the truck and attach the trailer. Another scene
will play, and the station clerks will chase after you. You need to
get the truck to Catalina's buyer in Flint County. Leave the town via
the south-bound street in front of you and take the first right. The
guys in the car will shoot at you during the drive, so watch your
health. Follow that road past the first intersection, then around an
s-curve. When you get to the 'T' intersection, go left. Follow that down
to the next 'T' intersection and go left again. Go down the hill and
into the RS Haul lot and park in the marker. Finally, a decent reward!
Things to try: If you have
$40,000, buy the safehouse in this town before starting the mission.
After you drive into the marker at the gas station, a damage- and
bullet-proof Sabre will be parked on the north side of the building. It
will be locked, so push it down the street to your safe house (with the
truck Catalina's in) and into your garage. When the car is in the
garage, kill Catalina to end the mission. If you don't kill her, the car
will disappear, because that's what the clerks use to chase after
you. Now just restart the mission and beat it.
Reward: $5000
*The trucking odd job is now available. Check out the 'Odd Jobs' section for details.
*After the mission, The Truth will call. Get to him by following the 'TT' on the radar.
4. Body Harvest - The Truth
Walk into the marker at the Budget Inn
Hotel in Angel Pine to start the mission. I saved my game when I got
into town in case something happened. After the scene, get in a car and
drive to the Cult farm to steal a combine harvester. Follow the yellow
blip on the radar. The marker is at the entrance to the farm. Do not
drive up the dirt road unless you want to get shot. When you get to the
marker, get out of your car and stealth-walk (L3) around the east side
of the farm, in between the trees. The combine is in the field,
represented by a brown square on the radar. Sneak behind the wall of the
east side of the field and wait until it comes close to you. Then jump
over the wall, and sprint to the combine. Pull out the driver and take
off. Once the guy's out, he'll shoot at you. Once you're leaving the
farm, the other survivalists will chase after in pickups, with guys in
the back with guns. Run over any on-foot farmers that get in your way
(they spray out the chute!). Take the combine to The Truth's farm in
Leafy Hollow marked by a yellow blip on the radar. You should lose the
cultists pretty fast. Park in the red marker in the barn.
After the cutscene, Cesar will call. His
gang, the Aztecas, have split up, and there's a price on his head, maybe
Kendl's too. They're going to stay at your trailer in Angel Pine, so
meet them there. There's a BF Injection at Truth's farm.
Reward: Respect +
5. King in Exile - Cesar & Kendl
Get to the marker at your
trailer in Angel Pine to meet up with Cesar and Kenl. When you get
outside, Catalina calls you for your next mission. Follow the 'C' on the
radar.
6. First Base - Catalina
Get to the 'C' on the radar to
meet up with Catalina. Did you notice the three graves next to her
house? Former boyfriends, probably. She's one screwed up lady. I'll do
the mission in Montgomery next, so head there.
7. Against All Odds - Catalina
Get to the marker at the Off
Track Betting building in Montgomery to start the mission. She'll give
you some satchel charges, so go inside. Put a satchel on the red door.
Now get to the opposite corner of the building and equip the detonator.
Press Circle to blow the door open. Now go inside and do the same thing
to the safe. After the scene, you get a three-star wanted level, so get
to the Pay-N-Spray marked on the radar. Be careful not to drive off one
of the many cliffs in this area and into water. Once your wanted level
is gone, get back to Catalina's shack in the hills.
Reward: $2000
*After you complete two
of Catalina's missions, Cesar will call you about a race around the
countryside. He's marked on the radar by 'CV'. I won't be covering that
until Catalina's missions are completed.
8. Gone Courting - Catalina
Get to the marker at
Catalina's house to meet up with her. After she's done being the man,
pick another one of her missions. I'll go with the one in Blueberry
next.
9. Local Liquor Store - Catalina
Before starting the mission,
get an uzi you can shoot while driving. It will make completing this
mission a lot quicker. Get to the marker in front of the liquor store in
Blueberry to start the mission. Four other guys on ATVs show up and rob
it first. Katalina kills one of them so you can take his quad. Chase
after the other guys and pick up the money they drop, you don't need to
get off the quad for this. Just run over the briefcase. You don't even
need to collect them right away. Just keep chasing after the bikers
until they're all dead, then go back and pick up the cases; they're all
marked by green blips on the radar. The bikers will split up before
Montgomery, but they'll group back together on the other side of town.
After you've collected all three briefcases, head back to Catalina's
hideout to finish the mission.
Reward: $1000
*During this mission, you will complete one of San Andreas' 70 Unique Stunt Jumps, across the broken bridge.
10. Made in Heaven - Catalina
Walk into the marker at Catalina's hideout to meet up with her. There's only one more mission of hers to do.
11. Small Town Bank - Catalina
Get to the marker in Palomino
Creek, marked by a '$' on the radar. After the scene, you're supposed to
keep targeting the employees/customers in turn, but now matter what you
do, the panic alarm will go off and you'll get a two-star wanted level
after the next scene. Shoot the ATM's to get the money and follow
Catalina out the back door. There are cops all over this alley, high and
low, so be careful and kill them all. You'll raise your wanted level up
to three stars. When you get to the end of the alley, a short scene
will play, you'll have to kill another couple of cops, then another
short scene will play. Follow Catalina on the bike. There will be a gold
star along the dirt path. Collect it to lower your wanted level by one
star. When you reach the next town, let Catalina get on your bike and
head back to her hideout.
Reward: $10,000
*During this mission, you will complete another one of San Andreas' 70 Unique Stunt Jumps, across the broken bridge.
12. Wu Zi Mu - Cesar
Before starting this mission,
make sure you have a fast car. If you beat 8-Track in Los Santos, go to
the forum and get the Hotring Racer. The Buffalo parked at Catalina's
house is a good choice too. Either way, make sure it isn't damaged when
you start the mission. Also, it might be smart to save your game at
Catalina's beforehand.
Head to the marker in Red
County, marked by a 'CV' on the radar, to meet up with Cesar. For the
race, just follow the markers. Be very careful not to fall off a ledge
and into the water. Speed is not the important factor in this race. Just
take it easy and watch out for sharp turns. It's easy to lose the other
guys in straight-aways, or if you're good with turns. You can spin the
other cars out by ramming the side-rear corner of their car. This race
may take a few tries. The race ends in The Panopticon, west of where it
started. It took me 2:56. There will be another scene shortly after you
finish.
Reward: $5000
*During this mission, you might complete one of San Andreas' 70 Unique Stunt Jumps, over the barn.
13. Farewell, My Love... - Cesar
You might want to save your
progress. Don't bother looking for a fast car, you get a different one
for the race. This race starts where you finishe the last one, and it
finishes where you started the last one. It's the same race, just
backwards. Follow the same strategy as last time. After the eighth
checkpoint is a dirt road you need to turn on to. It's very easy to miss
that turn, so look out. I finished in 3:10, and it was dark and foggy.
Reward: The deed to a garage in San Fierro
*Get out of your car to get a call from The Truth. Head to the 'TT' on the radar.
14. Are You Going To San Fierro? - The Truth
Before starting the mission,
read 'Things to try' to learn how to steal Truth's Mothership (make sure
you have a gun though)! Meet The Truth in Leafy Hollow, marked by a
'TT' on the radar, to start the mission. After the scene, help Truth
torch his marijuana plants with the flamethrower. The plants are marked
by red blips on the radar. It doesn't require too much fire to burn down
the plants, because the flames will spread a little. Be careful not to
walk into the fire. After you burn a few rows, you'll get high and the
screen will sway a little. When you're done, meet Truth at the
Mothership, then take down the chopper with the rocket launcher Truth
gives you. Then get in the Mothership and drive to the garage in San
Fierro.
Things to try:
Steal the Mothership! After you destroy the chopper, get to the
Mothership and shoot Truth through the windshield. He'll fall out and
die, causing you to fail the mission. Now just take the van to a garage
and save your game. There are two versions of this car, one with the
roof compartment raised, and one with it down. Repeat this if you want
both.
Reward: Respect +
===========================================================
===========================================================
San Fierro
Big Smoke's Courier
Note: These missions are
completely optional, in no way required to reach 100% game completion.
They'll stop occuring once you complete "The End of the Line".
1. Big Smoke's Cash
Every Monday and Friday, Cesar will call
you, reminding you that Big Smoke's courier is leaving Los Santos with
six packages of money. He's marked by a red blip on the radar, and will
end up around Pier 69 in San Fierro. If you accept the mission by
pressing 'right' on the d-pad, then you have to intercept the courier
before he reaches his destination. Ram the back of the car to make it
drop the money packages a total of six times. Every time you rob the
car, the next mission will have one more of Smoke's dealers in the car,
shooting at you when you try to ram it. A maximum of three people will
hang out of the car and shoot at you while a fourth drives.
Photo Op: Once you've finished
the mission, shoot at the Patriot to get the driver to stop and come
out. His license plate says 'ASSMAN'.
Things to try: Try this mission
with a tow truck the very first time you get the call. Track down the
Patriot and shoot at it to get the driver to stop and get out. Or if you
didn't start with the tow truck, finish the mission while you're still
in the countryside, wait for a tow truck or tractor (it has a hitch too)
to drive by and steal it. Tow the hummvee to a garage to unlock it;
it's bulletproof, explosion-proof, and fireproof. The Patriot might only
appear for the first courier.
Reward: You get money for every package you pick up; max $1800 per job.
2. Yay Courier
Every Wednesday and Saturday, Cesar will
call you to remind you that a motorcycle courier is leaving Back O'
Beyond, south of San Fierro, and heading to Los Santos. This biker is
carrying a backpack full of yay (drugs), and is marked by a red blip on
the radar. Accept the mission by pressing 'right' on the d-pad when
Cesar calls you and head off the dealer, just as you would for the
previous mission. Except this time, you need to be careful of the
backpack. If you shoot it, the drugs will leak out. You need to kill the
biker with the backpack damaged as little as possible. The more drugs
that leak out, the less money you get when you finally kill the courier.
The best vehicle for this job is a Sanchez (dirtbike), or another
offroad vehicle, as the courier tends to take shortcuts through the
countryside.
Reward: The less drugs that leak out of the backpack, the more money you get.
===========================================================
Garage
Just a heads up: make sure you save atleast $160,000
of your earnings (you'll easily get more than this while in San Fierro)
to purchase important properties. You will need $30,000 to purchase
Zero's RC shop to be able to do his mission strand. You will need
$50,000 to purchase Wang Cars to do the 'Driving/Racing' mission strand
(which unlocks the 'Import/Export' odd job, as well as the street racer
customization shop). And finally, you will need $80,000 to purchase the
Verdant Meadows airstrip in the desert before you're ever able to do
missions in Las Venturas. If you use your money only to get food and
weapons/ammo, you should be fine.
1. Wear Flowers in Your Hair
Walk into the marker at your garage to
start the mission. You need some mechanics to help out with your garage.
Drive Truth to meet up with Jethro in Easter Basin. You might
recongnize this guy from GTA Vice City. He was one of the guys getting
high in the boat when you bought the boating company. Drive into the
marker and honk your horn to get his attention. Next, drive to the
hospital in Queens. After the scene, get to the hotdog van in King's to
talk to Dwaine. He's the other guy that was high in the boat in Vice
City. Park in the marker and honk the horn. After the scene, go
Downtown to the cop shop. After this scene, head to Garcia to visit
Zero. After he gets in the car, drive back to the garage in Doherty.
Reward: None
*You can now buy Zero's shop to open up his mission strand. See the 'Zero' mission strand for details.
2. 555 WE TIP
Walk into the marker at your garage to
start the mission. After the scene, drive to the Vank Hoff Hotel in
Financial. After the scene, follow the valet down to the underground
parking lot. Make sure you aren't wanted by the cops, because you fail
if they see you enter the car park. Kill him before he leaves the lot
and take his uniform. Now go to the front of the building and wait with
the other valets. The wait for the DA's blue Merit may take a while.
When the DA shows up, you'll know, because one of the Valets will say
so, mentioning that he's a good tipper. If the other valets aren't there
to say anything, just look for a blue car with the driver wearing a
white shirt and black vest and pants. Get in the car before the other
valets do and drive it to your garage. After the drugs are planted, be
careful not to damage the car; if you do, you can only take it to your
garage to get it fixed again, and it's slower than a Pay-N-Spray. Also,
if the car gets a wanted star, you fail the mission. Get it back to the
hotel and park it in the underground lot. Now get outside to the marker
and call the cops.
Reward: None
*The Valet odd job mission is now
available. Check out the 'Valet Parking' section for details. This is
not marked on the radar, but is required to reach 100% game completion.
3. Deconstruction
Walk into the marker at your garage to
start the mission. Go to the construction site behind your garage
and find a bulldozer. Before you get in, you might want to kill all the
construction workers. Otherwise, they'll try to pull you out of the
tractor. Ram all six of the portable buildings, marked by green blips on
the radar. Once that's done, a scene will play. Knock the portable
toilet into the hole with a bulldozer. Then get in the cement truck and
back it up to the hole, but be careful not to fall it.
Reward: None
*After the mission, Jethro will
call, opening up the Driving/Racing mission strand, marked by a red 'S'
on the radar (the one in San Fierro).
===========================================================
Syndicate
1. Photo Opportunity
Walk into the marker at your garage to
begin. After the phone call, get in a car and drive to Red County to
pick up Cesar. Get in his car and drive out to Angel Pine. Park in the
marker and get up on the roof, into the next marker. This next part can
be hard, so be ready. Every time one of the crooks shows up (they'll
have a marker over their head), take a picture of their face, and zoom
in as much as possible with square (zoom out with X). It doesn't need to
be an exact front-face picture. The first guy, Ryder, will arrive from
the alley behind Cluckin' Bell. The second guy, T-Bone Mendez, will
arrive the same way. After you've gotten his picture, zoom out and look
to your right. An official-looking guy will get out of the car. Next,
another car will pull up right in front of the last one, driven by a
pimp.
Photo Op: Cesar's license plate says 'LVA4L' (Los Varios Aztecas For Life). Odd, since the gang's put a bounty on his head.
Reward: Respect +
*The camera you get in this mission has infinite 'ammo', so don't lose it if you like taking pictures.
2. Jizzy
Walk into the marker at the garage to
start. The pimp you saw earlier is Jizzy B. Get to his club at Battery
Point. After the scene, get in the pimpmobile and drive his girl
Downtown and park in the marker. After the scene, get to Hashbury to
kill the pimp. After yet another scene, get under the freeway in Foster
Valley to kill two more guys beating up on one of Jizzy's girls. Jizzy
will call again, saying that the girl you dropped off Downtown is being
taken out of the game. Get back to the hotel and into the marker. A guy
in a limo picks up the girl. Chase after them and destroy his car and
his security in the black SUV. After they're all dead, you'll have a
two-star wanted level, so get rid of it.
Photo Op: The license plate on Jizzy's car says 'HO 2 HO'.
Reward: $3000, Respect +
*After the mission, Woozie will call, opening up his mission strand. He's marked by a 'W' on the radar.
3. T-Bone Mendez
Walk into the marker at the Pleasure Domes
Club (Jizzy's club) to start the mission. After the scene, get to the
van Downtown, then chase after the other bikers. Get up close to each of
them and press L1 to take their packages. After all four are collected,
take them to Pleasure Domes.
Reward: $5000, Respect +
4. Mike Toreno
Now it's time to get introduced to the
official-looking guy you took a picture of earlier. Walk into the marker
at Pleasure Domes. Mike's in trouble, so after the scene, get in the
car and head to the construction area behind your garage. When you get
there, you've missed him, so head to the docks in Easter Basin. He's not
there either. Head to the airport. The van is never in the same place
every time you play this mission, so drive around while looking at the
signal guage. The higher it gets, the closer you are to the van. When
you get to it, they'll speed off. Chase after them, but do not blow up
the van, or you kill Mike and fail the mission. Ramming it a few times,
along with T-Bone's shooting should be enough to call the guards out.
Kill them all, then a scene will play. After the scene, help the other
guys blow up the van. You'll have a two-star wanted level now, so get
back into your car and get to the airport's entrance gate, then drive
through the marker - do not park. Your wanted level will raise to three,
so get to the Pay-N-Spray across the street from your garage. Now get
back to Pleasure Domes.
Reward: $7000, Respect +
5. Outrider
Walk into the marker at your garage to
start this mission. After the call, meet T-Bone at the gas station in
Easter Basin. After the scene, drive to the van, marked by a yellow blip
on the radar. After this next scene, grab the nearby weapons and get on
the bike. The van next to you will immediately pull out, so get to the
red blip on the radar and take out the road block before he gets there.
Then head to the next road block, and the next, etc, until all of the
people are dead. When that's taken care of, follow the van to it's
destination in Doherty. You'll now have a three-star wanted level, so
head to Pay-N-Spray to get rid of it.
Photo Op: The license plate on Mike's car says 'OMEGA'.
Reward: $9000, Respect +
6. Snail Trail
Walk into the marker at the garage to start
the mission. After the scene, get to the construction site behind your
garage and find the sniper rifle in one of the cement pipes. Now cross
the street to the train station. You're going to have to follow the
train to Los Santos; there should be a dirtbike outside of the station,
leaning against the north wall. There isn't much time until the reporter
leaves, so hurry up and chase after the train. In the first tunnel,
there might be a train coming towards you on the right track. The second
tunnel was pitch-black dark inside, and there was another train coming
my way when I reached the other end. When you get in the train station
in Los Santos, get on the platform and stay on the side you entered
from. You can't let the reporter see you. Do not follow him up the
stairs. Wait at the bottom of the stairs until he is in the cab, then
follow him to the pier (you might remember it from the 'High Stakes, Low
Rider' mission), keeping your distance the whole trip. When you get to
the pier, keep your distance as the reporter gets out of the taxi. Take
out your sniper rifle and shoot him and the guy he's talking too. If one
runs away, chase after him and shoot him with another gun; if you dont
have another one, get closer and shoot him with the rifle.
Reward: None
7. Ice Cold Killa
Before starting this mission, make sure you
have a machine gun you can fire from a car and tons of ammo. Walk into
the marker at your garage to start the mission. After the scene, drive
to Pleasure Domes and walk into the marker. The security isn't going to
let you in the front door. Walk south a little and look to your right.
There's a scaffolding with wooden ramps going up the side of the bridge.
Get to the top. Keep following the wooden path until you're above the
glass window on top of Pleasure Domes (if you were to drop to a lower
part of the roof, you can die). Make sure your silenced 9mm is equiped,
then walk into the yellow marker to get inside. Crouch-walk down the
catwalk and go right. There's a staircase leading downstairs; go down
it. From the bottom of the stairs, go straight, to the end of the hall
and down another staircase. Now just sneak around the center bar to the
yellow blip on the radar, to activate another cutscene.
Jizzy makes a run for it, so sprint to the
door to avoid as much gunfire as possible. Jizzy escapes in a car, and
the only vehicle you can drive is a limo, so get in and chase after him.
This is the part you'll need the machine gun and ammo. While you're
driving, shoot him from your car. When his car gets damaged enough,
he'll get out. Kill him and he'll drop a briefcase with a phone inside.
Pick it up to finish the mission.
Reward: $12,000, Respect +
8. Pier 69
Make sure you have full health and armor,
and a gun you can shoot from a car, with tons of ammo, before starting
this mission. Walk into the marker near Pier 69 to begin. Get on the
roof with Cesar, and after the scene, shoot T-Bone's men on the roof
across the street. After another scene, run across the street and kill
T-Bone and all of his men. After you kill T-Bone, Ryder will jump off
the pier. Go after him and get into a boat. Perform a basic drive-by on
his boat to kill him.
Reward: $15,000, Respect +
9. Toreno's Last Flight
Walk into the marker at your garage to
start. Get to the helipad Downtown and kill everyone there. Climb the
staircase to get up to the helipad and grab the rocket launcher. Now get
on the motorcycle on the sidewalk, onto the freeway, and chase after
the chopper. Get a decent distance ahead of him, get off the bike, and
wait for him to come and shoot him with the RPG. If you dont get him,
follow the freeway more, and do the same thing. Eventually, Toreno will
hover around the end of the freeway, so you'll be able to shoot him
there. Just make sure you're not to close; he could fall right on you,
or explode near enough to you that you die too.
Reward: $18,000, Respect +
*The last mission in the Syndicate
strand, 'Yay Ka-Boom-Boom, isn't available until you have completed
Woozie's mission strand, marked by a 'W' on the radar. When you have
finished those, check out the 'Syndicate (Finale)' mission strand.
===========================================================
Zero
*To start Zero's mission strand, you
must buy his store in Garcia for $30,000. You'll have to wait for him
to call before starting the missions. This is probably the hardest set
of missions in the entire game.
1. Air Raid
Walk into the marker in front of Zero's to
start the mission. Once on the roof, you'll need to shoot the airplanes
down, and keep enough transmitters undamaged until the timer runs out.
It might take a few tries until you get used to the minigun.
Reward: $3000
2. Supply Lines
This is the hardest of Zero's missions.
Walk into the marker at Zero's to start. There are five RC couriers you
need to destroy (use L1 to fire your machine gun), and you're only
limited by your fuel guage. Don't worry about getting an exact aim on
your targets, as the bullets will go straight at your targets as long as
you're pointing in the general area. The couriers have guns, so if you
get shot down, you fail the mission.
I went after the one closest to me first,
then I headed east for the next one, then back around for the courier
that was second-closest to the starting point. Now head northeast for
the other two. The guy on the dirtbike, the more southwestern of the
two, has a guy on the back that will shoot at you a lot, but you need to
kill him first, because fuel is extremely important; when they're both
dead, you have to get back to Zero's before the fuel runs out. After
about six tries, I was able to kill all of them with little over half a
tank of fuel left (the game lowers the difficulty if you keep failing).
If you have the first edition of the game (aka, the "Hot Coffee"
version), then you'll lose fuel whether or not you hold the X button. If
you have the second edition or later, you don't use up any fuel if you
hold X to get up to speed then let go and just glide the rest of the
way.
Reward: $5000
3. New Model Army
This is a fun mission, but there is a time
limit, so be quick. The first thing you need to do is move the barrel
blocking Zero's path; pick it up using Circle. As Zero moves along,
Berkley's helicoptor will put another barrel in his way. Move it, then
head back to your base to get a plank and put it over the first gap in
Zero's path. Then get back to your base, pick up the bomb, then drop it
on the first tank in Zero's path. Clear the way so Zero can get to the
second gap. Before you put a plank there, bomb the other two tanks. Keep
clearing the path until Zero reaches the end.
Reward: $7000
*You have completed this Asset. Zero's shop will now earn up to $5000 a day. Pick it up regularly.
===========================================================
Woozie
1. Mountain Cloud Boys
Make sure you have full health and armor
before starting. Walk into the marker at Woozie's (marked by a 'W' on
the radar) to start the mission. After the scene, get in a car and drive
Woozie to the marker around the block. If he doesn't get into the car,
drive away until you get a message that says you left him behind, then
go back for him. Follow Woozie into the alley. Walk to the open gate to
start another scene. Kill the guys that get out of the car. Another
group will pull up on dirtbikes; kill them. Walk out into the alley and
kill everyone else. You fail if Woozie dies. Then get to the car to
trigger another scene. Sometimes, Woozie gets in and out of the car in
the scene. Just do drive-bys on the other two cars out on the street,
then pick up Woozie and take him back to his place.
Reward: $5000, Respect +
2. Ran Fa Li
Make sure you have a gun you can fire from a
car before starting. Walk into the marker at Woozie's to start the
mission. After the scene, get to the airport to pick up the car. When
you get in the car, the Da Nang Boys will cover the exit to your left.
There's another exit in front and to the left of you. Take that, then go
straight. Another van will block the way in front of you. Go left, then
take the first right. Go straight outside, then go right. A guy will be
on the street, shooting at you, so run him over and continue around the
curve. There will be another van, with a Nang Boy on either side. Run
one them over and continue out of the airport. Soon two motorcycles with
gunman will chase after you. Keep going to the garage in Espalande
North, marked with a yellow blip on the radar, and do drive-bys to get
rid of the bikers.
Reward: $6000, Respect +
3. Lure
Walk into the marker at Woozie's to start
the mission. After the scene, get into the decoy car parked outside, and
drive it out towards Whetstone. If you get out of the car you will fail
the mission. When you get to the marker, two bikers will begin to chase
after you. Even if you kill them both, two more will get on your
tail; but it does lessen your chance of them seeing you. Do not let them
damage the car enough to where they can see you; otherwise you'll fail
the mission. Keep following the markers, and taking out the bikers. The
chase ends at the eighth checkpoint, at a gas station in Whetstone. This
is the second time you're left way the hell out in the country. Have
fun driving back into town.
Reward: $8000, Respect +
4. Amphibious Assault
Max out your health and armor, and buy a
silenced 9mm, before starting. If your Lung Capacity stat is low, you'll
trigger a scene where CJ confesses he can't swim when you walk into the
marker. Go north, to the water, and practice swimming underwater to
raise your lung capacity. When you get in the water, press Circle to go
under. Swim around for a while and your lung capacity guage will rise.
Just watch your breath meter so you don't drown. After you get your
second message saying your Lung Capacity has been upgraded (not a guage
upgrade), head over to Woozie's to start the mission. However, it would
be smarter to keep upgrading your lung capacity.
After the scene, get to the yellow marker
at the docks. When you're in the water, follow the markers until you get
to an underwater tunnel. Get underwater and swim, as fast as you can,
to the other side of the tunnel. When you get to the next tunnel, wait
until your breath meter fills before going under again, and again for
the third tunnel. When you resurface, the game will explain your
situation with the patrolling boat guards. You can stick your head up
for breath, and as long as you stay still they won't see you. Swim
underwater for as long as your breath will alow, but do not risk any
health. Follow the yellow marker to the boat.
When you get aboard, pick up the knife, and
crouch down (L3). If you bought the silenced 9mm earlier, you can use
it now. Head left to approach the first guard. Either shoot him or
stealth-kill him. There are two more guards up ahead, one of them moving
back and forth between two points. Let him see you, then crouch-walk
back to near where you killed the last guard and hide behind the yellow
container. The guard that saw you should give up before he gets to your
side of the yellow container, so when he turns around, stealth-kill him.
Now the other guard is facing away from you, so sneak up on him and
perform another stealth kill. The last guy on this deck is further up,
and up a small staircase on the right. He is far enough to the side that
you can sneak behind him and perform a stealth kill (don't go up the
left stair case, because there is a guard facing your direction).
After you kill him, continue up the stairs to meet a second guard. He's
facing the other way, so stealth-kill him too. Now walk inside the door
and go downstairs.
Go left and down another set of stairs. Go
left again, but be careful before going into the marker. A guard is
around the corner. If he sees you, kill him with your knife, then get to
the marker.Press Triangle and your job is done! Get back to the deck of
the ship, and to the end where you got on. From the deck, you can kill
the guards on the boats with a gun, then swim to shore.
Reward: $11000, Respect +
5. The Da Nang Thang
Walk into the marker at Woozie's to start
the mission. After the scene, you'll be in control of a mini gun on a
helicoptor (if you've played GTA: Vice City, you'll know how this plays
out). When you get to the second side of the ship, you'll get shot down
by an RPG (rocket-propelled grenade) and lose all your weapons except
for a knife. Swim into the marker. When you're onboard, grouch down and
sneak up to the nearest guard to perform a stealth-kill. He'll drop a
shotgun, but I recommend you don't use it unless you want to attract
every guard on the ship; pick it up though.
There are three more guards on the top
containers, and they're all facing away from you. First, climb up the
shortest, yellow, container and get to the top, staying as close to the
south side of the ship as possible. Sneak up on the closest guard and
perform a stealth kill. He'll drop a machine gun, so pick it up. Do the
same to the other two guards, killing the southern-most guard first.
There are guards between the containers on the other side of the gap, so
kill them from where you're at with the machine gun you picked up, and
climb down the containers (do not take a big jump, or you'll lose a lot
of health, if not die). Climb up the other side.
When you get up top, sneak around between
the containers, but after the left turn between the red and yellow
containers, look out for guards coming up. There is one right after the
turn, facing towards you and two more up top, further your left. Kill
the nearby guard with a gun. Now another guard will run towards you;
kill him. Get around the corner and kill the guard above. In the space
behind the first guy you killed is a health pick-up. Get it, then
continue on, and around the corner. Shoot the guard at the end. Pick up
the gun he drops, then go into the space just around the corner to
collect more ammo. When you get out of the space, more guards will have
shown up, and will immediately shoot at you. Kill them all, and collect
anything they drop. Continue on and climb down the containers.
You will now be on the deck again, and
there is a big hole nearby. Jump down and walk into the marker. After
the scene, the guards notice you. Shoot them from where you are, then
get down and look to your right. There are two red containers met at the
corners. Climb on top to see there's a space below, with armor and
ammo. Get back out and follow the path between the containers. When you
get around the blue container, shoot the two guards, along with the
other two that show up because of the noise. When you get around the red
containers, a guard will throw a grenade at you. Run forward. If you
don't make it, it will destroy the armor you just picked up (if you
didn't get the armor, you probably die here). Get to the green blip on
the radar and shoot the lock on the refugees' container to free them.
You now need to get to the Snakehead on the
bridge. Head back to the hole you dropped in through a few minutes ago
and climb back up through it. Climb up the containers on the west side
of the hole. When you get on top of the high red container in the
center, shoot the guy at the door and enter it. There are two guards at
the top of the stair case to your left. Shoot them, then climb up, onto
the bridge. You can fight the Snakehead with a sword, or end it quick
with a gun; your choice. Now leave the bridge, and get back to the deck
where the hole was. Meet the refugees near there.
Reward: $15000, Respect +
===========================================================
Syndicate (Finale)
*Before you can start this mission, you need to finish both the 'Syndicate' and 'Woozie' mission strands.
1. Yay Ka-Boom-Boom
Make sure you have full health and armor,
along with a decent gun with ammo before starting. Walk into the marker
at your garage in Doherty to start the mission. After the scene and the
call, drive down to the bomb shop Downtown to pick up the wired car.
Drive the car to the drug lab in Doherty and kill the guards at the
gate. There are thugs with guns all over the place once you get in the
gates, so immediately go left and follow the path up, running over any
guards along the way. Take a right, then a left, then another right
after the crates to find the entrance to the lab. Drive up the ramp
(you're going to need a little bit of speed to get up it) and into the
building. Follow the lab around and park in the marker. Press Circle to
activate the bomb, then get out of the car and run out of the lab as
fast as you can. Just ignore the gunmen and run. Once you're out, shoot
the gunmen and head towards the gate you came in through (notice the
ramp inside the building on your way).
The gate closes when you get there, so kill
the gunmen and take their car back towards the drug lab. Take the car
around to the ramp you saw a minute ago and jump it, as fast as you can,
over the containers. If you miss and/or your car blows up, there's
another one somewhere in the grounds. Kill the gunmen and jump it onto
the streets. Drive back to your garage to finish the mission.
Photo Op: The license plate on the wired car says 'TIMEBOMB'.
Reward: $25000, Respect +
*After the mission, a mystery man will call, opening up a new mission strand in the desert.
===========================================================
Wang Cars
1. Back to School
Follow the red 'S' on the radar and go
inside the Driving School. Walk in the red marker to begin. You must get
atleast bronze (70%) in all 12 tests to continue with this mission
strand. After the guy explains everything, walk up to the TV to begin
the tests. Watch the videos to see exactly what you need to do.
The 360: Just
hold Square and X, along with either left or right on the left analog
stick to turn. Make a full circle to complete the test; it's very easy
to get 100% on your first try.
The 180: This is
not simply turning on the spot. You'll need to speed to the cones ahead,
flip around using your handbrake (R1), and go back between the cones
you started in to finish. You can do the 180 in whatever direction is
more comfortable for you.
Whip and Terminate: All you have to do is make a 90-degree handbrake turn, get to the end, and park.
Pop and Control:
In this test, you'll run over a spike strip to pop your tire, go around a
turn, and park at the end. Speed towards the spike strip, and let off
the gas when you get to the turn. Stay off the gas as you finish the
path to keep better control of the car.
Burn and Lap:
This test was the hardest for me to get 100%. You might find it easier
if you do it in the first-person view (press Select until you're seeing
from the bumber's view). To get a gold medal, you'll have to win in
under 36 seconds, so shoot for 7 seconds per lap. Hug the outer cones in
the center line, but be careful not to break them. It's possible to
push them in a tiny bit to shorten your overall track length, but it
takes a a bit of skill to do this on purpose. If the cones are moved in
too far, making your lap too small, the game will never count it as a
full lap and the timer will just keep going, so you may as well just
restart then. If you knock out an end cone and hug around the one before
it, you'll never progress to the next lap, just like if you had pushed
the outside cone in too far.
Cone Coil: Weave
between the rows of cones, pull a 180 at the end, weave between the
cones again, and park where you started. Sharp turns
are more controllable if you let your foot off the gas; don't risk
spinning out by thinking a heavy foot means a quicker time. Crossing
over the yellow line around the outside of the course will disqualify
you.
The '90': Speed
towards the two cars, and pull a 90-degree turn and park inbetween them.
When you're speeding down towards the two cars, go straight at the
front end of the car behind the parking spot; the car will go forward a
little while sliding.
Wheelie Weave:
Drive one side of your car up the ramp and drive on two wheels. You'll
have to turn left right when you start out, otherwise you'll miss the
ramp. This one will take a lot of practice. Turn left and the left side
of your car will go up; turn right and it will go down. In order to keep
the car up, you're generally going to be turning left the whole time,
so once I leave the ramp, I immediately turn right to give myself enough
room for that, then straighten up by tapping left before the car falls.
Keeping the car up from there is easy enough; just don't turn left too
hard or you'll move too far over. Now you just have to worry about
finding a good braking point to get the best landing position.
Spin and Go: When
you start out, hold L2 and R2 to look behind you while you drive in
reverse. When you get to the turn, let off reverse and spin your car
around (turn left if you're trying to spin clockwise; right if you're
spinning counter-clockwise). You shouldn't need any brakes if you time
it right. When you're just about 180 degrees around, turn your 'steering
wheel' into the turn (right for a clockwise spin; left for
counter-clockwise) and step on the gas to help swing the car around that
little bit more and head for the finish.
P.I.T. Maneuver:
This maneuver is actually used by cops in real life. You'll need to get
alongside the other car, and spin it around by pushing the rear-side of
the car. You'll need to stop with your car parallel to the other, but
he'll be facing the opposite direction. This is another that takes
practice, mainly with where you nudge the other car and your steering
input once you've got him spinning.
Alley Oop: This
is like the Wheelie Weave, only the ramp is bigger to get your car up in
the air to perform a spiral. Ride the left or right side of your car up
the ramp and use the left analog stick to spin your car while in the
air. The less of your car that is on the ramp, the easier you will spin.
Tilting the stick left will help spin the car counterclockwise, while
tilting it right will help spin the car clockwise. You'll need to land
with your car facing straight ahead, which is probably the most
difficult part of this test.
City Slicking:
For this test, you will need to race your car across town, into the
marker, and back to the driving school as quick as possible with as
little damage as possible. The car used has horrible handling and
will want to spin out a lot. Stopping the car, even if you're doing a
180, will fail the test. When you start, get on the road to your right
and follow the trolley track. Before the track turns right, cut across
the corner of the parking lot and get into the next north-south road to
reach the marker at the end of a winding road. After you drive through
the marker, make a 180-degree turn (remember not to stop; handbrake
spins are risky here) and head back the way you came. If you go back up
the windy road, there's a grass field on the right you can cut across to
get on the road that goes straight to the driving school. Stay on the
trolley tracks where available to avoid traffic. There is a glitch where
you can repeatedly pause and un-pause your game for the entire trip to
slow the clock, resulting in an extremely quick time.
Reward: Driving Skill +
*If you get atleast all bronze in
all tests, a Super GT will now spawn in the School's parking lot. If you
get atleast all silver medals, a Bullet will spawn. If you get all
golds, a Hot Knife (hotrod) will spawn in the parking lot.
*If you have completed both 'Back to
School' (get atleast bronze on all tests) and 'Yay Ka-Boom-Boom',
Jethro will call, asking you to purchase Wang Cars across the street
from your garage. You need to purchase the property before you can
continue with this mission strand.
2. Zeroing In
Purchase Wang Cars for $50,000 then go
across the street to your garage and enter the marker. After the scene,
quickly get to the first marker, which is just to the north of your
garage. Keep following the red blips as they show up on the radar. If
you take too long to get to one, you'll lose the signal (the blip turns
from red to white as time goes on) and fail the mission. Once you catch
up to the car, clip her back end to spin her around (P.I.T. maneuver
from 'Back to School'). She'll get out, so steal her car and take it to
the garage to finish the mission. This car will now spawn in Wang Cars'
showroom.
Reward: $5000, Respect +
*Wheel Arch Angel is now open. This
shop is like Loco Low Co, only it's purely for cars that can be made
into street racers. Any cars you steel in this mission strand will be
stored at Wang Cars and can be customized at Wheel Arch Angel (except
for Cesar's lowrider), only located in Ocean Flats, San Fierro.
3. Test Drive
Walk into the marker at your garage to
start the mission. After the scene, get a car and drive Cesar to the car
showroom Downtown. After the scene, jump your car out of the window and
follow Cesar back to the garage. You'll get a two-star wanted level,
and the cops will chase after you. Keep up with Cesar all the way back
to the garage to finish the mission. These cars will now spawn in Wang
Cars' showroom.
Reward: $5000, Respect +
3. Customs Fast Track
Before starting, make sure you have full
health and a good gun with some ammo. You can get armor as a safety
precaution, but it shouldn't be needed. Walk into the marker at the
garage to start the mission. After the scene, drive down to the docks in
Easter Basin. Walk into the marker under the crane and press Triangle
to get in. Use X to lower the magnet and square to raise it. The magnet
will autmatically attract the container once they've touched. Raise one
up off the ship and lower it to the marker below. Use the left analog
stick to rotate the crane and move it back and forth along the tracks.
Lower the container over the marker until a message appears, saying to
press Circle to drop the container. Repeat this process for the other
two containers. Be careful not to drop a container from too high, or it
will destroy the car inside, failing the mission.
After you've found the right container
(it's always the third), security guards will show up and shoot at you.
Kill all of them, then get in the car with Cesar and drive back to the
garage to finish the mission. The more damaged the car is, the less
money you get, and a Pay-N-Spray won't get your lost money back.
Reward: up to $10000, depending on damage to the car, Respect +
*The 'Import/Export' odd job is now available. See the 'Odd Jobs' section for details.
4. Puncture Wounds
Walk into the marker at the garage to
begin. After the scene, get in the car; it's equipped with spike strips
you can drop behind you. Now drive out to the target car in Foster
Valley; she'll be moving. When you get in front of the car, press Circle
to drop a spike strip and pop her tires. When she stops, get out of the
car and Cesar will call, and you'll fix the tires. Drive the car back
to the garage to finish the mission.
Photo Op: The license plate on the car with spikes says 'GOT MOD'.
Reward: $5000, Respect +
*Wang Cars is now an asset property. It will earn up to $8000 a day, so pick it up regularly.
===========================================================
===========================================================
Desert
Mike Toreno
1. Monster
Follow the '?' on the radar and walk into
the marker to start the mission. After the scene, take a simple race
around the desert. This truck can climb almost anything, so don't be
shy about taking shortcuts offroad. You need to get through all 35
checkpoints in under 6:30 to pass the mission.
Reward: up to $5000, depending on your time
*After the mission, the mystery guy will call again, telling you to get back to the ranch ('?' on radar).
2. Hijack
Walk into the marker at the ranch to begin.
Whaddya know, Toreno's alive. After Cesar shows up, get on the bike and
chase down the semi. When find it, pull up to the driver-side door so
Cesar can jump on and take the truck. When he finally stops the truck,
get off your bike and into the truck. Now take the truck to the garage
in Doherty.
Photo Op: The license plate on the motorcycle says 'PREACHER'.
Reward: $7000
*After the mission, Toreno will call again, telling you to get back to the ranch.
3. Interdiction
Walk into the marker at the ranch to start
the mission. After the scene, drive out to El Castillo del Diablo in the
desert. Drive into the marker to hear from Toreno. Grab the rocket
launcher on the porch, pick a car, and get to the top of the mountain,
marked by a yellow blip on the radar. After the scene, use your rocket
launcher to take out the other choppers. Make sure none of them crash
near you; the explosion could kill you. You'll now have a two-star
wanted level. Get in the car marked by a blue blip on the radar, then
drive to the green blip to pick up what the chopper dropped. After
you've gotten the package, your wanted level should have dropped to one,
maybe even zero, but get back to the ghost town in El Castillo del
Diablo and park in the garage. For a third time, you're left way out in
the middle of nowhere, except this time you don't have a car. Run to the
nearest road and steal a car to get back to the ranch.
Reward: $1000
4. Verdant Meadows
Now you'll need that other $80,000 I warned
you about at the beginning of the 'Garage' mission strand. Walk into
the marker at the ranch to begin. After the scene, head to Verdant
Meadows Airstrip, marked by a white airplane on the radar, and buy it
for $80,000 (so much for killing the owner if he doesn't sell it for
more than $1). This property has two garages; one right next to the safe
house (stores 4 cars), and the huge hanger across the runway (4
cars/planes). Walk into the yellow marker and save your game.
*When you get off your bike at the
airstrip, Jethro might call (he'll call sometime around this mission),
telling you about street racing clubs. The one in San Fierro is located
behind Wang Cars.
===========================================================
Airstrip
1. Learning to Fly
Go around to the back side of your house in
Verdant Meadows and go up the stairs into the room. Walk into the
marker to begin the mission. In order to continue with any missions,
you'll need to learn how to fly. After the scene, walk into the marker
to begin your flying tests; it works just like the Driving School. At
first, with your flying skill so low, the planes are a little tough to
control. Most of these missions might take several tries. Watch the
videos to see exactly what you need to do.
Takeoff: Hold X to get the
plane moving, then pull up with L3 when the game prompts you. Retract
the landing gear using R3, then fly through the carona. After you reach
the first marker, push L3 forward slightly to go down to the next
carona, then pull it back slightly to get to the final carona.
Land Plane: Press R3 to
take out your landing gear, then fly through the first carona. Lower the
plane to the runway, then hold Square to slow down. Try to even
yourself out before landing, then slowly drive into the marker; you can
hold X if you want to get there quicker and improve your time, but be
careful not to take off again.
Circle Airstrip: This is
where it gets tough. Choose which direction you want to go around the
airstrip. Take off like you did before and fly through the first carona.
The next carona will be to the opposite direction of which way you're
circling the airstrip so you can fly in a wider circle (if you chose
clockwise, the second carona will be left of the first one, or right if
you chose counterclockwise). After this carona, your circulation around
the strip will begin. Keep following the caronas around, keeping control
of your plane. The left analog stick only requires slight movement,
along with the use of L2/R2 to perform a smooth turn.
Circle Airstrip and Land:
Even tougher than the last, you'll be doing the same thing, but you also
need to land on the airstrip. After you've circled the strip, turn
towards the runway and land like you did in the second test (if you
circled clockwise, turn left onto the runway; if you circled
counterclockwise, turn right onto the runway).
Helicoptor Takeoff: Hold X
to rise, and when it says to, let off X to level off. Rotate the
chopper 180 degrees by holding R2 or L2; try not to spin any more than
180. Now push forward slightly on the left analog stick and hold X to
move through the corona.
Land Helicoptor: Move forward until the game says to release X, then land in the marker, using Square to low down.
Destroy Targets: This test
can be pretty tough. R1 fires your machine gun, while Circle fires
missiles. Move forward and shoot the three trucks parked on the runway.
It might be easier if you fly just above the ground and shoot at the
trucks with tons of missiles and your machine gun while moving toward
them. When they're all destroyed, go to the southwest part of the
airstrip and shoot the two moving vehicles. I just shot a load of
missiles at them and it worked out fine. When they're destroyed, land in
the marker on the runway.
Loop-the-Loop: This isn't
as hard as it may seem. Fly through the first carona, then immediately
pull down on the left analog stick until you make a full loop, and fly
through the second carona.
Barrel Roll: This works
almost exactly like the loop-the-loop, only you push the left analog
left or right to spiral the plane. Be careful not to fly up or down
while you're spinning.
Parachute onto Target:
Read the instructions the game gives you on how to speed up and slow
down your descent, but don't bother with rotating; it will only make
this test harder. Press Circle to open your 'chute when the game tells
you to and do your best to land in the center of the target. Pull back
to slow your decent and go forward if you need to. This may take a few
tries, but atleast it's fun.
Reward: Respect +
*After you've completed pilot
school, Woozie will call, opening up his mission strand in Las Venturas.
Check out the 'Four Dragons' mission strand for details.
2. N.O.E.
I recommend saving before starting, so if
you die, you can just reload your game at the airstrip. This is a very
tough flying mission. Walk into the marker in front of one of the
hangars at the airstrip. You have a 10 minute time limit. After the
scene, fly west, and south weaving your way in between the canyons and
get to the ocean on the west side of San Andreas, staying below the
radar. If you get above, you'll hear a beeping, and a meter will begin
to fill, get down as soon as possible or you'll get shot at with
missiles. From there, fly south along the shore until you reach the
southwest corner of the map, and be careful not to crash into anything,
such as a boat mast, a tree, or into the water. After you've passed Mt
Chiliad, head east and fly over Angel Pine. Go through the marker, flip
around to the western shore, and get back to the airstrip the way you
came.
Reward: $15000
3. Stowaway
Get armor and full health before starting.
Walk into the marker in front of the hangar at the airstrip to begin.
The hardest part of this mission is simply getting on the plane,
especially with all the barrels falling out of the rear end. When you're
on the bike, you can crouch down by tilting the left analog stick
forward slightly, to gain speed. If you crouch right away, behind the
the ramp and to the side, when you've got the speed, turn towards the
ramp to get on. Once you're on, DO NOT USE GUNS. It's possible if you
auto-target the guys, but it's not something you want to risk. Use a
knife or your fists to kill them; they won't be using guns either. Avoid
the barrels as you move further along the plane by going into the open
spaces between the mesh fences areas on the sides. Kill all the guards,
and pick up the parachute one of them drops. Now place a satchel charge
on the plane then jump out the rear end with your parachute equipped. If
you're low on health, try landing in front of the Cluckin' Bell to get
some food.
Reward: $20000
4. Black Project
This mission can be hard, but overly so; I
recommend full health and armor before starting, and if you can afford
it, get a silenced 9mm with some ammo. Walk into the marker in front of
the hangar between 20:000 and 6:00 to begin. Before you enter the gates
of Area 69, take out any guards you can see with your Sniper Rifle; use
the radar to help you locate them. Shoot the one on the ground near you,
the one in the tower nearest you, then the other northeastern tower.
Walk into the gates, but dont pick up the armor unless you absolutely
need it; it could come in handy later. There are more guards patrolling
the grounds south; kill them, take their M4's, then go south.
This is where I was discovered, which
triggered an alert. If you haven't been discovered yet, do your best to
sneak around and kill all the guards; your goal is to walk into the
underground garage-type door in the center of the base. However, since I
was discovered, that door closed and the objective changed to finding a
nearby vent to drop into. Use the M4 you've collected to kill the rest
of the soldiers on the ground and in the tower (you don't need to kill
them all if you dont want, just enough so that they wont see you get in
the vent); you shouldn't lose much health. Now get to the yellow blip on
the radar and shoot the vent open. Jump inside. Pick up the health if
you need it, then shoot through the grate.
An alarm will sound (it would no matter
which way you got into the base). Go north to the doorway, and shoot all
the soldiers in the room. There is armor and a minigun if you go up the
stairs into the blue room on your right. When everyone's dead, go
through the southern doorway and kill all the soldiers in the room. From
here, go east, into the hallway with the cage-like floor. If you need
the health below, there's an opening to your left before entering the
hallway. Continue down the hallway and go up the steps. These hallways
are dark, so put on your thermal goggles (press Circle when they're
selected to take them on/off). Kill all the soldiers in the hallway.
Follow the hallways north, then west towards the yellow blip on the
radar. Take the card from the scientist then walk into the marker to
open the door.
This part is a little tough. You need to go
down the long, spiral staircase, killing all the soldiers along the
way. Before you get to the actual stairway, you'll have to kill two
guards in front of you, on the other side. I recommend using the M4.
Slowly descend the stairway, killing the guards below, and on the
opposite side of you. At the bottom, walk up to the jetpack to put it
on. Hold X to ascend the stairwell. You rise pretty fast, so don't worry
about the guards shooting at you. When you're out, fly to top of the
canyon marked on the radar, and into the marker.
You won't have any wanted level now, but
anytime you go near Area 69 after this mission, you automatically get 5
stars. Once again, you're left out in the middle of the desert. Atleast
there's a dirtbike nearby. You might want to save your game to regain
health.
Reward: None
*After the mission, Truth will call. Meet him at the airstrip for the next mission.
5. Green Goo
Make sure you have an uzi (any weapon you
can fire from a car will do) before starting. Walk into the marker at
the airstrip to begin. After the scene, fly the jetpack to the train,
marked by a green blip on the radar. When you meet up with the train,
shoot everyone onboard with your uzi, and shoot the crates until you
find the green goo. Pick it up and take it to Truth at the airstrip.
You'll have a two-star wanted level now.
Reward: $20000
*You have now acquired the airstrip
Asset. It will earn up to $10,000 a day, so pick it up regularly. The
jetpack will now spawn at the airstrip, next to the motorcycle.
===========================================================
===========================================================
Las Venturas
The Four Dragons
1. Fender Ketchup
Walk into the marker at the Four Dragons
Casino on the Strip in Las Venturas. It's marked on the radar by a
yellow circle with a dragon inside. When you're inside the casino,
follow the yellow dragon blip on the radar. After the scene, drive
around to scare the guy on the hood. Speed, drive in the wrong lane,
jump the car, do anything as long as you don't kill him. Once he
confesses he's from the Sindacco family, drive him back to the casino.
Reward: $5000
2. Explosive Situation
Now starts the planning for the Caligula's
Casino heist. Head to Hunter Quarry to get the explosives; it's marked
on the radar by a yellow blip. Drive into the blip, then jump your
car to the bottom of the quarry and get in the big dump truck. Run over
all of the boxes, marked by green blips on the radar, and get out of the
truck to collect the dynamite. When you've collected them all, security
guards block the exit, so get on the dirt bike (blue blip) and follow
the markers out of the quarry. Look before you leap! Some jumps may
require more speed than others, so look at where you need to jump before
attempting it. If you miss a jump, you'll have to start over again, or
atleast a few checkpoints back, depending on where you are. Be patient.
After you're out, follow the yellow blip to the drop off point.
Reward: $7000, Respect +
*The 'Heist' mission strand is now available, marked by a green '$' on the radar in the Four Dragons Casino.
3. You've Had Your Chips
Make sure you have full health and armor
before starting. Walk into the marker in the Four Dragons to begin.
After the scene, get to the plastics factory in Whitewood Estates. DO
NOT DRIVE ONTO THE PROPERTY. Get out of your car by the western opening.
Look inside the grounds and to your right to see a car with two guards
sitting inside; walk towards the car to activate a short scene, in which
the two guys run inside. Now walk up to the door to activate another
scene. Run back out of the building and get behind the car to avoid
taking too many hits. Shoot as many guys as you can from here. When
you've shot all you can get to, move towards the door and kill more
guys. When they're all taken care of, destroy all the machines with
green markers floating above them. Use guns, satchels, a rocket
launcher; whatever you have left over from other missions or trips to
AmmuNation. While you're doing this, a few more gunmen will enter the
building, so kill them. When all the machines are destroyed, more gunmen
will come and shoot you. Kill them, grab a car, and head back to the
casino.
Reward: $20000, Respect +
===========================================================
The Truth
1. Don Peyote
Walk into the marker in front of the Four
Dragons to begin. After the call, get in a four-door car and head out to
Arco del Oeste to pick up Paul and Maccer (you'll remember them from
Vice City). Drive into the marker to trigger a scene. Get in your car
and drive up to Paul and Maccer to let them in. Now drive to the snake
farm near your airstrip and into the marker. Kill the farmers (otherwise
they'll chase you all the way back to Las Venturas) then head to
Caligula's Palace to meet up with Rosie (another familiar face from Vice
City).
Photo Op: At the snake farm, there are two trucks. One's license plate says 'TAMMY', the other says 'TIM'.
Reward: Respect +
===========================================================
Ken Rosenberg
1. Intensive Care
Walk into the marker in
Caligula's to start this mission. After the scene, get to the hospital
near the airport and drive into the marker. After the short scene, get
to one of he red blips on the radar and ram the ambulance. The mafia are
alerted of your 'disturbance', so get to another red blip and ram the
ambulance to see if it's the one with Johnny inside; you'll get a
message saying so. Ram the ambulance (don't shoot at it; it's easy to
damage the car enough that you wont survive the trip to the factory)
until the mobsters get out and shoot at you. Get in the ambulance and
drive it to the meat factory in Whitewood Estates. Two Sindacco cars
will chase after you on the way.
Photo Op: There's a Patriot in the hospital parking lot that has a license plate reading 'H CARMAN'.
Reward: $5000, Respect +
===========================================================
C.R.A.S.H.
1. Misappropriation
Before starting, get a sniper rifle, full
health and armor, and maybe an off-road vehicle such as a Patriot or
Bobcat (pickup truck). Head to the 'C' blip on the radar and walk into
the marker to start the mission. After the scene, drive towards the
marker but DO NOT ENTER THE GHOST-TOWN!!! Drive up onto the hill on the
east side and look around with your sniper rifle. Near the northern
helicoptor parked on the rocks, you should be able to see a red marker.
It's floating above the dossier you need to kill. You can follow my
strategy, or you can cause a commotion, resulting in the dossier getting
in a helicoptor and you having to chase him back to Las Venturas; pay
close attention, and read this next part before trying anything.
You're going to need to sneak to a sniping
position. Stay on the hill, and drive to the northern edge. Follow the
edge a little to the west, just until you can see the dossier through
your sniper rifle; he's right up next to a building. Shoot him from
here, then drive to pick up the package before one of the FBI agents
gets to it; if they do, shoot them asap. Getting the package (green
marker) will complete the mission. You'll deliver the package to
Tenpenny later.
Reward: None
===========================================================
Ken Rosenberg (Cont'd)
1. The Meat Business
Get full health and armor, and a gun before
starting. Get to Rosie's office at Caligula's. After the scene, get
into a car with Ken and drive to the meat factory you dropped Johnny
Sindacco off at earlier. Get out of the car and walk into the yellow
marker at the door. After the scene, kill the guys o in this first room.
You're main objective is to keep Ken alive. If you need health, there's
a heart in the room to the left of where you start. Ken will grab an
extinguisher out of that room. Now head forward to the door blocked by
fire and shoot all the thugs from here. Ken will now put out the fire,
then run into the freezer in the next room. Kill all the guys here, then
go into the freezer and pick up the armor in the back. Now continue
forward and kill everyone in the next room. Next, go into the room on
the right, packed with boxes. Kill everyone inside, then head out the
exit on the other side. Drive Rosie back to Caligula's.
Reward: $18000, Respect +
===========================================================
The Four Dragons (Cont'd)
1. Fish in a Barrel
This isn't a mission. Just walk into the marker at Four Dragons to watch a cutscene to toast your partnership with Woozie.
*After the scene, Ken will call, opening up the 'Salvatore Leone' mission strand.
===========================================================
Madd Dogg
1. Madd Dogg
Follow the 'D' on the radar and walk into
the marker. After the scene, run across the parking lot and steal the
pickup truck and drive it into the marker. Use X and Square to move left
or right (don't move towards or away from the building) and follow Madd
Dogg back-and-forth until he jumps. After you've caught him, get to the
hospital and drop him off. Crashing will lower his health
significantly, so drive safe.
Reward: Respect +
===========================================================
Salvatore Leone
1. Freefall
Walk into the marker in Caligula's to start
the mission. You might remember Maria and Salvatore from GTA3. After
the scene, head to the airport and steal the plane in the hangar, marked
by a blue blip on the radar. Finally your flying skills are needed! Fly
north and get to the hitmen's plane before it lands. The yellow blip on
the radar will point up when you need to go higher, point down when you
need to go lower, and will become a square when you're at the same
height as your target. When you reach the plane, turn around to get
behind it and fly through the corona. Once in the plane, kill the four
thugs, then the fifth after the short scene. Fly back to Las Venturas'
airport and come to a complete stop on the runway.
Reward: $15000, Respect +
*After the mission, Tenpenny will
call about the package you got from the Dossier earlier. Take it to him
at the ghost town in Las Brujas. Check out the 'C.R.A.S.H. (Cont'd)'
mission strand for details.
===========================================================
C.R.A.S.H. (Cont'd)
1. High Noon
Before starting, make sure you have full
health and armor, and a gun you can shoot from your car, along with
plenty of ammo (the SMG is the strongest, but it's expensive). Do this
mission during the day, so you can see the desert roads better. After
you get the call from Tenpenny about the dossier's package, walk into
the marker at Las Brujas, marked by a 'C' on the radar. After the scene,
get in the Bandito next to you and kill Polaski. Chase after him,
ramming and shooting him along the way. After the car starts on fire,
he'll jump out and shoot at you. Kill him to finish the mission.
Photo Op: After you've killed Pulaski, his car will be repaired. The license plate says 'PULASKI'.
Reward: Respect +
*After the mission, Ken will call.
===========================================================
Salvatore Leone (Cont'd)
1. St. Mark's Bistro
Get full health and armor, and a gun,
before starting. Walk into the marker in Caligula's to start the
mission. After the scene, drive to the airport and get into the plane.
Now follow the yellow blip on the radar and match it's height; There
will not be any markers or coronas for you to fly through. After you
arrive at the Bistro, kill all the Forellis on this level, and take
their guns, ammo, and money. Two Forellis will run up, so kill them too,
along with the two thugs on the lower level you can shoot from up here.
Go downstairs (STAY AT THE FOOT OF THE STAIRS) and kill the guys behind
the counter. Now if you look at the doorway, there's a guy with a red
marker over his head. You can kill him from where you're standing, or
move towards him and chase him to the backyard and kill him there. Go
through the doorway and go downstairs, killing any Forellis. Continue on
through the kitchen and out the door on the other side. If the guy with
the red marker got away from you earlier, you'll meet up with him in
the backyard. You're safest by staying on top of the staircase and
crouching behind the ledge to avoid taking damage. Shoot everyone in the
yard, then fly back to the Las Venturas airport after the scene.
Photo Op: The car in the yard has a vanity plate that says '4GEDIT'.
Things to try: Save your game
in two different files before starting this mission. In one file, you
can continue on beating the game, and in the other you can replay this
mission and visit Liberty City any time you want.
Reward: $20000, Respect +
*After the mission, Salvatore,
Sweet, and Woozie will call. The 'Home in the Hills' mission strand in
Los Santos is now available.
===========================================================
The Heist
1. Architectural Espionage
Get full health and armor before starting.
Walk into the marker in the Four Dragons, marked by a green '$' on the
radar. After the scene, head to the planning department in Come-A-Lot
and walk into the marker. If you have a weapon equipped, put it away and
walk up to the front desk. Press 'Right' on the d-pad to answer both of
her questions (or you can answer Yes, No, Yes), then head for the
stairs behind and to the left of you. You can open the door by walking
into it. Head to the top to activate a short scene. Now go downstairs
and follow the marker. When you get into the document depository, walk
up to the A/C units and punch them to start them on fire. A fire alarm
will sound, so you can head back upstairs to the blueprints and take a
picture of them. The cops are onto you now, with a two-star wanted
level. Head back downstairs to exit the building, killing the cops along
the way. Crouch-walk to see better, and use a shotgun if you have one;
they kill with one shot. Once you reach the ground level, be prepared to
sprint through the door, and go right, to the door. Once you're
outside, you'll get a four-star wanted level. Head back to the Four
Dragons and park in the marker by the side garage. You'll now lose your
wanted level.
Reward: Respect +
2. Key to Her Heart
Walk into the '$' marker in the Four
Dragons. After the scene, drive to Caligula's. Follow the croupier to
the sex shop, but keep your distance. Once she reaches the store, follow
her inside and walk into the marker. After the scene, walk into the
room and pick up the gimp suit. Tail the croupier to her house. After
she goes into her house, wait for the gimp to show up, then kill him.
You'll be able to identify him because he's the only person carrying a
dildo. Walk into the girl's house to activate a scene.
Photo Op: The croupier's license plate says 'SPANK'.
Reward: Millie is now your girlfriend, the Gimp suit is delivered to your house, Respect +
*In order to get the security
keycard, you'll need to get your 'Progress with Millie' guage up to 33%,
which took me three dates (with no gifts). She'll then call you. Walk
into her house and pick up the card. If you keep going to her house and
she's never home to take her out, it's just a glitch in the game. When
you walk back outside, Woozie will call.
Photo Op: You're never going to see this room again...unless you use the Hot Coffee cheat...so take pictures if you want.
3. Dam and Blast
Get full health (and armor if you're not
good with stealth) before starting (dont bother with guns; you lose them
once you get to the dam). Walk into the Heist marker to start the
mission. After the scene, get to the airport and into the plane. You're
going to have to get very high very fast, so when you take off, first go
east, then turn around and go west and climb as quick as you can. Right
when you hit the corona, press Triangle to jump out of the plane and do
your best to parachute into the marker below. You might have to do a
little bit of running or swimming. Personally, jumping out of your
parachute (Triangle) and into the water from that height is fun, so I
didn't mind the swimming. As I mentioned, you lose all your weapons when
you reach the marker. Sneak up ahead and get the knife by the red
container. Stealth-kill the nearest guard once he turns around. Look at
the radar to see which direction the other guard is facing. When he's
facing away from the water, perform another stealth-kill, then walk into
the marker.
Look at your radar. The red blips are the
guards, and the yellow blips are the transformers you need to put
satchel charges on. Sneak up the stairs to your left and get behind the
first transformer; watch out for the electrician. Get up to the center
of the transformer and press Triangle to plant the charge. Now sneak
around the transformer counterclockwise and wait until the patrolling
guard goes north. Perform a stealth kill on the nearby electrician. Now
get back behind the transformer and wait for the guard to come back.
Slowly crouch-walk behind him while he heads north and get behind the
second transformer and plant another satchel. This time, wait until the
guard is heading south, then quickly crouch-walk to the next transformer
after he passes the one you're at. Now you have two guards to worry
about; the one you just snuck past, and another north-south patrolling
guard. There should be a point where the first guard is standing at his
southern post (facing south) and the second guard is moving north.
Quickly stealth-walk behind the next transformer and place the satchel.
When the second guard is moving south and passes you, quickly
stealth-walk the final transformer and place the satchel. If he sees
you, run to the transistor and place the charge, then run into the
marker.
Reward: Respect +
*You'll now have a one-star wanted
level, and you'll get your guns back. Swim a little south and you can
get in a plane or helicoptor to fly back to Venturas.
4. Cop Wheels
You might want armor for this, but you
shouldn't need it. Atleast have full health and a gun. Walk into the
Heist marker in the Four Dragons to start the mission. Pick a green blip
on the radar and go there and steal the police bike. You might need to
chase him down, so use your gun to shoot the cop off the bike. When you
have a bike, drive it onto the back of the truck marked by a blue blip
on the radar; he'll be going counterclockwise around the freeway. You
can cut through town or drive the opposite direction to save time,
depending on where the truck is. Repeat this for the other three bikes.
You'll gain a two-star wanted level, but it'll disappear once you
complete the mission.
Reward: Respect +
5. Up, Up, and Away!
Before starting, make sure you have full
health and armor, and a gun. Walk into the Heist marker in the Four
Dragons between 20:00 and 6:00 to start this mission. After the scene,
follow the yellow blip on the radar. When you get to K.A.C.C. Military
Fuels, a Patriot will come out of the gates. This is your chance to slip
inside. Once in, immediately head north and get behind the warehouse to
park and take cover. Shoot the guards near the gate. Pick up the M4s
they drop and go inside the warehouse you just hid behind (the entrance
is on the west side of the building). There are two containers you'll
have to walk through, but for now just stay in between them and shoot
all the guards you can. If you need health or armor, there are pick-ups
nearby. Once all the guards are dead, go out the eastern exit. There's a
guard south of you; kill him, then continue in that direction, then go
east, killing any guards. Go up the stairs on your right, and kill the
guard at the top. Go up the next staircase to the roof. Two gunships,
marked by red blips on the radar will shoot at you. Kill all the guards
and get to the gun (yellow blip) to shoot them down. It'll be hard to
see them at night, so shoot just under the red markers hovering above
them.
Once they're destroyed, go a little south
and up the staircase to the helipad. Get in the helicoptor and fly south
to the blue blip on the radar. Again, it's hard to see in the dark, so I
recommend you fly high to avoid hitting a building or any other tall
object. Once you reach the van, hover over it until your magnet catches
it. Now fly to your airstrip out in the desert, and becareful not to
smash the van into anything or accidentally press Circle to drop the
van. Once you're at the airstrip, lower the van into the marker (it
doesn't have to be exact, just DO NOT DROP IT), then land the helicoptor
in the next marker to finish the mission.
Reward: Respect +
*Once again, you're left out in the middle of nowhere. Just take one of your planes and fly back to Venturas
6. Breaking the Bank at Caligula's
Ah, the heist at last! I recommend full
health, armor, and a gun before starting. Walk into the '$' marker in
the Four Dragons to begin. After the scene, head to Caligula's and walk
inside. Follow the yellow blip on the radar to activate a short scene,
then swipe your card to open the door. Head downstairs one level into
the generator room. Head to the north wall and equip the gas weapon; it
looks almost like a fire extinguisher. Throw it into the open vent with
Circle. Follow the yellow blip on the radar. On the way, Zero will cut
out the lights. Equip your night-vision goggles (in your weapon
inventory). and swipe your card by the door. If you need armor, there's a
room on your right with a pick-up inside. Head out the east exit and
follow the hallway around. The garage isn't open enough for the van to
get though, so find the forklift (blue blip) to open it.
Follow Woozie's men to the vault and kill
all the guards in sight. Once you're near the vault door, Zero will
call. Pick up the satchel charges and follow the blue blip to the
generator room. Throw your charges onto the two generators (there are
blips hovering above them), then get a good distance away from the room
and press circle to detonate the bombs. Head back downstairs towards
Woozie and the team. After you enter the safe, Mafia will come down.
Kill them all, then lead the team back to the van, marked by a yellow
blip on the radar. Kill the Mafia on the way. After a short scene, the
lights will come back on. Go back the way you came in, killing any
Mafia, and head to the elevator (yellow blip). Next, follow the blip
upstairs to the roof. Once on the roof, follow it to the end to pick up
the parachute. You're supposed to land on the building across the
street, but as many times as I've been through this mission, I have
never been able to do it. Just parachute down to the street and get in a
car to drive to your airstrip and finish the mission.
Reward: $100,000 and Respect +
*The croupier uniform has been delivered to your wardrobe.
*After the mission, Salvatore will call to tell you you're dead. Don't worry, you won't be seeing him again.
===========================================================
===========================================================
Return to Los Santos
Home in the Hills
1. A Home in the Hills
Walk into Woozie's office in the Four
Dragons Casino, marked by a dragon in a yellow circle on the radar.
After the scene, jump out of the plane and parachute onto the roof of
the mansion, marked on the radar by a yellow blip. If you open your
'chute right after you jump, you shouldn't have a problem reaching the
roof. If you miss it, you'll have to find a way up onto the roof. Once
you land, look to your right and pick up the armor if you need it. Kill
all the Vagos for when the Triads arrive. Do not let any of them die.
Lead the Triads down the stairs and around to the door.
After the scene, kill the Vagos and head
down the hallway, killing any more of them. The Triads will clear out
every room along the way. There's armor in the second room on the left.
At the end of the hallway, shoot the guards downstairs from where you're
at. Go down the stairs and clear out the room to your left. Go in the
bar to your north, kill the Vago inside, and pick up the health if you
need it. There are also some night-vision goggles next to the stairs
that will help you navigate the darker hallways of the mansion. Now
follow the hallway west, kill the two Vagos, then chase after Big Poppa.
When you get to the pool, Big Poppa exits the house; go after him.
Get in the pink Ferrari/Thunderbird-looking
car and chase after him. Do not lose him or you'll have to go back to
Las Venturas and start over. If you can handle it, cut across the grass
corners while going downhill to cut him off, or atleast get closer if
you're lagging behind. Ram or shoot at his car until it explodes. You've
now taken back Madd Dogg's mansion.
Photo Op: The license plate on the pink car you drove says 'J LOMAX'.
Reward: Respect +
*You can now save your game at the mansion.
*After the mission, Ken will call
and CJ has him come to the mansion. Madd Dogg needs a sound engineer and
an accountant. Follow the 'CJ' blip on the radar to continue.
2. Vertical Bird
Get full health and armor before starting,
then walk into the marker at the mansion. Toreno wants you to steal a
military jet. Well, atleast he gives you a ride to the boat. Get in and
you'll get a silenced 9mm. Follow the yellow blip on the radar to the
aircraft carrier. Once you're close, Toreno will call. After the scene,
quickly get out of your boat and swim through the open door of the ship.
You've only got a knife and the silenced pistol to work with, so be as
stealthy as possible. Crouch-walk (L3) part-way up the ramp and wait
until you see a guard in the next room. Wait for a minute and the guard
should be gone, and a mechanic will start driving a forklift around the
room. When the guy in the forklift is near the middle to south side of
the room, walk in and he'll see you. He'll get out of the forklift and
run for the alarm on the north wall. You should be able to shoot him
before he activates it. Now crouch-walk through the open hatch door on
the east wall and go up the first staircase. Go into the hallway on your
left and at the end, on the right, will be a guard with a gun. Quickly
shoot him, then go through the east door. There should be two or three
guards in here that you'll need to shoot. Next, head through the east
door and into the marker. After the short scene, exit the room and go
down the hallway on your right. There should be one or two guards to
take care of. At the end, get in the jet that's outside, on your right.
Hold X and it will fly straight up like a helicoptor. Retract the
landing gear with R3. Rise up atleast higher than the ship, then hold
the right analog stick forward to allow the jet to move forward.
Now for the hard part. It's made even
harder if it's dark out, so you may want to fly around until it's light
before attempting this. You'll have to detroy four ships in Tierra
Robada, while other military jets try to shoot you out of the sky. R1
auto-targets your enemies, and L1 fires your missiles. Fly north toward
the ships. If an enemy jet fires missiles at you, pull back on the left
analog stick to do a backflip and avoid them. If you get hit, you're
screwed, as your jet will not handle well at all. Try to keep going with
your mission though. Once you reach the ships, hold R1 to target them,
wait until the target turns red, then fire as many missiles as you can.
Watch out for the mountains and jets. Destroy all four ships and the
jets tailing you. When everything's destroyed, land at your airstrip and
park in the hangar.
Reward: $50,000
*The Hydra will always spawn in that hangar from now on!
3. Home Coming
Get a gun and have atleast full health
before starting. Walk into the marker at the mansion to begin. It's time
to pick up Sweet, so after the scene, drive down to the police station.
After a second scene, take Sweet back to the Grove. After a third
scene, kill all the drug dealers in your hood. They drop a lot of money,
so be sure to pick it up. Once they're dead, shoot atleast three Ballas
to start a gang war and take back the hood. Survive all three waves and
Grove Street is yours. If you're running low on health, there should be
health and armor pick-ups in the street.
Reward: Respect +
*A new mission strand is now
available, marked by an 'S' on the radar. See the 'Grove Street' section
for details. You might get another call from Catalina, in another
pathetic attempt to make you jealous.
4. Cut Throat Business
Walk into the marker at the mansion to
begin. After the scene, drive Madd Dogg to Loc's video shoot in Flint
County (behind the station with the Trucking odd job). When you get
there, you'll get a scene, then Loc takes off in a hovercraft. Chase
after him, and don't worry if Madd Dogg falls behind. It's very unlikely
that you'll be able to shoot at him, so stay focused on chasing him and
not crashing or getting behind. After a couple minutes, Loc will get
onto the pier. Follow him to the end and, after the scene, chase after
him in the go-cart. Again, just focus on chasing after him; you're not
likely to get in any shots. Watch out for short turns. When he turns
into an alley, follow him up the stairs to activate a scene and finish
the mission.
Reward: Respect +
===========================================================
Grove Street Families
1. Beat Down on B-Dup
Walk into the marker in front of your house
on Grove Street (the 'S' on the radar) to begin the mission. After the
scene, follow the yellow blip to B-Dup's house. He's moved out, so head
to Glen Park and take over the area. Drive around the purple area of the
map and shoot three Ballas to start a war. Drive-bys didn't work for
me, so you'll have to get out of the car and shoot them. Make sure to
pick up and health, armor, ammo, and money in the street. After you've
taken over the area, shoot the Ballas outside B-Dup's house and walk
into the marker.
Things to try: The Infernus
(Honda NSX look-alike) in front of B-Dup's house is damageproof, but
it's locked. If you can push it to your garage, put it in there and kill
Sweet to fail the mission and it's yours.
Reward: Respect +
2. Grove 4 Life
Get full health and armor, and
a gun, before starting. Follow the 'S' on the radar back to Grove
Street and walk into the marker to begin the mission. After the scene,
drive Sweet to Idlewood and take over some Balla territory. Drive around
the purple area of the map and find a group of three Ballas. You'll
have to get out of your car and shoot them to start a war. Keep an eye
on your health and look for pickups. Once you've taken over two areas,
drive Sweet back to Grove Street.
Reward: $10,000 and Respect +
===========================================================
Riots
WARNING: In order to trigger
the final mission, 'End of the Line', you'll need to obtain 35% of Los
Santos' gang territories. It's easiest to do this before the riots
begin, because cars are hard to come by and cops are everywhere. The
riots will stop after you've completed 'End of the Line'.
1. Riot
Walk into the marker at Madd Dogg's mansion
to watch a cutscene in which Tenpenny is dropped of all charges for the
murder of a fellow officer. This causes the entire city of Los Santos
to riot in the streets. Try to avoid the chaos and head back to Sweet's
house.
Things to try: The Truth's and
Cesar's cars are parked at the mansion and both are unlocked. Take 'em!
Sweet will wait for you at the mansion while you store them in a garage.
2. Los Desperados
Get full health and armor, and a gun,
before starting. Walk into the marker at Sweet's house to begin. After
the scene, hire two Families members (target them with R1, then press Up
on the d-pad), and drive Cesar and your gang to Unity Station. The
Vagos have taken over Cesar's hood, so kill them all. They're marked by
tiny red blips on the radar.There's a lot of money to be picked up here,
so make sure to do so. After the area's clear, follow the yellow blip
into the marker near the alleyway. After a short scene, kill the Vagos
in the alley. You'll get a few more short scenes, followed by more Vagos
entering the alley. Kill them and you'll get another scene, showing
Vagos with a flamethrower and a rocket launcher on the roof. Take out
the guy on the roof first, then kill the rest.
Reward: Respect +
*After the mission, Sweet will call.
You need to take over atleast 35% of the gang territories before you
can start the final mission. To see how much territory you own, pause
the game, go to 'STATS', then 'GANGS', and scroll down to 'TERRITORY
UNDER CONTROL'. Once you reach 35%, Sweet will call again to tell you
that he's found Smoke hiding in a crack house in East Los Santos.
3. End of the Line
Read 'Things to try' before starting the
mission to learn how to steal this once-in-a-game (seriously) SWAT tank.
Get full health, armor, and a gun before starting this mission. You
also might want to save your game at your house on Grove Street after
you're suited up, because it's very easy to run out of health and armor
in this mission. If you save, you can just load your game after dying,
instead of trying to find a car to drive to AmmuNation to buy everything
again.
Walk into the marker in front of Sweet's
house to begin. After the scene, drive Sweet to Smoke's crack fortress
in East LS, marked by a yellow blip on the radar. After another scene,
you'll need to steal the SWAT tank a couple blocks over, and marked on
the radar by a blue blip. There should be a bike right near the car that
you can ride if you're too lazy to run. Avoid all the gunfire, get in
the tank, and drive it back to the crackhouse. When you get back, there
are two gangsters guarding a door. Notice that the wall around the door
is a different color than the rest of the building; like it's been
painted over. Ram your tank through the door to get in and run over the
Ballas and Vagos. Make sure to take all their ammo and money, then walk
through the door at the end.
Floor 1: Security Area
Have your gun at the ready and go up the
stairs. Kill the Balla and follow the hallway around. Another Balla will
roll out of the first dark space on your left. Continue on and kill the
two Ballas at the end of this next hallway. If you need it, pick up the
armor at the end. Crouch-walk through the door for your first big
shootout. Crouch behind the boxes and take out every gangster in the
room. Now go through the doorway on the other side of the room, kill the
two guys here, then go up the stairs. Kill the guy at the top, then go
right, into an empty room with a combat shotgun and a health pick-up.
Now exit this room and go through the door near the stairs.
Floor 2: Drug Lab
Go up the stairs and kill the guy in the
barred room. Take the armor, then go through the door. Kill the Vago in
here and go through the next door for another shootout. In here, you can
shoot the explosive barrels to take out nearby enemies; shoot everyone
else. Watch out for the guys high up. When you're done, go up the stairs
on the other side of the room, and go right, following the catwalk all
the way around to the door. Kill the guys below, and the one that comes
through the door. In this room, pick up the health, then go through the
other, rusty, door.
Floor 3: Ballas Lounge
Go up the steps, kill the guy in the room,
and collect the armor. Go through the rusty door, kill the Balla and
Vago, and go through the next door. Kill the gangsters in here and go
through the next door for another shootout. Through the first door on
your left is armor, bt kill the gangster inside. There's health in the
room across the hall, and again, kill the gangster inside. Continue
around the hall and through another door. In this dark room, you'll get a
messsage telling you to get to Big Smoke. Head upstairs and through the
door.
Big Smoke
After the scene, kill the gangsters near
Smoke. Now go to the northeast corner of this floor and pick up the
night goggles; you're going to need them in a minute. There's a room
near the bottom of the west staircase where you can find armor and ammo.
On the secon floor, in the room in the northeast corner, you'll find
two health pick-ups. Now go after Smoke and his goons. Keep shooting at
Smoke (an AK-47 or M4 works quickest) and eventually his health meter
will reach zero, activating another scene.
The Escape
Tenpenny has lit the whole place on fire.
You've also got a short time limit to get out of the building the same
way you came in. Put your goggles on, quickly grab the nearby armor (and
if there's health in the room, get it too), equip a gun, and run out
the door. Run as fast as you can back the way you came in. Quickly shoot
enemies along the way, and run through the fires. When get to the
stairs, the building will be smoky. Crouch-walk to see better. When you
get to the first room that's on fire, you'll see a fire extinguisher and
health. Grab both and quickly put out the fire (aim for the base). You
can also shoot all the enemies below from the window. Get through the
door, shooting everyone you see, and put out fires along the way (just
put out enough to allow you to get through - half the hallway). If a
fire's only blocking half of your path, just run around it. When you
reach the room where you hid behind the boxes near the door, kill all
the enemies then exit into the hall. Kill the two enemies at the end,
and pick up the armor in the small barred room. When you finally get
outside, kill the gangsters in the hallway and go to the other end to
activate another, short, scene.
The Chase
After the scene, you'll be in a car. Chase
after the firetruck. Along the way, gangsters will throw molotovs and
shoot at you; ignore them, you will not suffer any damage. Just worry
about Sweet and don't bother trying to ram or shoot the truck. Take it
easy when the firetruck goes offroad behind the houses. It's easy to
slide and miss a turn. The same goes for when you're headed downhill;
it's very easy to spin your car and fall behind. Keep following Tenpenny
through town. Once you get on the freeway, cops will climb out of the
truck and onto the ladder to kick Sweet off. Just ram the back of the
truck and Sweet will fall into your car. Do not try following the truck
until Sweet falls off; you'll never catch him. Sweet will take control
of the car. Now shoot the cops on the truck (still, don't worry about
shooting the truck itself). Also shoot the cops, gang cars, and
motorcycles chasing after you. You'll get a short scene showing the
firetruck going through an alley and you following close behind. That
signals the half-way mark of the chase, and the second half is a lot
easier. Soon, Tenpenny will lose control of his truck and drive off the
bridge over Grove Street (you might have noticed earlier in the game
that you can drive through it yourself! And you still can!) and you'll
get the final scene of San Andreas' main story. You get your
disappointing reward after the credits roll.
Things to try: Steal the SWAT
tank now, it's your only chance (unless you have a cheat device)! After
the scene where you and Sweet are talking in the car and you need to get
the tank, take the tank to a safehouse and store it in your garage.
Kill yourself to fail the mission and the tank is all yours. Do this as
many times as you like to get multiple tanks.
Photo Op: As a souvenier, take a
picture of Big Smoke's statue on floor 3, and the Rockstar "Not
Welcome" mat before the room where you meet Smoke. The license plate on
the white car you drive for the last part of the mission also says 'I MY
AK', but I don't think there's any way to take a picture of it.
Reward: Respect +
Required Odd Jobs
Ammu-Nation Challenge
Location: In any Ammu-Nation with a shooting range
Prerequisite: Complete Sweet's mission 'Doberman'
Reward: Max Pistol skill
Walk into any Ammu-Nation with a
shooting range, such as the one in Market, Los Santos, and walk into the
red marker to begin. If you lose a round at any point, you have to
start all over, from Pistol Round 1. This is a very easy way to raise
some of your weapon skills.
Pistol Round 1
Using a 9mm, be the first to
destroy all three targets with a pistol. Each target has 7 pieces to
shoot out, and aim for the little red circles on each. Once you've
destroyed the target in front of you, it will go up into the ceiling and
another one, a little further away, will replace it. Don't waste your
time shooting the competitors' targets.
Pistol Round 2
Using a 9mm, shoot the targets as they move closer to you. Be the first to destroy all three targets to win the round.
Pistol Round 3
This time, there is one target
shared between the three of you. Shoot the most pieces and be the first
to reach 20 points to win.
Micro SMG Round 1
This one plays out just like Pistol Round 1, only with a different gun.
Micro SMG Round 2
This one plays out just like Pistol Round 2, only with a different gun.
Micro SMG Round 3
This one plays out just like Pistol Round 3, only with a different gun.
Shotgun Round 1
Same as the previous Round 1's.
You don't need to aim so accurately with the shotgun. You can shoot at
the center post and get both pieces in that row.
Shotgun Round 2
Same as the previous Round 2's.
Shotgun Round 3
Same as the previous Round 3's. Of
any gun, this is the hardest round yet. As your shotgun skill gets
higher, your reload time gets quicker, so this should become easier over
time. This one took me about 5 tries.
AK47 Round 1
Same as the previous Round 1's. This time, you're aiming right over CJ's shoulder, so it's a bit easier.
AK47 Round 2
Same as the previous Round 2's.
AK47 Round 3
Same as the previous Round 3's. I was able to win this one on my first try, but only by one point.
===========================================================
BMX Challenge
Location: The skate park in Glen Park, Los Santos
Prerequisite: Complete the mission, 'Sweet and Kendl'.
Reward: One step closer to 100% game completion.
Before starting the mission, I
recommend raising your Cycling skill. To do this, simply ride around
town. Over time, a meter will pop up, updating you on how high your
skill is. The higher your skill, the easier this mission will be. As
your Cycling skill raises, it becomes harder to fall off a bike, and you
can jump higher. You also gain muscle and stamina, and your max health
raises.
To begin, get on the BMX bike next
to one of the wooden half-pipes. When the mission starts, you have 10
seconds to get to a checkpoint. After that, each checkpoint you collect
adds 10 seconds to the countdown. Assuming you have a fairly high
Cycling skill, most checkpoints should be easy to get. To get a
checkpoint that's on the far edge of a half-pipe platform (see sketch
below), go off the lip of the pipe and lean towards the platform to get
on it. Then just ride off the edge of the platform to collect the
checkpoint. The hardest checkpoint to collect will be the one hanging
over the middle of the cement half-pipe. To get this, start at the
southeast corner of the park. Pedal as fast as you can towards the
halfpipe and jump into the marker.
____O
| |
/ |
___/ |
===========================================================
Chiliad Challenge
Location: Mt. Chiliad in southwestern San Andreas
Prerequisite: None
Reward: Closer to 100% game completion
Quick overview:
There are three downhill bike races on Mt Chiliad. Follow the red
markers along the paths and watch out for sharp turns and cliffs. If you
fall off of your bike, you'll have 25 seconds to get back on before you
fail the mission. You must win one race before you can unlock and
compete in another. Win all three races for them to count towards 100%.
Tips: Have a
high Cycling skill before starting so it's harder to fall off your bike.
You can use R1 to powerslide around sharp corners. Don't bother doing
drive-bys on your competition, you'll just fail the mission. If you fall
too far off the path, you'll reappear back on. What makes these races
challenging is that they spin to easily and will throw you off. The
other bikers can hit you and easily knock you off too. If you lose your
bike, it could even keep sliding down the hill, making it all the more
frustrating.
Scotch Bonnet Yellow Route
Competitors: 5
Get to the top of Mount Chiliad
and get on the mountain bike between 7:00 and 18:00 to begin this first
race. There are 18 checkpoints (red markers) to pass through, including
the finish line. On the straightaways, you can quickly press X to speed
up, but I was able to beat the race just by holding down X and slowing
down for the corners. There is a fairly long straightaway (after
checkpoint 10, I think) that you can sprint-pedal, but take it easy
around the turn; it may be wide, but it's easy to spin or fly off your
bike here. So quit sprint-pedaling before the checkpoint to make the
turn. Once you win the race, you unlock the next one.
Birdseye Winder
Competitors: 5
Get on the mountain bike on top of
Mt Chiliad between 7:00 and 18:00 to begin the race. There are 30
checkpoints here, including the finish line. There are also more hairpin
turns and longer straights. Take it easy around the sharp corners but
sprint-pedal through the straightaways. Otherwise, follow the same
strategies as last time, and as mentioned in the 'tips'.
Cobra Run
Competitors: 2
To start this race, head back up
to the top of the mountain and get on the bike between 7:00 and 18:00.
However, you do not start up there. Once you get on the bike, you'll
appear further south to start the race. There are 21 checkpoints
including the finish line, but the race is more off-road oriented.
There's only one sharp turn, but take it easy and be careful not to miss
any checkpoints even on the straights, especially on the wooden ledge
path.
===========================================================
Collection: 100 Los Santos Spray Tags
Location: The
tags are all around Los Santos. You can find spray paint in your room on
Grove Street after you complete the mission 'Tagging Up Turf'
Prerequisite: None
Reward: Respect +, and the AK-47, Tec-9, Sawn-Off Shotgun, and Molotov Cocktails spawn in your Grove Street kitchen.
The first six tags are sprayed
during the mission 'Tagging Up Turf'. For tags 7-100, I'll start on the
west side of the city and work my way east. You can find spray paint in
your bedroom in your house on Grove Street. Be careful not to spray
around cops or you'll attract a 1-star wanted level. When I was going
through, collecting all the tags, I skipped over one in East Beach -
that became #100.
Click here
to see the map with each tag's location - I tried to get them as exact
as possible, for when my descriptions are hard to follow. Also, I
apologize for the numbers being a little blurry; I had to use Paint to
make it.
1. Idlewood. On the west wall of the south end of the bridge.
2. Idlewood. Directly across the street from tag #1, on the front of the blue house.
3. Idlewood. On the east wall of the alley behind the house tag #2 is on.
4. East Los Santos. Next to the
Cluckin' Bell, there's a red 'Mexican Food' building. The tag is on the
wall with the mural of the woman.
5. East Los Santos. There's an alley on
the north side of Cluckin' Bell's parking lot - also behind the red
'Mexican Food' building. The tag is on the northeast wall.
6. East Los Santos. Across the street,
to the south of Cluckin' Bell. The tag is on the roof, above the sign
that says 'SIGN'. To get to the roof, go around to either side and climb
the fence(s) to get behind the building. There's a block that you can
climb onto, then climb up onto the roof.
7. Santa Maria Beach. At the end of the
dock with the ferris wheel, go to the southeast corner and up the
stairs. The tag is on the wall.
8. Santa Maria Beach. Behind the Pay-N-Spray, on ground level. The tag is on the south wall.
9. Rodeo. Look for the red 'RANCH' buildboard tucked between two buildings. The tag is on the wall below the billboard.
10. Rodeo. On the side of the Vinyl Countdown store.
11. Marina. On the wall by the dock, at the bottom of the east staircase.
12. Marina. On the corner of the building where the pier meets the street.
13. Verdant Bluffs. The tag is on the
roof of the observatory, on the wall of the northernmost dome. There's a
ramp spiraling up either side of the building for easy access.
14. Verona Beach. Just north of the Verdant Bluffs observatory, on the west side of a brownish-gray stone building.
15. Market. On my map, there's a low
section of roof where the dot for this tag is marked. Use a jetpack or
climb on top of a car to reach it.
16. Market. Directly across the street
from the small blue 'SPACEY' store, there is a multi-colored building
with a ledge indented into the second floor. The tag is on the wall at
the east end of this ledge. Climb on top of a car, or go around the west
side of the building to the stairs to reach it.
17. Market. On the northeast corner of a
building with windows that are supposed to be reflecting the road, but
just have a distorted image of the road.
18. Temple. On the east wall of the TransFender.
19. Vinewood. On the north side of a building - there's a building right next to it with six American flags hanging out front.
20. Market. On the northernmost
building that has the sides supported by angled stilts, go down the
steps to find the tag on the north wall.
21. Verona Beach. On the main strip
(you'll find Ammu-Nation further north on this road), look for a movie
theater called 'Legal', where 'Reservoir Dregs' and 'Return of the
Mullets' is playing. From here, cross the street and go to the building
to your right (north). Go up the steps and follow them around to the
east side of the building. Follow this to the end and you'll find the
tag on the wall.
22. Commerce. On the side of the
'Legal' building I referenced for tag #21. It's on the south wall, but
the tag is hard to see against the brick - look closely.
23. Commerce. On the north wall of the
building that looks like it could be a capitol or courthouse. It's to
the west of the center pillars, behind a palm tree.
24. Pershing Square. On the south wall of the police station.
25. Downtown Los Santos. At the top of some jaggedy stairs, the tag is on the wall to your left (west).
26. Mulholland Intersection. In the
parking lot under the Intersection, on the west side. The tag is on the
wall, next to a couple dumpsters. It's a little hard to see because the
tag's color almost matches the wall's.
27. Mulholland Intersection. There are
two on-ramps in the northeast corner of the Intersection. The tag is on
the wall of the eastern-most ramp.
28. Downtown Los Santos. At the base of a skyscraper with its sides supported by columns, the tag is on the northeast wall.
29. Commerce. Near some trees in a courtyard, in between some buildings.
30. Los Santos International. On the main level, on the south wall of the building with a lot of glass windows.
31. Los Santos International. Above the
east end of the tunnel. Follow the ledge on the south wall before the
tunnel - the tag is right above the tunnel's entrance.
32. El Corona. Near your safehouse on
the El Corona/Verdant Bluffs border. There are walls behind the houses
on the south side of the neighborhood. The tag is on the south side of
the green section of wall/fence.
33. El Corona. On the south wall of the sex shop - look closely; the tag blends in with the wall.
34. El Corona. On the west wall of an apartment, above the door.
35. El Corona. In the neighborhood of
your El Carona safehouse, the tag is on the east wall of the house at
the end of the street.
36. El Corona. On the east wall of the bar directly across the street from the tattoo parlor.
37. El Corona. On the south wall of the Liquor Mart. There is also 'LA RAZA MOVIMIENTO' graffiti on the wall as well.
38. El Corona. On the center dividing wall in the spillway tunnel.
39. Idlewood. On top of the gas
station's car wash. You can jump up to reach the ledge of the gas
station, or stand on a car and jump to reach the roof. The tag is on the
back of the carwash sign.
40. Little Mexico. On the north side of a big stone building - it looks like it could be a church.
41. Little Mexico. Across the street
and to the east of tag #40. It's on the east wall of that building (the
meeting place for one of the street races unlocked in San Fierro is at
this building).
42. Little Mexico. On the northwest wall of the building to the north of tag #41.
43. Idlewood. On the west wall of the Alhambra dance club.
44. Idlewood. On the side of one of the apartments on the west side of the freeway off-ramp.
45. Idlewood. On a wall in a courtyard of the buildings on the east side of the freeway off-ramp.
46. Jefferson. On the inside wall of a garage.
47. Jefferson. On the east wall of the hospital.
48. Glen Park. On the northeast corner of the fence at the skatepark, on the inside of the fence.
49. Glen Park. On the wall in the alleyway on the west side of the Optica building, across the street to the south of the pond.
50. Glen Park. Under the bridge, on the north wall of the pond.
51. Glen Park. On the wall of a courtyard, similar to that of tag #45.
52. Las Colinas. In between two houses,
on one of their walls (there are no well-known references, so you'll
have to see the map for this one).
53. Las Colinas. On the back of a house above the train tunnel, on the opposite side of the street of tag #52.
54. Las Colinas. On the wall of a brick slope.
55. Glen Park. Across the street and a
little west of tag #54, there is an o. range building and a blue
building. The tag is in the alley between them.
56. Jefferson. In the alley on the west side of the used car lot and behind the Urban clothing store.
57. Jefferson. In an alleyway across the street from the Urban clothing store and behind your safehouse.
58. Jefferson. On the south, outside wall of the hotel, below the stairs.
59. Las Colinas. In the entrance to the train tunnel, on the west wall.
60. East Los Santos. On the west wall of an underground carpark.
61. Jefferson. On church's north wall.
62. Jefferson. In the alley behind the deserted liquor store. It's hard to see against the wall, so look closely.
63. Las Colinas. On the south wall of an orange house.
64. East Los Santos. On the lowest wall of the huge set of stairs.
65. Los Flores. Across the street from
tag #64 is a blank billboard. Across from that is a orange/brown
building with a hedge in front of it. The tag is on that building.
66. East Los Santos. Across the street
to the south of tag #65 is a building that looks like an apartment with a
brick foundation. The tag is on the northern part of the west wall.
67. East Los Santos. From 'your'
entrance to Big Smoke's crack den, go south and into the alley on the
same side of the street. The tag is on your immediate left.
68. East Los Santos. In the same alley as tag #67. Enter the same way as before and to see the tag on your right.
69. Los Flores. In the south part of the alley across the street to the east of tags #67 and #68.
70. East Beach. Near one of the glass
windows on the west side of the road shaped like a backwards or
upsidedown 'S' (the curvy one).
71. East Los Santos. In the tunnel on the south side of the car wash.
72. East Los Santos. Across the street
to the south of tag #71, go a little west and you'll see a building
called Groceries, Productos Mexicanos. The tag is on the south side of
that whole building, behind the railing.
73. Las Colinas. On the east wall of an
apartment - it's the northernmost building on that main north/south
road running along the beach.
74. East Beach. On the wall of the apartment next go Colonel Fuhrberger's.
75. East Beach. Directly up the hill from tag #74, next to an armor pick-up.
76. East Beach. Look at the buildings
running along the beach and find the one with two green garage doors at
ground level. The tag is on the roof above that. To get up there, follow
that building north until you get to the garage doors that are mostly
green, but are yellow at the bottom. Jump to climb onto the roof of
that, then go east along the roof until you drop down. The tag is on the
wall you dropped down from.
77. East Beach. From the bottom of the
curvy 'S' road, look straight ahead, then a little to your left. You
should see a mult-story carpark with half-circle ramps sticking out
towards the road. The tag is right inside the first level of that
carpark, on the wall in the southeast corner.
78. East Beach. There is a pedestrian
bridge that crosses over the road running along the beach. On the west
side of that bridge is a parking lot. The tag is next to a couple garage
doors in the southwest corner of the lot.
79. East Beach. On the southeast wall of the Los Santos Forum.
80. Playa Del Seville. On the wall facing the beach, just south of the short pillars that run out into the water.
81. Playa Del Seville. On the north
wall of the east green apartment complex, across the street to the south
of the Los Santos Forum. The tag is green, as is the wall it's on, so
look very closely.
82. Playa Del Seville. On the outside of the east wall of the electrical plant.
83. Playa Del Seville. From tag #81,
walk around to the east side of the building until you get to the
tunnel/garage. The tag is on the short wall on the east side of that
tunnel.
84. Playa Del Seville. On the northwest wall of the basketball court.
85. Ocean Docks. Across the street to the west of the big tanks. The tag is on the south end of the wall.
86. Ocean Docks. On the center wall of the flood control spillway, under the bridge.
87. Willowfield. Behind your safehouse
you'll find some shops. The tag is on ground level, on the wall between
Sushi Man and Hong Kong Deli.
88. Willowfield. On the south wall of the 98 cent store at the end of the street your safehouse is on.
89. Willowfield. On the south wall of the Cluckin' Bell.
90. Ganton. On the southwest wall of the bridge above the entrance to Grove Street.
91. Ganton. On the south wall of the un-enterable barbershop next to the Binco clothing store.
92. Idlewood. On the north-inside wall of the hotel behind the Well-Stacked Pizza parlor.
93. Idlewood. Across the street to the
north of the Pay-N-Spray. The tag is on a wire window just west of the
Wholesale Produce building.
94. Willowfield. Across the street from the liquor store with a yellow sign. The tag is next to a Sprunk vending machine.
95. El Corona. On the outside, southeast, wall of a tunnel in the flood control spillway.
96. Willowfield. On the front, east, wall (the building is diagonal NW-SE) of a small warehouse/storage building.
97. Ocean Docks. On the east corner (another diagonal building) of a blue train loading dock.
98. Ocean Docks. On the bridge's notheast support beam (on the same level as the actual bridge).
99. Ocean Docks. On the east side of
some crates in between a couple blue-gray storage buildings. The
buildings and crates are lower than the street level.
100. East Beach. At the top,
northern, curve of the S-curve road, go into the alley to reach the next
street. Directly across this street, go up the small staircase to find
the tag on the wall.
For your convenience, here's the map again.
===========================================================
Collection: 50 San Fierro Photo Ops
When taking pictures, you're
looking for floating camera icons (circles with a silhouette of a camera
in the middle; they're only visible when looking through the camera).
They're easy to see at night, because they glow, so if you're doing this
during the day, keep your eyes peeled. Just like with the other
Collections, you'll get a reminder saying you've got a photo op after
every one, in case you're not sure. If you're sure you got the pic, but
don't get the message, it means you didn't zoom in on the icon enough.
But before you can do any of this, you're going to need a camera. If
you're already in San Fierro, there's always one at the Burger Shot in
Garcia. Otherwise, you can find one in your room on Grove Street. You
can save the pictures if you like, by using L1 instead of Circle to take
the pictures. Just like with the Los Santos Tags, I tried getting them
in an order that wouldn't have you traveling back and forth across town,
but I overlooked one again, which I turned into #50.
Click here to see the map showing exact locations of each Photo Op.
1) San Fierro. Floating above the north end of the bridge on the northwest side of Mt Chiliad.
2) Missionary Hill. Floating next to the red and white metal tower, about next to the second-highest horizontal bars.
3) Foster Valley. On the map, south of San Fierro, you'll see a row of five white circles, representing circular buildings. The icon is floating above the second building to the north.
4) Foster Valley. Just east of photo op # 3, there is a building with a clear glass ceiling. The icon is floating above the north side. Stand by the tall rock and you should be able to see it from there.
5) Easter Bay Airport. At the main entrance to the airport, the icon is floating in front of the billboard with the airplane sticking out of it.
6) Red County. Just east of the Easter Bay Airport, there's a bridge going over some water. The icon is floating over the bridge.
7) Easter Bay Airport. In the northeastern area of the airport, you'll find three white/cream-colored tanks. The icon is floating in between the two northwesternmost ones.
8) Easter Bay Airport. In the northern area of the airport, there is a tall building with a rod sticking straight up. The icon is floating at the top of that rod.
9) Easter Basin. It's floating above the southwest end of the big, empty boat dock where you do the NRG-500 Challenge.
10) Doherty. Directly east of the red 'S' icon, there are two tall tanks, with the icon floating in between them.
11) Avispa Country Club. In front of the tall tower, near the top.
12) Avispa Country Club. Above the tennis courts.
13) Garcia. Behind Burger Shot, there's a construction site. The icon is floating in front of the company's sign on the north wall.
14) Hashbury. On the east-west road northeast of the SubUrban clothing store, the icon is floating above the festival banner.
15) Hashbury. From the church in Ocean Flats, look across the street to the east. The icon is floating up near the powerlines, in about the middle of the block.
16) Ocean Flats. There's a rod protruding from the top of the church; the icon's at the bottom of it.
17) Queens. Above the Hippie Shopper, on the side where you collect your asset prophet (that's if you've completed the courier; if you haven't, it's the side with the motorcycle parked out front).
18) Ocean Flats. Above the 'Wizard of Ass' sign.
19) Garcia. Floating above home plate in the northern baseball field.
20) Cranberry Station. Floating in the center of the glass roof, above the train tracks.
21) Doherty. At the top of the tall yellow crane in the construction yard behind your garage.
22) King's/Queens. Under the green awning at the hotel you can buy.
23) Queens. On the back side of your hotel, in the center.
24) City Hall. In front of the City Hall building.
25) City Hall. Behind the dome on top of City Hall.
26) Palisades. In the center of the donut on top of the donut shop near your Paradiso safehouse.
27) Juniper Hill. Above the entrance to the Supa Save.
28) Chinatown. Above the red and blue Chinese-style entrance to Chinatown, right next to your safehouse.
29) Chinatown. South of photo op #28, there is a yellowish building with a Chinese-style tower above it. The icon is floating near the top of the tower.
30) King's. There's a building with a gray awning that says W's. Above that is a very tall tower. The icon is floating near the top, on the east side.
31) King's. Just northeast of photo op #29, there's an L-shaped building with four pillars at the top. The icon's floating up there.
32) Downtown. Just northeast of photo op #30, there are three tall office buildings grouped fairly close together. The icon is floating in between the two northeastern buildings.
33) Easter Basin. Above the spinning Xoomer gas station sign.
34) Easter Basin. Near the front of the aircraft carrier, above the anti-aircraft gun. If you don't want to get the 5-start wanted level, take a boat out to the other blip I have marked on the map.
35) Garver Bridge. It's in between the southernmost bridge supports, in the center, by the lowest horizontal cross-beam.
36) Garver Bridge. In between the northern support, in the center, near the top.
37) Downtown. Inside the Zombotech building, in the center of the golden sculpture.
38) Esplanade East. In front of the clock on the clock tower.
39) Financial. On top of the Vank Hoff Hotel, at the tip top of the radio tower.
40) Financial. On the north side of an office building, about half-way up.
41) Downtown. In front of the high-up statue.
42) Calton Heights. Over the twisty road near your safehouse.
43) Calton Heights. Over the east entrance to the tunnel heading towards Katie's house.
44) Juniper Hollow. Next to the spinning burger above Burger Shot.
45) Gant Bridge. In between the souther supports, by the second-lowest horizontal beam.
46) San Fierro Bay. Over the ship northeast of Jizzy's (east side of the Gant Bridge). The icon is floating near the top of the tall wooden pillar with a bunch of short horizontal beams on it. You won't be able to see it from land, but if you don't feel like getting a boat, just stand at the water's edge near Jizzy's, zoom in near the top of the pillar and take your picture. The game will know that you know it's there.
47) Esplanade North. Floating above the USS Numnutz submarine.
48) Esplanade North. In front of the green Pier 69 sign.
49) Esplanade North. Just northeast of photo op #48, above the rocks.
50) King's. Hovering above a tall brick chimney-looking tower. =========================================================== Collection: 50 Las Venturas Horseshoes Location: The horseshoes are scattered all around Las Venturas, and you don't need any special equipment to pick them up. Prerequisite: None Reward: Luck +, and the M4, MP5, Combat Shotgun, and Satchel Charges spawn in front of the Four Dragons Casino. Tips: Get the jetpack from your safehouse; it'll make getting to each horseshoe a lot faster. Click here to see a map showing the exact location of each horseshoe. I started by going clockwise around the outside of the freeway, then counter-clockwise in town. 1. Las Venturas: Under the 'Welcome to Fabulous Las Venturas' sign in the northwest corner of the city. 2. Prickle Pine: In front of the door of the northeasternmost house by the railroad. 3. Yellow Bell Golf Course: On the roof of the building at the golf course, in front of the northwest window. 4. Prickle Pine: In the pool near the tennis courts. 5. Prickle Pine: Behind the gate-door of the southeast tennis court. 6. K.A.C.C. Military Fuels: By the northwest corner of the northeast building. 7. Creek: In the east corner of outside of the shopping center. 8. Rockshore East: Floating above a dumpster behind the southeast corner of a warehouse. 9. Rockshore West: Behind a house, next to a blue recycling canister. 10. Rockshore West: Behind a house. 11. Randolph Industrial Estate: Under the freeway leading to Los Santos. 12. Blackfield Chapel: On the roof of the church, on the east side. It's easy enough to run up the side. 13. Greenglass College: On your map, the horseshoe is in the center of the green circle with the gray 'X'. 14. Whitewood Estates: Hovering above the bushes in front of an unmarked building that looks like it could be a strip mall or offices. You'll have to jump to reach the horseshoe. 15. Whitewood Estates: Behind a big red warehouse. 16. Pilson Intersection: On top of a narrow blue wall. You'll have to use a jetpack or stand on a car to reach it. 17. Redsands West: There's a stack of cargo crates in the area. The horseshoe is on the west side of one stack, and you'll need the jetpack to reach it. 18. Redsands West: On top of the Casino, overlapping the steakhouse with the red roof. 19. Las Venturas Airport: Kind of out in the open, in the northwest corner of the airport. 20. Las Venturas Airport: Like #20, it's out in the open. On the east side of the north curve in the airstrip. 21. Las Venturas Airport: Behind the main building, on the right (south) side of the center part covered in blue windows. 22. Blackfield Intersection/LVA Freight Depot: On the southwest side of the Sumo building. 23. LVA Freight Depot: In the southeast loading ramp of the south building. 24. The Four Dragons Casino: On the roof of the garage used in some casino missions, such as 'Fender Ketchup'. 25. Come-A-Lot: On top of the Come-A-Lot sign. The only way to reach this is with the jetpack. 26. Las Venturas: On the west side of the roof of the wedding chapel. 27. Come-A-Lot: In the center of the main casino, there are a bunch of towers with colored cones on top. The horseshoe is on the tower that doesn't have a cone, in the north of this area. 28. Come-A-Lot: This one is easy to miss. From the casino, go two blocks east and you'll see a yellow building. On the east side of that is a red building with stairs leading up to the top. The horseshoe is in the center balcony on the southeast side of this building. 29. The Camel's Toe: Surrounding the entire pyramid there is a ledge held up by pillars. This horseshoe is on the east ledge, in about the middle. 30. The Camel's Toe: On the tip top of the pyramid. 31. Royal Casino: In the northwest corner of the third floor of the multistory carpark. 32. Pirates in Men's Pants: Next to the mouth of the statue of the skull. 33. The Clown's Pocket: On the roof, on the west side of the part that looks like a circus tent. 34. The Visage: Under the second waterfall from the north, near the top. 35. Starfish Casino: In an alleyway between the casino and a 24-7. 36. Starfish Casino: On the south side of the Cluckin' Bell, there's a narrow ledge with a sign for 'Venturas Steaks Drive-Thru'. The horseshoe is on that ledge. 37. Starfish Casino: On the ledge above the Zip clothing store. 38. Julius Thruway East: On the billboard advertising the Victim clothing shop. 39. Old Venturas Strip: Across the street from the big rainbow, the horseshoe is in front of the word 'CASINO' in yellow/orange letters. 40. Roca Escalante: Enter the train tunnel from the north to find the horseshoe after the first curve. The map shows both the entrance to the tunnel and the location of the horseshoe. 41. Roca Escalante: On the roof of the Erotic Wedding Chapel. 42. Roca Escalante: In the pool at the V-Rock Hotel. If you haven't started on the Oyster Collection yet, be careful not to pick up the oyster that's under the diving board. 43. Julius Thruway North: West of the Well-Stacked Pizza parlor, next to some garages. 44. The Emerald Isle: Just south of horseshoe #43, on the east side of the car wash. It's in between a short wall and the pole supporting the 'Cok-O-Pops' billboard. 45. The Emerald Isle: On top of the Emerald Isle skyscraper. The top of the building is barely reachable by jetpack, so it might take a few tries. When you're going up, try being up against the building; it seems to allow you to go higher. 46. The Emerald Isle: Below the 'Strain Hard' billboard, in an enclosed area. 47. The Emerald Isle: On top of the building on the south side of horseshoe #46. 48. The Emerald Isle: On the east side of the multistory carpark that sits in the next 'area' over, Redsands East. The horseshoe is next to a low, blue wall. 49. Redsands East: On the back balcony of a hotel. 50. Redsands East: On top of the building west of the gym. =========================================================== Collection: 50 San Andreas Oysters Reward: Sex Appeal and Lung Capacity + Just as a heads up, all oysters will be under water. Click here to see the map with each oyster's exact location. 1. Ocean Docks, Los Santos: At the end of the small wooden dock near tag #80. 2. Ocean Docks, Los Santos: Next to the southeastern staircase that goes down to the water. 3. Ocean Docks, Los Santos: Under the bridge in the center of the Ocean Docks island. 4. Ocean Docks, Los Santos: Under the bridge in the southwest corner of the Ocean Docks island. 5. Los Santos: Along the beach on the southwest corner of Los Santos International. This oyster is very easy to miss, so I tried to get the dot on the map as exact as possible by relating it's location to other things on the map. If you go to your map at the pause menu, line up the curser so that the vertical line is at the west edge of the two circular freeway turns on the west side of the airport and the horizontal line runs along the southern edge of the tunnel south of the airport. The oyster should be around the location where the lines intersect. 6. Verdant Bluffs, Los Santos: It's right up by the wall of the ocean, near the south end of the tunnel. 7. Verona Beach, Los Santos: Under the pedestrian bridges on the beach. 8. Santa Maria Beach, Los Santos: At the end of the pier with the lighthouse. 9. Marina, Los Santos: Under the northernmost bridge over the strip of water. 10. Glen Park, Los Santos: In the pond. 11. Mulholland, Los Santos: In the pool at Madd Dogg's mansion. 12. Fisher's Lagoon: At the end of the dock with the rickety wheel chair. 13. Red County: Under the bridge that's closest to the freeway's, just northwest of Palamino Creek - the town on the northeast corner of Fisher's Lagoon. 14. Red County: Under the wooden bridge just southeast of Blueberry. 15. Red County: Just off the beach across the water from the San Fierro Airport's landing/takeoff strip. 16. Red County: Under the bridge southwest of Blueberry. 17. Flint County: From oyster #16, follow that road south to the next bridge - you find the tag underneath. 18. Richman: Under the railroad bridge, just southeast of oyster #17. 19. Flint County: Under the freeway bridge at the Flint Intersection. 20. Flint County: In the water on the west side of the freeway, near the trailer park. 21. Flint County: Under the highway bridge in the south-central part of Flint County. 22. Flint County: Under the first wooden bridge north of oyster #21. 23. Whetstone: Under the bridge on the east side of Mt Chiliad. 24. Mt Chiliad: Under the bridge on the northwest side of Mt Chiliad. 25. Missionary Hill: In the pond on the northwest corner of Missionary Hill, just south of the Avispa Country Club in San Fierro. 26. Easter Basin: Under the front of the cargo ship where you deliver the cars from the Export/Import missions. 27. Red County: At the end of the runway of San Fierro's Airport. 28. Easter Basin: South of the aircraft carrier there are three covered boat docks; the oyster is in the middle one, but not too far in. Going anywhere near here will get you a 5-star wanted level, so be quick. 29. Easter Basin: Under the front of the aircraft carrier. 30. Garver Bridge: Between the two center supports of the bridge. 31. San Fierro: Under the front of the cargo ship that's floating near the northeast corner of Esplanade North, San Fierro. 32. San Fierro Bay: Under the west side of the cargo ship on the southeast side of the Gant Bridge. 33. Gant Bridge: Under the south end of the bridge, between the sand and the bridge support. 34. Gant Bridge: Between the northern support and the cliff that's just a few feet north of it. 35. Tierra Robada: Across from the Bayside Marina, where a big rock juts out from the coast. 36. Tierra Robada: Along the coast, where the road is very close to the water. 37. Tierra Robada: Directly east of oyster # 30, where the water cuts into the land a little ways. The oyster is under the eastern bridge. 38. Tierra Robada: Just east of oyster #37, side the small boat garage next to the skinny dock. 39. Tierra Robada: Under the bridge on the south side of Las Barrancas. 40. The Sherman Dam: Under the west control tower bridge on the north side of the dam. 41. Tierra Robada: Under the high wooden bridge northwest of the Sherman Dam. 42. Valle Ocultado: Under the plane parked near the dock that's on the southwest corner of Valle Ocultado. 43. Bone County: Near the northern coast, near where part of the coast goes into the water (like a ramp or steep path). I tried to get the dot as exact as possible on the map. 44. Las Venturas: At the northeast corner of the map, a boat always spawns just off the coast. The oyster is under the boat. 45. Roca Escalante: Under the diving board at the V-Rock Hotel. If you haven't started the Las Venturas Horseshoe collection yet, be careful not to pick up the one that's in this pool. 46. The Visage: Under the second-southern waterfall at The Visage on The Strip. 47. Pirates in Men's Pants: Just south of oyster #46, it's in front of the skull. 48. Pilgrim: In the only pool in the area. 49. Come-A-Lot: In the pool on the north side of the bridge/walkway. 50. Frederick Bridge: On the north side of the bridge's center support. =========================================================== Courier Location: Los Santos: Roboi's FoodMart in Commerce San Fierro: Hippy Shopper in Queens Las Venturas: Burger Shot in Redsands East Prerequisite: None Reward: Each building you do the missions for turns into an asset property, earning money you can pick up regularly. See individual missions for details. Quick overview: Courier missions are basically like a paper route you may have had as a kid. You drive a bike around and throw a package through the red corona (drive-by style). Get to the coronas as fast as you can, but slow down to make sure you get the package delivered; you'll want to save as much time as possible, so get it right the first time. There are four stages to each courier that you must complete for them to count towards 100%, and they must be done in one run-through. After one stage ends, stay on your bike for a minute and wait for the next one to begin. Tips: If you miss a target, drive over the package to pick it up again! Every package you have left over at the end is worth $100. Los Santos Get on the bicycle at Roboi's Food Mart in Commerce, Los Santos to begin. It's tucked away between two buildings, so if you can't find it, look for an orange "Rampage" billboard. It's right across the street. Stage 1: There are three coronas to deliver to. Two of them are right near Roboi's, and the other is at the police station in Pershing Square. Once they're all delivered, head back to Roboi's to get your cut. Don't get off your bike, the next stage will start in a second. Stage 2: You now have four coronas to deliver packages to. The quickest route is in a circle. Get to the package in Market first, then in Temple, then Idlewood, then finally Verdant Bluffs (look at the map in the pause menu and move the crosshairs over the blips to see their locations). By sprint-pedaling, I was able to deliver all packages with 2:30 left over. When they're all delivered, head back to Roboi's and wait for the next stage. Stage 3: Now you have 5 coronas to deliver to. Pause the game and look at your map. First, hit the closest corona, in Conference Center, then the one in Verona beach, then the police station in Pershing Square, then Idlewood, and finally Verdant Bluffs. When you're done, head back to Roboi's to get your cut and wait for the final stage. Stage 4: You have six deliveries to make. Pause the game right away and look at your map. First, hit the two at Santa Maria beach to the southwest. Next, go north to the one in Vinewood, then east to the one in Temple. Next, go to the far east side of Los Santos and deliver the one in East Beach, then finally go south and deliver the one in Playa del Seville. That final one is tucked away between two giant tanks, so watch out for that. Once you're done, look at your map and find the quickest way back to Roboi's to collect your final cut. Reward: Roboi's is now an asset property. It will generate up to $2000 a day, so collect it regularly San Fierro Get on the motorcycle in front of the Hippy Shopper on the south side of Queens, San Fierro to begin this courier. Stage 1: You have three minutes to deliver three packages. They're all nearby, so drop them off in any order and get back to Hippy Shopper to get your cut and wait for the next stage. Stage 2: Now you have five minutes to deliver 4 packages, and these ones are, as expected, more widespread. Your quickest path is probably to hit the targets in a circle on the map. First, go west to the one in City Hall, then northeast to the one in Chinatown, then east to Downtown, then finally the one in Garcia. When they're all dropped off, head back to the Hippy Shopper to collect your cut and wait for the next stage. Stage 3: 5 minutes, five deliveries. Again, go in a circle: Ocean Flats, Palasades, Paradiso, Chinatown, Doherty. Then head back to Hippy Shopper. Stage 4: Six deliveries in six minutes. Juniper Hollow, Downtown (east corona), Downtown (southwest corona), Cranberry Station, Hashbury, Avispa Country Club. Head back to Hippy Shopper to complete San Fierro's Courier mission. Reward: The Hippy Shopper becomes an asset, generating $2000 a day; pick it up regularly. Las Venturas Get on the Faggio at the Burger Shot in Redsands East, Las Venturas to begin this courier. You should know what to do by now, so I'll just give you a quick route for each stage. Look at your map to find the locations. Stage 1: Three minutes, three deliveries. Easy enough. Stage 2: Five minutes, four deliveries. Airport (north), Airport (south), Camel's Toe, Strip. Stage 3: Five minutes, five deliveries. Redsands East, The Strip (north), The Strip (south), Airport, Redsands West. Stage 4: Seven minutes, six deliveries. Roca Escalante, Spinybed, Prickle Pine, Redsands West, Whitewood Estates, Blackfield. Reward: This Burger Shot is now as asset property, earning $2000 a day; pick it up regularly. =========================================================== Exports Prerequisite: Complete the mission 'Customs Fast Track' Reward: Cars are open for importing on certain days of the week. Overview: Go to the docks in Easter Basin, San Fierro. Near the big yellow crane is a chalkboard with a list of cars you need to deliver onto the nearby ship. Every time you deliver a car, it will be available for import on certain days of the week (hold L1 while CJ is on foot to see what day it is). You also start out with three cars (Club, Jester, Perennial) that are available for two days of the week. Then, for every five cars you deliver, another, more rare car will become available for importing. You can use the crane to lift the cars onto the ship and into the marker, or you can drive the cars up the ramp. If you use the ramp, the marker probably won't be visible, but after you've used the crane a few times, you can guess where it is and get out of the car to collect your reward. It's also easier to damage your car by using the ramp, but it's quicker than the crane. Once a list is completed, you earn an extra $215,000. Tips: -Don't damage any of the cars you're delivering. The more damage, the less money you get for it. -Buying all the safehouses in San Andreas is one of the requirements for 100%. This is the perfect mission to raise all that money quickly. List 1 Deliver 5 cars from the list: Monster is available for import. Deliver 10 cars from the list: Windsor is available for import. Patriot - One of the hardest land vehicles to obtain in the game. You can steal one from Area 69 in the desert, or next to the aircraft carrier (the one you steal the Hydra from) in Easter Basin, San Fierro. Either way, you'll attract a five-star wanted level (get to a safehouse and save your game to get rid of the heat - your car will still be waiting for you outside). There's also one parked in the parking lot of Easter Bay Chemicals, just east of the airport. Deliver it undamaged to recieve $40,000 and the ability to import it. Sanchez - These are very common out in the country and desert, but you can find some parked on the south side of Mt Chiliad, near the finish line for the Chiliad Challenge races. There's also one parked in southern Queens, San Fierro, almost exactly on the northern border of Hashbury. From your Hashbury safehouse, at the west exit, go north to your second right. Immediately after you turn right, look to the left and find the dirtbike in the small alley. Deliver it undamaged to earn $10,000. It's now available for import. Stretch - One is parked behind Wang Cars in San Fierro, but only while it's on the list. Deliver it undamaged to get $40,000. It's now available for import. Feltzer - Pause the game and look at your map. If you exit Los Santos on the west side, over the small bridge near the trailer park, the freeway continues south, then curves west and heads toward Angel Pine. In the south-to-west curve in the freeway, there are two small gray areas on the east side of the north-bound lane (not where a road bridges over the freeway - further south). In the northern one is a motel, and in the parking lot is the Feltzer. If you go there and don't see it, leave the area and come back and it should be there. Note that the Feltzer is only parked here while it's listed on the export board in Easter Basin. Deliver it undamaged for $35,000 and the ability to import it. Remington - These lowriders look like old Cadillacs. There is one parked at unity station, in the parking lot where you did the low rider challenge, and they're fairly common to see driving around Hashbury, San Fierro. Note that the one parked at Unity Station is only available while it's listed on the board in Easter Basin. Deliver it undamaged for $30,000. You can now import this vehicle. Buffalo - There's always one parked next to Catalina's house in Fern Ridge, northwest of Los Santos. Deliver it undamaged and get $35,000. It's now available for import. Sentinel - In Vinewood, Los Santos, you'll find a movie studio with two water towers on the property. If you can find the area with four tennis courts, it's across the street to the east. Go around the block to find the entrance, then go to the southeast corner of the area and the Sentinel is parked between two small buildings. Deliver it undamaged to recieve $35,000. Note that this car is only parked here while it's needed for the list. You can now import this vehicle. Infernus - From your safehouse in Paradiso, San Fierro, drive west to the first north/south street you come across. Follow that north and turn on your second right. At the top of the first part of the hill (before you reach the next north/south street), there is an Infernus parked on a driveway along the road; it looks like a Honda/Acura NSX. Deliver it undamaged for $95,000 and the ability to import it. Camper - These hippy buses are found all around Hashbury and the surrounding areas in San Fierro. If you can't see one on the streets, look at your map in the pause menu. See the clothing shop in Hashbury, just north of your safehouse? A Camper is parked in the alley behind the clothes shop. Deliver it mint for $26,000. You can now import this vehicle. Admiral - There's always one parked in Verona Beach, Los Santos in the parking lot of a building called 'Papercuts'. A safe delivery earns you $83,949 and the ability to import it. List 2 Deliver 5 vehicles: the Bandito is available for import Deliver 10 vehicles: the Turismo is available for import Slamvan: In El Corona, Los Santos, there is one parked behind a "Nude & XXX Shop", directly east of your safehouse on the border between El Corona and Verdant Bluffs (go through the alley with garages and the shop is at the east end). It's only there while it's on the list, and is worth $19,000 undamaged. Blista Compact: Enter San Fierro's airport from the main entrance, and right after you pass under the sign with the airplane flying over the Golden Gate Bridge, look to your right. The Blista is parked at the bottom of the red satellite-looking thing. It's only available here while it's on the export list, and is worth $35,000 undamaged. Stafford: There's a hotel you can buy in Queens, San Fierro. This car is parked out front, next to the staircase, but only while it's on the list. Deliver it unamaged and get $35,000. Sabre: One is parked in the parking lot of the baseball fields in Garcia, San Fierro, but only while it's on the list. Don't scratch it and you'll get $19,000. FCR-900: One is parked in Roca Escalante, near the building with the Well-Stacked Pizza parlor. Or, if you've gotten atleast all silver medals in bike school, you can find it in front of the school in Blackfield, Las Venturas. It's worth $10,000. Cheetah: From your safehouse in Prickle Pine, go north, to the end of the street and look across the street and to the west. At the last house, a Cheetah should be parked in the driveway. Most cars that park here park perpendicular to the house, but the Cheetah will park diagonally on the driveway, and only while it's on the list. The thing is, I've only seen it there once, and I was being chased by cops at the time, so I didn't stop to pick it up. Cheetahs commonly drive around that safehouse anyway, so you're better off just driving around Prickle Pine until you come across one. The more sporty the car you're driving, the more likely you'll see the Cheetah. Deliver it undamaged for $105,000. Rancher: Go to EasterBoard Farm in Blueberry Acres (just west of your safehouse in Blueberry). Enter the farm through the main (south) entrance and go left at the fork in the dirt road. The Rancher should be on your immediate right, but only while it's on the list. Undamaged, it's worth $40,000. Stallion: In Juniper Hollow, San Fierro you can find one parked in front of the Supa Save. It's only parked there while it's on the list and is worth up to $19,000. Tanker: These semi trucks are driving all over the countryside and desert, but to find one parked, atleast while it's on the list, you'll have to go to Tierra Robada. Find the boating school in the northwest corner of your map and look directly east. Right after the water, there is a gray shape next to the freeway. There, you'll find a diner called 'Jays', with a Tanker parked next to it. Deliver it undamaged to earn $35,000. Comet: While it's on the list, you can find it in the parking lot of the Avispa Country Club in San Fierro, next to the tennis courts. It's worth up to $135,000.
List 3 Deliver 5 cars: Vortex (hovercraft) available for import. Deliver 10 vehicles: Bullet available for import. Blade: There's always one parked in a driveway down the street from your safehouse in El Corona, Los Santos. It's worth up to $19,000. Freeway: These motorcycles are very common driving around the countryside and desert. Otherwise, one is always parked at the gas station next to the building where you do the Trucking odd job. It's worth up to $10,000. Mesa: While it's on the list, the Mesa is parked at the bottom of Mt Chiliad, by the finish line for the Chiliad Challenge bike races. It's worth $25,000 undamaged. ZR-350: While it's on the list, it's in the parking lot of the Clown's Pocket (you can buy a safehouse there), off The Strip in Las Venturas. It's worth up to $45,000. Euros: While it's on the list, it's parked under the giant statue at the Camel's Toe in Las Venturas. Deliver it undamaged for $35,000. Banshee: There is always one parked next to the gym in Garcia, San Fierro, and it's worth up to $45,000. Super GT: If you've got atleast all bronze medals at the driving school, it's parked out front. Or you can find it parked behind the northernmost control tower at San Fierro's airport. Deliver it undamaged to earn $105,000. Journey: Another vehicle common driving around the countryside and desert. This camper is otherwise parked at the top of Mt Chiliad. It's worth up to $22,000. Huntley: This Range Rover look-alike is parked in front of the driving school in Doherty, San Fierro, just down the street from your garage. It's only there while it's on the list, but worth $40,000 undamaged. BF Injection: It's parked on the beach, directly south of Angel Pine. Or on the south end of the beach in San Fierro, directly west of the building on top of Missionary Hill (almost exactly west of where the road ends). You can also find it on Verona Beach in southwest Los Santos, near the arched wooden bridges; it's only there while it's on the list. Deliver it undamaged for $15,000. Imports After all three lists are delivered, here are each days' available cars and their costs. Sunday -Club $28,000 -Camper $20,800 -Sanchez $8,000 -Stafford $28,000 -Tanker $28,000 -Vortex $20,800 Monday -Perennial $8,000 -Stretch $32,000 -Buffalo $28,000 -Sabre $15,200 -Turismo $76,000 -ZR-350 $36,000 Tuesday -Jester $28,000 -Vanity Plates: G MAN, SWAV -Remington $24,000 -Admiral $28,000 -Bandito $12,000 -BF Injection $12,000 -Blade $15,200 Wednesday -Club $28,000 -Feltzer $28,000 -Windsor $28,000 -Cheetah $84,000 -Huntley $32,000 -Mesa $20,000 Thursday -Perennial $8,000 -Monster $32,000 -FCR-900 $8,000 -Rancher $32,000 -Banshee $36,000 -Journey $17,600 Friday -Jester $28,000 -Infernus $76,000 -Slamvan $15,200 -Stallion $15,200 -Super GT $84,000 -Euros $28,000 Saturday -Sentinel $28,000 -Patriot $32,000 -Blista Compact $28,000 -Comet $28,000 -Freeway $8,000 -Bullet $84,000 =========================================================== Firefighter Location: Get in any firetruck Prerequisite: None Reward: CJ becomes fireproof Get into a firetruck and press R3 to begin. Once you start, a blue blip will appear on the radar. This represents a fire you need to put out. In order for these missions to count towards 100% game completion, you'll need to complete level 12 in one run. As the missions progress, more cars will appear on the map at once, and the people that get out will be on fire and will run away - you'll have to put them out. If you let a person die (time runs out, they fall off a bridge, etc) or you die/get busted, you fail the mission and have to start over from level 1. Put out fires by pressing Circle or L1 to spray water out of your turret. You can aim the turret with the right analog stick. =========================================================== Freight Train Location: On a train Prerequisite: Complete the mission, 'Yay Ka-Boom-Boom' Reward: $50,000 and free transportation Go to any one of San Andreas' train stations and wait for a train to come in. Or, if you come across one while roaming around the state, follow it to the next station. When it stops, go up to the door and enter it like you would any other car and press R3. You must make five successful deliveries to in a row to complete a level, which there are two of. It's easy enough; get to the next train station, stop in the corona, then head to the next. The only part that should be remotely hard is getting the train to stop, but once you get used to how long it takes, it's pretty easy. Also, do not take the train above a speed of 50 or you'll derail it (your controller will rumble and the train will shake once you reach about 48). 45 is all you need. There are two stations in both Los Santos and Las Venturas, and one in San Fierro, meaning a level is complete when you've delivered to the station you got on the train. Once level one is done, get out of the train and get back in and press R3 to start level 2. Once that's done, you get your reward. =========================================================== Gym Location: Marked on the radar by a red dumbell. Los Santos: Ganton, near Grove Street. There's also some exercise equipment on Verona Beach. San Fierro: The Cobra Martial Arts gym is in Garcia, next to the Burger Shot. Las Venturas: Below the Belt is in Redsands East, next door to a bomb shop. Prerequisite: The Los Santos gym opens after you complete Sweet's mission 'Drive-Thru', and the other two are opened as soon as you open the cities. In order to be able to start learning new fighting moves, you'll have to level up your Muscle once. Reward: New fighting moves learned, one step closer to 100% game completion. Tips: If you lose 40% Fat, gain 20% Stamina, or build 20% Muscle, you will reach your daily limit and will not be able to work out for another 12 hours. In order for these to count towards 100%, you'll need to go into each gym, walk into the red marker, and learn the new fighting moves. It's as simple as that. While you're there, you might as well work out: -Treadmill: Gain Stamina and burn Fat. You simply run in place, with a choice of 10 different speeds. Press X as fast as you can or you'll fall off. To switch the speed up or down, press right or left on the D-pad, respectively. -Stationary Bike: Gain Stamina and burn Fat. As the name suggests, it's exactly like biking, only you're staying in one place. There are 10 different levels, each providing different amounts of resistance. -Bench Press: Gain Muscle and burn Fat. Lay down on the bench and lift barbells. You have a choice of weight ranging from 40 to 320 pounds. The more Muscle you have, the more powerful your punches become. -Dumbells: Gain Muscle and lose Fat. You... well, lift dumbells. Weights ranging from 20 to 110 pounds. More Muscle equals a more powerful punch. -Punching Bag: This doesn't really help anything, just something to practice punching. Or, if you're making a movie out of San Andreas' freeroam and need a dramatic training scene, this is perfect! =========================================================== NRG-500 Challenge Location: Near export/import crane in Easter Basin, San Fierro Prerequisite: None Reward: Closer to 100% game completion When you were doing the export/import odd job, you may have noticed a big empty boat dock next to the crane. On the west corner of that dock is an NRG-500 racing motorcycle. Get on it to automatically start this challenge. You have 10 seconds to collect your first corona before time runs out and you fail. First, go straight (not down the ramp), get the first corona, then cross the bridge for the second, grab the nearby third, then drop down into the empty dock. Quickly go up the ramp to get the two rings, then go back down and collect the three on the floor and the two on the low wall. Now you have 7 rings floating high above the outer edge of the dock. Get as much speed as you can and ride up the side to jump at each of them. This will probably take you quite a few tries to learn the right spots to hit and the quickest paths to each ring. If you want, you can always come back to beat your last time. =========================================================== Paramedic Location: Get in an ambulance anywhere, anytime. Prerequisite: None Reward: Money for each level completed, plus Max Health grows to 150 (up from the standard 100) Get into an ambulance and press R3 to begin the missions. You'll need to complete level 12 for these missions to count towards 100% game completion. After you press R3, a blue blip will appear on the radar, somewhere in your immediate area. That blip represents an injured person that needs a ride to the hospital. Get to the blip and the person will get inside. As you progress through the missions, more and more injured people will appear on your radar at once, so you'll have to pause the game to look at your map and plan the quickest routes. Your ambulance has a limit of 3 passengers, so you'll have to take multiple trips in the higher levels. Each person picked up adds more time to your clock; just be careful not to run over any patients. Tip, submitted by hobson:
"Go to Angel Pine and then all the patients are within that village and nowhere else. Minimal traffic as well so the job is done in literally 5 minutes." =========================================================== Pimping Location: Get in any Broadway Prerequisite: None Reward: -You get a cut from each of your girls' dates -Prostitutes pay to see you, instead of the other way around Tip: This is a good mission to start early on in the game, as it raises your driving skill. To start this mission, get in a Broadway (see the above pic); any Broadway, as they can all do this. If you're in Los Santos, there's one parked behind the gas station in Idlewood. Get in the car and press R3. Pimping is basically the same thing as 'Taxi', but you only deal with two customers, dropping them off at different points. Go pick up the girl by following the blue blip on the radar. Now you need to drop her off at the yellow blip (the hooker I picked up wanted to be dropped off at a church...!); try to get there before the timer runs out. When you drop her off, you'll have to pick up the other girl, so get to the blue marker. Drop this girl off at her destination. Again, before the time runs out. Your other girl needs to be picked up again, so get to her. That's the gist of this whole mission; you go back and forth, taking the girls to their customers. Sometimes a guy will get too rough with her, or refuse to pay, and you'll need to take him out. Keep at it until your 'pimping skill' meter fills. =========================================================== Purchase All Safehouses Los Santos 1) Ganton Price: Free - you have this house from the beginning of the game. Garage Capacity: 2 Other: Camera and spray paint in upstairs bedroom, a video game on the main floor, and when you reach 100% game completion, the Hydra and Rhino spawn outside (on top of Sweet's house and under the bridge, respectively). When you spray all 100 tags, weapons spawn in your kitchen. Once you reach a certain level of respect, the house will earn up to $1000 a day. 2) Willowfield Price: $10,000 Garage: None 3) El Corona Price: $10,000 Garage: 2 4) Jefferson Price: $10,000 Garage: None 5) Verona Beach Price: $10,000 Garage: None 6) Santa Maria Beach Price: $30,000 Garage: 4 7) Mulholland Price: $120,000 Garage: 2 8) Mulholland Price: Free - Madd Dogg's mansion. You automatically get this after the 'Home in the Hills' mission. Garage: None Other: There's a Sparrow on the roof, a pool, three video games, a gym, and pick-ups for health, armor, and night vision goggles. Badlands 1) Dillimore Price: $40,000 Garage: 4 2) Palomino Creek Price: $35,000 Garage: 4 3) Fern Ridge Price: Free - this house becomes a save point once you've started Catalina's missions. Garage: None Other: A Buffalo spawn next to the house. 4) Blueberry Price: $10,000 Garage: None 5) Whetstone Price: $100,000 Garage: None Other: Chances are, you'll never come out here. Just trying to reach the farm is a little tedius; it's up so high. There is a pickup truck and a tractor parked in the property, as well as some jumps you can play around on. 6) Angel Pine Price: Free - you automatically gain the trailer once you leave Los Santos. Garage: None Other: You can't go inside the trailer, so there's no wardrobe change. A Sanchez is usually parked outside. 7) Angel Pine Price: $20,000 Garage: None San Fierro 1) Doherty Price: $20,000 Garage: None 2) Doherty Price: Free - You obtain the deed to this abandoned gas station after the second countryside race, against Catalina and Claude. Garage: 4 3) Hashbury Price: $40,000 Garage: 4 4) Queens Price: $50,000 Garage: None 5) Chinatown Price: $20,000 Garage: None 6) Paradiso Price: $20,000 Garage: 4 7) Calton Heights Price: $100,000 Garage: 4 Desert 1) El Quebrados Price: $20,000 Garage: None 2) Tierra Robada Price: $20,000 Garage: None Other: A Sanchez usually spawns next to the building. 3) Tierra Robada Price: Free - Toreno's place becomes a savepoint once you start his missions. Some heavy-duty weapons spawn inside. Garage: None 4) Fort Carson Price: $30,00 Garage: 4 5) Verdant Meadows Price: $80,000 Garage: One 4-car garage, and a 4-car hangar big enough to store airplanes. Other: Getting all medals in Pilot School will make the Hunter, Stuntplane, and Rustler spawn in and near the hangars. Completing Toreno's mission where you steal the Hydra will make that jet spawn here. Completing the heist mission where you use the helicoptor with the magnet will make the Leviathan spawn here (after the mission, it doesn't have a magnet). Las Venturas 1) Prickle Pine Price: $50,000 Garage: 4 2) Creek Price: $10,000 Garage: None 3) Old Venturas Strip Price: $6,000 Garage: None 4) Whitewood Estates Price: $30,000 Garage: 2 5) Redsands West Price: $30,000 Garage: 2 6) The Clown's Pocket Price: $6,000 Garage: None 7) Pirates in Men's Pants Price: $6,000 Garage: None 8) The Camel's Toe Price: $6,000 Garage: None 9) The Four Dragons Casino Price: Free - the casino becomes a save point once you start Woozie's missions here. Garage: None Other: It's a casino; gamble your life away! 10) Rockshore West Price: $20,000 Garage: 2 To confirm you have purchased all safehouses, pause your game and look at the Stats menu. Under Money, your property budget should be $1,039,000.00. =========================================================== Quarry Location: Hunter Quarry, just west of Las Venturas Prerequisite: Complete the mission 'Explosive Situation' Reward: $29,000 total, plust the quarry becomes an asset, producing $2000 daily Mission 1 Head to the east side of Hunter Quarry and walk into the marker to begin. Get in the bulldozer so you can push the rocks off the path before the time runs out. DO NOT DRIVE OFF THE EDGE! The green blips on the radar mark the rocks you need to push. If a blip is a triangle pointing up, it means the rock is higher than where you're currently at. If it's a triangle pointing down, the rock is lower, and if it's a square, it's at the same height as you. The right analog stick controls your truck's loader, not the camera, so be careful not to lift it. Otherwise it'll be harder to push anything. The rocks don't have to go directly into the markers, just over the cliffs. First hit the rock straight ahead of you and push it over the edge. Next, turn right, follow the path along the top level to the next rock and push it over. Now continue north, then west, along the top path to the next rock. Next, turn around and follow the path down one level to the next rock to push it off. Next, back up, turn left (facing southeast) and go up the left path. Follow that second level around to the next rock to push it off, then continue along that path, down the slope, and push the next rock off. Now to your left (northeast) there is a downward slope that might be hard to see, but follow that to the final rock and push it off. Head back to the top (east side) to start your next mission. If you're not against cheating, get out of the bulldozer and spawn the jet pack (Up, Down, Left, Right, L1, L2, R1, R2, Up, Down, Left, Right) to fly up there faster. Reward: $500 Mission 2 A rival company has placed four bombs around your site. The tricky thing about this mission is it's easy for your bulldozer to run them over (don't worry, they wont explode from that). Make sure your loader is lowered all the way by pushing the righ analog stick up. The first is behind your little office building. Just push it into the red marker. Next, take care of the bomb near the crane. Feel free do drive off the edges to get to it faster. Push it up the sloper into the marker, then head down to the next bomb. Finally, get to the bomb between the crushers and push it into the marker. You can use the jetpack cheat to get to the top again. Reward: $1,000 Mission 3 Get a gun you can shoot from a car before starting. Get into the giant dumper and head out to the road (on your way you'll see the other entrance to the quarry - remember it for the next mission) and chase after the other giant dumper. Perform a quick drive-by to take care of him. The truck is yours for the keeping if you like it. Reward: $2,000 Mission 4 Get back to the quarry to begin. Get on the dirtbike leaning against the office building and quickly get out to the road and follow it to the other entrance you saw last mission. Get in the dumper and take the bodies back to the main entrance. BE CAREFUL NOT TO DROP THE BODIES OUT THE BACK! You should be fine if you don't move the rear carrier up or down, or hit any other cars or rocks. Once at the quarry, follow the beaten path (it's a lighter brown than the rest of the dirt) to the bottom of the quarry and dump the bodies in the fire. Reward: $3,000 Mission 5 Walk into the marker at the main quarry entrance to begin. Your truck is loaded with explosives and you have three minutes to get it to the end of your airstrip in the desert. Do not hit other cars, roadside rocks or adjust your rear loader or you'll most likely fail the mission. Try getting onto the railroad and following it north until the trailer park near the electric plant. Cross the highway here and get to your airstrip. Again, be careful of the terrain and traffic. Dump the barrels into the red marker. Reward: $5,000 Mission 6 Walk into the marker at the quarry to begin. Get in the bulldozer and quickly head to the train tracks to push the barrels out of the way. You'll have to push all the explosives clear of the tracks (the green blips above them will disappear to tell you they're out of the way). Reward: $7,500 Mission 7 Walk into the marker at the quarry to begin your final mission. Get on the nearby dirtbike, jump down to the bottom of the quarry and get into the bulldozer. Push the body and bike (green blips) to the crane area (yellow blip). Be careful with the body; it's easy to run over. Also watch out for slopes, as the objects you're pushing will roll down them, possibly making your job harder. Next, get into the crane. You can drive or get up there a lot quicker with the jet pack (see the end of Mission 1). The controls for the crane are displayed on-screen. Believe it nor not, this is the hardest part of the mission. You'll have to lift the bike and body into the truck. Once they're in the back of the dumper, get in it and carefully follow the path up to the main entrance. Remember, as long as you don't bump anything, the body and bike shouldn't slide around in the back of the truck. Once you reach the gate, carefully drive to the water (yellow blip) and dump the cop and his bike. The highway can be extremely hard to cross. If you drop them before getting to the marker, get back to the quarry entrance and destroy the dumper to fail and start again. Once you get to the water, back up to the edge and use your handbrake (R1) to hold you in place and keep you from rolling into the water yourself. Reward: $10,000, and the quarry is now an asset property, earning $2,000 daily; pick it up regularly =========================================================== Race Tournaments First, off, there's a trick that lets you keep any vehicle from the races (I don't think this would work for the airplanes, though). When you get to the marker to start the race, first pause the game and mark your location on the map. When you start the race, drive to the marked location and get out of your vehicle. When the time runs out, you'll lose the race, but your vehicle will still be there. What sucks is that the NRG-500's that have enough torque to pop a wheelie by themselves lose that torque outside of a race. Los Santos Location: Little Mexico - look for the checkered flag blip on your radar. -Lowrider Race Vehicle: Blade Tips: This race is done in Cesar's mission, 'High Stakes, Low Rider'. -Little Loop Vehicle: NRG-500 Reward: $10,000 Tips: You're on a motorcycle, racing against other maniacs on motorcycles - becareful not to run into any of them and spin yourself around. Also remember that it's easy to get thrown off your bike. This race can be a little harder than the last one. -Backroad Wanderer Vehicle: FCR-900 Reward: $10,000 Tips: It's a race through the rich neighborhoods of northern Los Santos, meaning dramatic change in elevation, cliffs, and some tight turns - be careful. Letting off the gas can give you more better control over your bike, so use that to your advantage while going downhill. This is easily more difficult than Little Loop. -City Circuit Vehicle: FRC-900 Reward: $10,000 Tips: I swear, it's amazing these guys are even allowed to operate a vehicle. Right off the line, all but one other racer crashed into another and fell off their bike. This is an easy one. The race is made up of long straightaways, so lean forward (but not so much that you stand up) to be more aerodynamic and speed up. -Vinewood Vehicle: Sunrise Reward: $10,000 Tips: Part of this race is back in northern Los Santos with the drastic elevation change, and cars are much easier to flip than bikes. It's also easy to hit a bump and completely lose control while your car flies off a cliff or one of the bridges. If that happens, just get out and wait until the time is up to restart. It's a tough race. -Freeway Vehicle: Super GT Reward: $10,000 Tips: You've got a rear-drive car with too much torque, meaning it's going to try to spin every time you turn, especially at high speeds. It pretty much ruins the whole race for you. You can pick up an early lead after the first straightaway by driving over the center grass center-divide at the first turn, but you'll need to drive carefully to keep it. -Into the Country Vehicle: Bullet Reward: $10,000 Tips: The only hard thing about this race is dealing with freeway traffic that only Grand Theft Auto can bring you. Otherwise, you've got a great car that handles well at high speeds. Easy win. -Badlands A Vehicle: Sabre Tips: This race is done in the Badlands mission, 'Wu Zi Mu'. -Badlands B Vehicle: ZR-350 Tips: This race is done in the Badlands mission, 'Farewell, My Love...' San Fierro Location: Behind Wang Cars in Doherty. -Dirtbike Danger Vehicle: Sanchez Reward: $10,000 Tips: As with any other motorcycle race, you've got a vehicle that spins easily - and it doesn't help that the competitors are horrible drivers. You're already off road, so you can cut corners to get to each marker. Be careful while crossing the bridges though: just getting on and off them can spin you around. Once you get ahead of the other riders, it should be an easy race. -Bandito County Vehicle: Bandito Reward: $10,000 Tips: Banditos roll and spin easy, but they're also hard to keep upside down. Just like with Dirtbike Danger, you can cut corners to get to a marker. When you get to the markers in the Whetstone/Shady Creeks area (it was about 50 seconds into the race for me), be very careful not to drive off the cliff and into the water. There's also a special crossing, where the dirt has built up, to cross the river you'll need to look out for. And almost immediately after that is a wooden bridge that's easy to miss - it's also high up. If you land in the water, just get out to be disqualified for destroying your vehicle and restart. Near the end is a pond you circle around, then a shallow creek you drive over. The dirt isn't high enough to be above the water, but it's obvious where you can cross because of where the beaten path leads. -Go-Go Carting Vehicle: Kart Reward: $10,000 Tips: Go carts have very sharp handling, and that might take a while to get used to. Personally, I hate driving these things, but I found it easy to get well ahead of the other racers and win on my first attempt. -San Fierro Fastlane Vehicle: Alpha Reward: $10,000 Tips: Like the Super GT, the Alpha has a little too much torque at the rear wheels. It'll spin out, but nowhere near as easily as the Super GT. Overall, the race isn't too hard. -San Fierro Hills Vehicle: Phoenix Reward: $10,000 Tips: This is probably a car you'll want to steal, as it's impossible to find without using a traffic cheat. They may be the stereotypical redneck-mobile, but I love cruising around in them. As you'd expect from an American muscle car, the Phoenix has a tendency to want to spin out - more than the Alpha, but not so much as the Super GT. It shouldn't cause you any major problems though. When you get to the south end of the freeway, be careful not to drive off into the water. Use the same careful driving tactics when navigating the curvy roads of Missionary Hill - you might see your opponents flying off the cliffs above you! -Country Endurance Vehicle: Bullet Reward: $10,000 Tips: You've got a great vehicle, but the race is long and tough. Be extremely careful at high speeds, especially when you're anywhere near water. Remember that letting off the gas gives you better control over your vehicle, which can really help you out when you're dealing with dramatic elevation changes. When you get to the uphill s-curves, be careful going around the second turn - it's easy to fly off, landing at the bottom of the hill. After that, you're dealing with high altitude roads on cliffs with water at the bottom. Keep an eye on the radar to look for sharp turns near water. The race ends near, not exactly where, you started. Las Venturas (street) Location: LVA Freight Depot - look for the checkered flag on your radar. -San Fierro to Las Venturas Vehicle: Banshee Reward: $10,000 Tips: Everyone in the race is driving one of San Andreas' supercars, so even the slightest bump between cars can send you flying. It's easy to get an early lead if you don't crash into anything or spin out. When you get out onto the desert highways, watch out for the game's crazy highway drivers that can easily send you into the water. -Dam Rider Vehicle: NRG-500 Reward: $10,000 Tips: Right off the bat, try not to hit another biker - it doesn't take much to spin a bike around. Like the last race, it was easy to shake off the other racers after the first couple of turns. At any s-curves, you can usually just skip across the dividing sand/grass, unless the markers are at the apex of each turn. The race ends right after the dam. -Desert Tricks Vehicle: FCR-900 Reward: $10,000 Tips: It's another race on bikes, so take the usual precautions. It's an easy enough race, just remember that almost immediately after the dam, the race is taken offroad and ends in a ghost town in El Castillo del Diablo. -Las Venturas Ringroad Vehicle: Turismo Reward: $10,000 Tips: You're driving one of the game's fastest cars around Las Venturas' outer freeway. Unfortunately, you're dealing with the idiotic highway drivers again. Overall, the race is easy if you can avoid the traffic. You should be fine if you stay on the edge, next to the median. The only thing you'll have to worry about here is the gaps in the median - if you hit the far side of the gap, you're launched into the air. Las Venturas (airplane) Location: Las Venturas Airport - look for the checkered flag on the radar. -World War Ace Vehicle: Rustler Reward: $10,000 Tips: For the airplane races, it's just you out there, and there doesn't seem to be a time limit, so take it easy. Simply fly through the checkpoint coronas. In this race, you'll be flying in between tall buildings, then tall trees. Fly carefully. The Rustler is one of the better-handling planes in the game, so it shouldn't be too hard. -Barnstorming Vehicle: Stuntplane Reward: $10,000 Tips: The Stuntplane has very sensitive handling, and it can take a while to get used to. Most of the race takes place throughout the countryside, over rivers with cliffs on both sides. Try not to crash. -Military Service Vehicle: Hydra Reward: $10,000 Tips: You're in a long race with the fastest airplane in the game. This will require quite a bit of skill, as a lot of the checkpoint require you to fly very close to cliffs and bridges (both under and over). Remember, you only need to <i>survive</i>, so don't worry if you have to turn around and get the markers you miss. Once you're up to speed, just let off the gas alltogether and take your time going through each corona. The race ends next to the west side of Mt Chiliad. -Chopper Checkpoint Vehicle: Maverick Reward: $10,000 Tips: You're in a very slow helicoptor, so the race is very easy. -Whirly Bird Waypoint Vehicle: Maverick Reward: $10,000 Tips: You're in the same helicoptor as in Chopper Checkpoint, only this time you're weaving between tightly-spaced buildings and under bridges. It's still very easy. -Heli Hell Vehicle: Hunter Reward: $1,000,000 - assuming you've already beaten all the other races in all cities. Tips: It's the same type of race as the last one, only the buildings are a little closer together and you're in a faster helicopter. The hardest corona to get to is the one under the Mulholland Intersection - be extremely careful when navigating in there. There's another corona fairly soon after that requires you go slip under a low bridge, and over the street lights underneath it. =========================================================== School: Driving Location: Doherty, San Fierro - it's marked on the radar by a red 'S' Prerequisite: Complete the mission 'Deconstruction' Reward: Get atleast all Bronze medals to make the Super GT spawn out front; get alteast all Silver for the Bullet; get all Gold for the Hotknife. Note: You don't need to get all gold for this to count towards 100% game completion - only bronze. The 360: Just hold Square and X, along with either left or right on the left analog stick to turn. Make a full circle to complete the test; it's very easy to get 100% on your first try. The 180: This is not simply turning on the spot. You'll need to speed to the cones ahead, flip around using your handbrake (R1), and go back between the cones you started in to finish. You can do the 180 in whatever direction is more comfortable for you. Whip and Terminate: All you have to do is make a 90-degree handbrake turn, get to the end, and park. Pop and Control: In this test, you'll run over a spike strip to pop your tire, go around a turn, and park at the end. Speed towards the spike strip, and let off the gas when you get to the turn. Stay off the gas as you finish the path to keep better control of the car. Burn and Lap: This test was the hardest for me to get 100%. You might find it easier if you do it in the first-person view (press Select until you're seeing from the bumber's view). To get a gold medal, you'll have to win in under 36 seconds, so shoot for 7 seconds per lap. Hug the outer cones in the center line, but be careful not to break them. It's possible to push them in a tiny bit to shorten your overall track length, but it takes a a bit of skill to do this on purpose. If the cones are moved in too far, making your lap too small, the game will never count it as a full lap and the timer will just keep going, so you may as well just restart then. If you knock out an end cone and hug around the one before it, you'll never progress to the next lap, just like if you had pushed the outside cone in too far. Cone Coil: Weave between the rows of cones, pull a 180 at the end, weave between the cones again, and park where you started. Sharp turns are more controllable if you let your foot off the gas; don't risk spinning out by thinking a heavy foot means a quicker time. Crossing over the yellow line around the outside of the course will disqualify you. The '90': Speed towards the two cars, and pull a 90-degree turn and park inbetween them. When you're speeding down towards the two cars, go straight at the front end of the car behind the parking spot; the car will go forward a little while sliding. Wheelie Weave: Drive one side of your car up the ramp and drive on two wheels. You'll have to turn left right when you start out, otherwise you'll miss the ramp. This one will take a lot of practice. Turn left and the left side of your car will go up; turn right and it will go down. In order to keep the car up, you're generally going to be turning left the whole time, so once I leave the ramp, I immediately turn right to give myself enough room for that, then straighten up by tapping left before the car falls. Keeping the car up from there is easy enough; just don't turn left too hard or you'll move too far over. Now you just have to worry about finding a good braking point to get the best landing position. Spin and Go: When you start out, hold L2 and R2 to look behind you while you drive in reverse. When you get to the turn, let off reverse and spin your car around (turn left if you're trying to spin clockwise; right if you're spinning counter-clockwise). You shouldn't need any brakes if you time it right. When you're just about 180 degrees around, turn your 'steering wheel' into the turn (right for a clockwise spin; left for counter-clockwise) and step on the gas to help swing the car around that little bit more and head for the finish. P.I.T. Maneuver: This maneuver is actually used by cops in real life. You'll need to get alongside the other car, and spin it around by pushing the rear-side of the car. You'll need to stop with your car parallel to the other, but he'll be facing the opposite direction. This is another that takes practice, mainly with where you nudge the other car and your steering input once you've got him spinning. Alley Oop: This is like the Wheelie Weave, only the ramp is bigger to get your car up in the air to perform a spiral. Ride the left or right side of your car up the ramp and use the left analog stick to spin your car while in the air. The less of your car that is on the ramp, the easier you will spin. Tilting the stick left will help spin the car counterclockwise, while tilting it right will help spin the car clockwise. You'll need to land with your car facing straight ahead, which is probably the most difficult part of this test. City Slicking: For this test, you will need to race your car across town, into the marker, and back to the driving school as quick as possible with as little damage as possible. The car used has horrible handling and will want to spin out a lot. Stopping the car, even if you're doing a 180, will fail the test. When you start, get on the road to your right and follow the trolley track. Before the track turns right, cut across the corner of the parking lot and get into the next north-south road to reach the marker at the end of a winding road. After you drive through the marker, make a 180-degree turn (remember not to stop; handbrake spins are risky here) and head back the way you came. If you go back up the windy road, there's a grass field on the right you can cut across to get on the road that goes straight to the driving school. Stay on the trolley tracks where available to avoid traffic. There is a glitch where you can repeatedly pause and un-pause your game for the entire trip to slow the clock, resulting in an extremely quick time. =========================================================== School: Motorcycle Location: Blackfield, Las Venturas - it's marked on the radar by a red 'S' Prerequisite: None Reward: Biking Skill +. Get alteast all Bronze medals to make the Freeway spawn out front; get atleast all Silvers for the FCR-900; get all Golds for the NRG-500. Note: You don't need to get all gold for this to count towards 100% game completion - only bronze. The 360: Simply hold X, Square, and either Left or Right simultaneously until you rotate a full 360 degrees. The 180: Just like with the Driving School, speed to the cones, pull a handbrake-180 around the center cones, and return to where you started. You'll want to stop with your bike matched up with both the front- and side-center cones to get a perfect position - this goes for all other bike tests. The Wheelie: Speed ahead, wheelie (pull back on left analog stick) through the coned path, land back on two wheels, then stop within the cones at the end. For the wheelie, don't pull back so far that your rear end scrapes against the ground - you'll get stopped for that. Jump and Stop: Speed ahead, jump the ramp, and stop within the cones at the end. The Stoppie: Same as 'The Wheelie', only you perform a stoppie (let off gas, brake and push forward on the left analog stick) through the middle of the cones. The hard thing about stoppies is keeping your bike straight. You only need to brake enough to get your rear end up in the air. Once it's up, let off the brake and keep holding the analog stick up until you reach the end. Sit back down and park within the cones at the end. Jump and Stoppie: Easily the hardest test yet, this combines the 'Jump and Stop' and 'The Stoppie' tests. Speed ahead, jump the ramp, land in a stoppie and touch back down within the cones at the end. Watch the video and notice how CJ leans forward while in the air to land in a stoppie. Brake immediately when you touch the ground after jumping, and try to stay straight while you pull in between the cones. =========================================================== School: Boat Location: At the end of a dock in Bayside Marina in the northwest corner of San Andreas - it's marked on the radar by a red 'S' Prerequisite: Complete the mission 'Pier 69' and you'll get a phone call about the boat school Reward: Get alteast all Bronze medals to make the Marquis spawn next to the dock; get atleast all Silver for the Squallo; get all Golds for the Jetmax. Note: You don't need to get all gold for this to count towards 100% game completion - only bronze. Basic Seamanship: Full speed ahead and stop within the parallel buoys. Your goal is to stop as soon as possible within the buoys, so don't worry about getting your boat perfectly centered. Plot a Course: Get through all eight pairs of buoys - you can go full-throttle the whole course. Hitting buoys will count against you. I got a gold medal with a time of 30:725. Fresh Slalom: Just like with 'Plot a Course', only there are now 15 pairs of buoys. You can go full-throttle again, but keep an eye on the radar to know which set to hit next, and when you'll need to pull a sharp turn. The 10th pair is the one you need to worry about most. Immediately after the 9th pair, you'll have to hand a sharp right turn to get to the tenth. After the 13th pair, keep an eye on the radar so you don't go through the wrong set of buoys. Flying Fish: Jump atleast 55 meters to get a bronze medal. The ramp is at an angle, so when you start out, go right for a little ways, then head straight for the ramp at full throttle to get the most distance. When you leave ramp, pull back on the left analog stick, then push forward mid-jump to make your front end land first - the spot where your front end lands is what counts toward the 55 meters. Land, Sea, and Air: This test combines all the previous lessons. You'll need to get through all 23 pairs of buoys, some with ramps, in less than 3 minutes. Keep an eye on the radar to watch out for sharp turns. I was able to go full throttle the whole race. =========================================================== School: Pilot Location: Your airstrip in the desert - it's marked on the radar by a red 'S' Prerequisite: Purchase the Verdant Meadows airstrip for $80,000 Reward: Get atleast all Bronze to make the Rustler spawn outside; get atleast all Silver for the Stuntplane; get all Gold for the Hunter. Note: You don't need to get all gold for this to count towards 100% game completion - only bronze. Takeoff: Hold X to get the plane moving, then pull up with L3 when the game prompts you. Retract the landing gear using R3, then fly through the carona. After you reach the first marker, push L3 forward slightly to go down to the next carona, then pull it back slightly to get to the final carona. Land Plane: Press R3 to take out your landing gear, then fly through the first carona. Lower the plane to the runway, then hold Square to slow down. Try to even yourself out before landing, then slowly drive into the marker; you can hold X if you want to get there quicker and improve your time, but be careful not to take off again. Circle Airstrip: This is where it gets tough. Choose which direction you want to go around the airstrip. Take off like you did before and fly through the first carona. The next carona will be to the opposite direction of which way you're circling the airstrip so you can fly in a wider circle (if you chose clockwise, the second carona will be left of the first one, or right if you chose counterclockwise). After this carona, your circulation around the strip will begin. Keep following the caronas around, keeping control of your plane. The left analog stick only requires slight movement, along with the use of L2/R2 to perform a smooth turn. Circle Airstrip and Land: Even tougher than the last, you'll be doing the same thing, but you also need to land on the airstrip. After you've circled the strip, turn towards the runway and land like you did in the second test (if you circled clockwise, turn left onto the runway; if you circled counterclockwise, turn right onto the runway). Helicoptor Takeoff: Hold X to rise, and when it says to, let off X to level off. Rotate the chopper 180 degrees by holding R2 or L2; try not to spin any more than 180. Now push forward slightly on the left analog stick and hold X to move through the corona. Land Helicoptor: Move forward until the game says to release X, then land in the marker, using Square to slow down. Destroy Targets: This test can be pretty tough. R1 fires your machine gun, while Circle fires missiles. Move forward and shoot the three trucks parked on the runway. It might be easier if you fly just above the ground and shoot at the trucks with tons of missiles and your machine gun while moving toward them. When they're all destroyed, go to the southwest part of the airstrip and shoot the two moving vehicles. I just shot a load of missiles at them and it worked out fine. When they're destroyed, land in the marker on the runway. Loop-the-Loop: This isn't as hard as it may seem. Fly through the first carona, then immediately pull down on the left analog stick until you make a full loop, and fly through the second carona. Barrel Roll: This works almost exactly like the loop-the-loop, only you push the left analog left or right to spiral the plane. Be careful not to fly up or down while you're spinning. Parachute onto Target: Read the instructions the game gives you on how to speed up and slow down your descent, but don't bother with rotating; it will only make this test harder. Press Circle to open your 'chute when the game tells you to and do your best to land in the center of the target. Pull back to slow your decent and go forward if you need to. This may take a few tries, but atleast it's fun. =========================================================== Stadium Events 8-Track Location: Los Santos Forum in East Beach, Los Santos. Prerequisite: Drive around enough to raise your driving skill. Reward: $10,000, and the Monster and Hotring Racer spawn in the parking lot. This is a 12-lap figure-eight race in a Hotring Racer. Just drive carefully, especially around corners, as these cars are easy to spin out. It's also pretty easy to destroy these cars, so if you go full throttle, you're not going to last long. Twelve laps is plenty of time to catch up and take the lead. If you can do it without damaging your own car, spinning out other cars by nudging the side of their back end can be pretty helpful. Bloodbowl Location: Corvin Stadium in Foster Valley, San Fierro Prerequisite: None Reward: $10,000 and the Bloodring Banger spawns out front Get a gun you can shoot from a car with plenty of ammo before starting. Walk into the marker at the stadium to begin. This has the same basic idea as the NRG-500 Challenge; you have 30 seconds to get to the first marker and increase your time by 10 seconds. If your time runs out, you lose. Get your time above 1 minute and you win. The challenge is the other cars competing for the same thing, and most of them are just there to try and stop you. You have someone in your car to shoot at them, but the gun I told you to get before starting will help even more. If your car is smoking, find a wrench pick-up to fix it and continue on. It's a pretty tough mission. Once you've won, you'll get your money, and the Bloodring Banger will spawn outside. Unfortunately, the bars the car is wrapped in do absolutely nothing to stop the panels from getting crushed. Dirt Track Location: Dirtring Stadium in Blackfield, Las Venturas on Mondays and Wednesdays (hold L1 while on foot to check the day) Prerequisite: Have a Bike (motorcycle) skill of 50% Reward: $25,000 and the BF Injection will spawn out front Walk into the marker in front of the Dirtring Stadium to begin. This is a 6-lap, dirt-circuit race on the Sanchez dirtbike. Stay away from the other bikers as much as possible (they'll spin you out) and work your way ahead of them. There are several jumps that will spin you out if you land wrong. There's actually a straight section with three jumps where most of the other bikers always fall off their bikes. It's an excellent chance to pass them. You'll also have to watch out for sharp turns. After you launch off the long wooden ramp with the arrow on it, and follow the curve around, make sure you go straight and not go right, and make that turn again. Kickstart Location: Dirtring Stadium in Blackfield, Las Venturas, on Sunday, Tuesday, Thursday, Friday, and Saturday Prerequisite: Have 50% bike (motorcycle) skill Reward: A Dune spawns out front A very high to full bike skill is recommended before starting. Walk into the marker at the Dirtring Stadium on one of the above-mentioned days to start this obstacle course. You have 4 minutes to collect atleast 26 points worth of coronas to win. The green ones are worth 1 point, the amber worth 2, and the red are for 3. If you want to leave the challenge early, get off the bike and head for the red marker on foot. If you fall off the bike, you have 30 seconds to get back on. Go after the easy obstacles first, then go for the more challenging ones if you want/need the extra points. There's not much I can tell you here other than to drive carefully. =========================================================== Taxi Location: Get in any taxi Prerequisite: None Reward: -Possible tips from each fare -All taxis get nitrous -All taxis can jump by pressing L3 Tip: This is a great mission to do early on in the game, as it raises your driving skill To start this mission, simply get in a taxi and press R3. In order for this to count towards 100%, you need to pick up and deliver 50 fares. It's simple enough; when you click R3, a blue blip will show up on the radar, somewhere in your immediate surroundings. Go to the blip to pick up the customer, and take them to wherever they want. The condition of your car and how you drive affect how much you get tipped. =========================================================== Trucking Location: The RS Haul in Flint County, just west of Los Santos - it's marked on the radar by a gray truck silhouette. Prerequisite: Complete the mission 'Tanker Commander' Reward: $33,500 total, and this RS Haul becomes an asset propery, generating $2000 daily - pick it up regularly. Walk into the marker at the RS Haul in Flint County to start the mission. There are a total of eight missions you'll need to complete in order for this to count towards 100% completion, but you can come back any time afterwards. Make the deliveries on time and without damage to get the most money. Once you complete a mission, you'll be forced out of the truck, which locks so you can't get back in. Steal a car and drive back to RS Haul. The delivery locations seem to be random, so I can only give you basic tips when they're needed. Before starting out, pause the game to look at your map and decide the quickest route. Mission 1 Simply get to your destination without blowing up, and before the time runs out, and you get the full reward. Reward: Up to $1,000 Mission 2 This time, you're delivering fragile goods, so be extra careful not to take any damage. Watch out for smaller cars that can get under your trailer and unhitch it. Reward: Up to $1,500 Mission 3 Your third delivery involvs transporting illegal goods, and once you exit RS Haul, you'll get a wanted level of 3 stars. When the cops are after you, they'll try to get underneath your trailer and unhitch it, so be mindful of that. You'll lose the wanted level once you stop in the red marker. Reward: $2,000 Mission 4 Simply get to your destination before time runs out to get your full reward. Reward: $3,000 Mission 5 This mission always seems to be in San Fierro, so get ready for a long trip delivering extremely fragile goods. Keep an eye on your damage meter - it's full, but your truck might be smoking right from the get-go, so be extra careful. Reward: Up to $4,000 Mission 6 Another transfer of illegal goods, meaning a 3-star wanted level the whole way. Your destination is probably Battery Point, San Fierro - I got it twice in a row. Again, be careful of cops getting under your trailer to unhitch it. You don't have to worry about damage, but don't let your truck explode. Reward: $5000 Mission 7 This time you have fragile goods that need to be delivered an extremely long distance under a time limit. Look at your map for the quickest route. Chances are you'll be delivering to northern San Andreas. Highway drivers in this game are horrible, so be very careful. Reward: Up to $7,000 Mission 8 Highly illegal goods need transporting to Las Venturas. You've got a 4-star wanted level! Look at your map for the quickest route - you're going to need it. You've got to deal with cops trying to unhitch your trailer and crazy highway drivers all in one mission. There are no damage penalties, which is good, but this mission is by no means easy.There's also no time limit, so take it easy. Speeding only leads to more damage, especially when cops are coming head-on. Also watch out for when the cops are driving alongside your truck - and rubbing against you - they'll pull you off course pretty easily. Reward: $10,000 and RS Haul becomes an asset property =========================================================== Valet Parking Location: Vank Hoff Hotel in Financial, San Fierro (across the street from the very tall, pointy building) Prerequisite: Complete the mission, '555 WE TIP' Reward: Tips after each level, and the Vank Hoff Hotel becomes an asset, generating $2000 daily Before you can start, you'll need to get your valet uniform on, so head to your house and enter your wardrobe. It's one of your 'special' clothes. Walk into the marker in front of the hotel to begin. Wait for a car to pull up and get into it before the other valets. Drive it to the underground garage and park it in the red marker. Then sprint back up front and wait for the next car. If you kill another valet, you'll recieve a 20 second penalty. If you do not damage the vehicle you're parking, you'll recieve a 45 second bonus. If you damage a vehicle, your bonus will be less than 45, or if you damage it enough, you wont get a bonus at all. Park the vehicle perfectly in the parking space and you could recieve another 15 second bonus. You'll need these bonuses. If you sprint back upstairs immediately after parking the car, you should get another car pulling in when you get up there. Level 1 Park 3 cars in 2 minutes. Level 2 Park 4 cars in 2 minutes. Level 3 Park 5 cars in 2 minutes. Level 4 Park 6 cars in 2 minutes. Level 5 Park 7 cars in 2 minutes. =========================================================== Vigilante Location: Get in any law enforcement vehicle anytime. Prerequisite: None Reward: Max Armor is raised to 150 (from the standard 100) Get in any law enforcement vehicle and press R3 to activate the 'Vigilante' mission. If you want to do this in a regular car, such as a police cruiser, Ranger, FBI Rancher, etc, you'll need to get a gun you can shoot from a car and TONS of ammo. These vehicles, especially the police bike, are extremely vulnerable to damage, especially in the later levels. I strongly recommend the Rhino (tank) for the Vigilante missions, as it has infinite ammo and gets the job done a lot quicker. There's also the army helicopter, the Hunter, you can get at your airstrip by getting all gold medals in the pilot school, which is easiest for getting around town. The Hunter can be hard to use, however, because you'll have to navigate between tall buildings and trees - and if you've ever flown anything near any tall object, you know it sucks. Overall, the Hunter is probably the best choice, as it combines the ability to travel fast, and it has the missiles to take out enemies even if you don't exactly hit them. Plus, if you get any wanted stars, you don't have to worry about the cops getting in your way. I started this mission on the west side of Las Venturas and it was pretty easy with the Hunter as a lot of the suspects drove around the desert. If you pick the same location, just be careful not to fly over Area 69 or you'll get missiles shot at you. You'll need to complete 12 levels of 'Vigilante' for it to count towards 100% game completion, and every level gets harder as more vigilantes pack into the cars for multiple-person drive-bys. Again, I recommend the tank as it can take the most abuse, or the Hunter as it can probably avoid the gunfire alltogether. Once you press R3, a suspect will show up on the radar, marked by a red blip. Get to him asap and kill him. If the vigilantes get out of the car, make sure to kill them all - same goes for when there are multiple vehicles. At level 9, the suspects started separating, and driving further away from each other. The Hunter definitely comes in handy at times like this, especially when a group of people get out of the cars and make a run for it - you can just bomb the crap out of the area they're standing and guarantee you'll kill them! Once you reach level 13, you'll hear the familiar jingle meaning you've completed the mission. =========================================================== Congratulations! You should now have completed San Andreas 100%. You've been awarded $1,000,000, the Hydra and Rhino spawn outside your house on Grove Street (on Sweet's roof and under the bridge, respectively), your stats have been boosted, and you now have unlimited ammo. If you're missing something, use the 'Contents' section as a checklist. In the Stats menu, under 'Missions', you should have 145 missions complete.
Unrequired Pastimes
Burglary
Location: Los Santos: Find the van near Grove Street. First, go near the entrance to the gym and face south. Look ahead of you and to your left and you will see a row of apartment buildings. The Boxville is parked on the eastern side of the western-most building. San Fierro: Go to the entrance to the parking lot of the driving school in Doherty (there is a 'Turning Tricks' sign (the last 's' is tire tracks) on the front wall) and face north. Get on the street and go west, then take your first right (north) turn. On this road, look on the left side and enter the northernmost alleyway. The van is right in here. Las Venturas: Go to the street on the north side of the pyramid of The Camel's Toe casino. Go west until you get to a building with two green awnings on this street and stop at the western-most awning. Now look north from this position. See the van parked to the left of the garage? Prerequisite: Complete Ryder's mission, 'Home Invasion'. Reward: -Whatever money you make from the burglaries -Bonus $3,000 when you reach the $10,000-stolen mark To do these missions, you need to enter a black Boxville van between 20:00 and 6:00 and press R3 (right analog stick) to begin. The only Boxvilles that trigger this mission are located above. You get a $3,000 bonus for every $10,000 worth of loot you steal. Here's what I did (in Los Santos): A few minutes before 20:00, go and get the Boxville. Now head to the lockup in Playa del Seville (it's right near the street Loco Low Co is on). When burgling, stick to Loco's neighborhood and the nearby apartments with blue walls. Wait there until 20:00, then press R3. Look for a house/apartment with a yellow marker in front of the door; that means you can go inside. Back the truck fairly close to the door, but not too close, so you can quickly get the items in it and get back into the house. When inside, look for TVs, VCRs, and stereo systems. They're usually all stacked on a shelf or small entertainment system, whatever you want to call it. Remember to press L3 to crouch (not while holding something; you'll drop it) and stay quiet. Look in every room of the house, but try doing this quickly... and quietly. Watch out for things on the floor, like cereal boxes, because walking over them will make noise. Also be careful when walking into a house and seeing everybody sitting on the couch in the main room... get out now, before they kick your ass or call the cops. If you're heard, you have ten seconds to get out of the house before they call the cops. After you've robbed a second house, more items will appear in the houses you robbed before, so you can go back. Don't worry if you don't make it back to the lockup before the timer is up. You're only in trouble if your still in a house. Here's a strategy that can make you $10,000 in one night. Find two houses that are right across the street from each other (or right next to each other). Park the van in the middle of the street (or in between the two houses) and rob both houses. Just keep going back and forth between the same two houses, as the items will keep reappearing. Assuming the items are in the main room when you enter the house (like they are in the houses near Loco), don't worry about making noise. Ten seconds is plenty of time to run in, steal the items, and run out before the cops are called. =========================================================== Criminal Ranking You can find this ranking by pausing your game, going to 'Stats', and looking in the top right corner of the screen. The highest ranking is supposedly King of San Andreas, once you reach 1,000,000 points (and anything above that). I have yet to get this high, so I'll confirm it if I ever do. Here is a list of things that will affect your ranking: - 10 points if you use a cheat code
- 3 points if you get busted or wasted
+ 1 point if you get $5000
+ 1 point if you kill a civilian
+ 5 points if you complete a mission
+ 5 points if you blow up a vehicle
+ 30 points if you blow up a helicoptor or airplane =========================================================== Gang Territories There are a total of 57 gang territories around San Andreas; 56 of these areas are in Los Santos, and the other is in Bayside Marina near the boating school in the northwest corner of the map. Sometimes you'll already own that territory, sometimes the Vagos do. Hopefully you already do; it's not easy to find gang members out there. To take control of an area, walk into it and shoot three of the rival gang's members to start things off. You will get a message saying that you have triggered a gang war, and the area that you're in will blink red on the radar. You will now have to kill three waves of the opposing gang, and more gangsters come at you each time. If you're running low on health, look around the surrounding streets for health (floating red hearts) and armor (floating blue/gray vests) pick-ups. Once you've killed all three waves of gangsters, the area becomes yours. Being in control of areas of town means you will attract the attention of opposing gangs. They will frequently wander into your area and try to take it back. When this happens, you will get a message saying your area is under attack. That area will blink red, and will be marked on the radar with a silhouette of a person. If the silhouette is yellow, the Vagos are attacking, and if it's purple, it's the Ballas. When you arrive, you will only need to kill the gangsters that are there; there will not be multiple waves like there are when you attack an area. If you fail to get to your attacked area in time, you will lose gang influence and you may or may not lose the territory. Once you've taken over all 57 territories, they will no longer get attacked, but you might see a few Vagos or Ballas on occasion. This also means that you won't see their cars driving around. There are a few places you can find the Ballas car, and the rare time you see one driven around by a regular person, but you will not see the Vagos' Tornado ever again, unless you enter the 'Urban Traffic' code. Tip: During a gang war, you can somewhat control where you enemies come from. If you want them to come from a certain direction, face CJ in the opposite direction, with the game's camera to CJ's back. =========================================================== Girlfriends There are a total of six girls you can date in San Andreas, two of which you meet in missions. Some girls are more loose than others, if you catch my drift, so you'll get invited for coffee sooner. Collecting all of San Andreas's oysters not only makes most girls re-datable after they've been killed, but it nullifies all of their initial requirements, such Michelle's request for you to gain more weight before she'll become your girlfriend. Take care of each girl, and get a reward when you reach 100% 'success'. Sex Appeal -Appearance: Clothes, tattoos, and haircuts (more important than vehicles) -Vehicle: The last vehicle you drove; damage to the car lowers sex appeal, and customizing it will not help. Tips -Drive carefully: Girls do not like it when you keep crashing into things. If she takes too much damage, she'll stop the date. It's also possible to kill the girl, but you can go out with her again by meeting her where you first did (Millie and Denise are not re-dateable, so make sure you reach 100% before killing them off). -Bring gifts: Girls like gifts! There are flowers, dildos, and vibrators placed all around San Andreas. When you have the gift equipped, walk up to your girlfriend and press L1 to give it to her. You can also kiss her by pressing L1 if you don't have a gift/weapon equipped. I've heard kissing is actually bad for your relationship success unless you give her a gift first. Denise Robinson Occupation: Unknown - she's a 'hood girl. Location: You rescue her in the mission, 'Burning Desire'. Afterwards, she lives just outside of Grove Street in Los Santos. Vehicle: The license plate on her Hustler says 'HOMEGIRL' once you reach 50% and she gives you the keys. Dates: Pick her up between 16:00 and 6:00. For dinner-dates, she likes the Well-Stacked pizza parlor near her house, and for driving dates, she likes you to drive fast and perform drive-bys (she'll tell you when she feels like blastin' on some Balla fools).
100% Reward: Pimp Suit Millie Perkins Occupation: Caligula's Croupier Location: You meet her in the mission, 'Key to Her Heart'. Afterwards, she lives in Prickle Pine on the north side of Las Venturas. Dates: Pick her up between 12:00 and 22:00. She likes you to have lots of sex appeal. For dinner-dates, she likes the Steak House in Redsands West. 100% Reward: None (You earn the Gimp Suit after completing the mission where you meet her). Notes: After you reach 50% with her and she gives you the keys to her car, her license plate says 'HOMEGIRL'. Helena Wenkstein Occupation: Member of the National Rifle Association Location: You'll find her on the roof of the Ammu-Nation in Blueberry. Once she asks to be your girlfriend and you say yes (press Right on the d-pad), she lives on the farm in Flint Range Dates: For dinner, she likes the restaurant (there's no name on the gray/black building; it's the closest one to her house) in Rodeo, Los Santos. 100% Reward: Extra: While dating her, you can find molotovs, a chainsaw, a 9mm, and a flamethrower in her barn. She's also got a Bandito parked out front that's pretty fun to drive. Katie Zhan Occupation: Nurse Location: You'll find her in the northeast corner of the golfcourse in San Fierro, near some bushes. Afterward, she lives in northern Paradiso Dates: For dinner, she likes the diner behind her house 100% Reward: Medic Outfit Extra: While dating her, you keep your weapons after being wasted (you appear at her house instead of the hospital) Michelle Cannes Occupation: Auto Mechanic Location: You'll find her in the driving school in San Fierro. Afterwards, she lives Dowtown Dates: Pick her up between 16:00 and 6:00. 100% Reward: Mechanic/Racing Suit Extra: While dating her, you can stop in her garage for a free paint job and repair (Pay-N-Spray) Barbara Schternvart Occupation: Cop Location: You'll find her in the sherriff's parking lot in El Quebrados. Dates: 100% Reward: Cop Uniform Extra: While dating her, you keep your weapons after being busted =========================================================== Video Games I'll add more locations as I find them. There are stores out in the middle of nowhere with video games, and I almost never visit them, so it may take a while to track down all the locations. They Crawled From Uranus Locations:
-The Johnson house on Grove Street -Madd Dogg's Crib in Mulholland, LS Controls: D-pad/L stick: circle clockwise/counter-clockwise Circle: Fire weapon Triangle: Exit game Start: Pause game Objective: Enemy spaceships will spiral out of the center of the screen. You simply shoot them (Circle) while circling around them with your spaceship (D-pad or L stick). Keep moving or you'll get hit by one of their guns. Every time your health reaches 0%, you lose a life (you start with three). Lets Get Ready to Bumble Locations: -Ten Green Bottles bar in Ganton, LS -Madd Dogg's Crib in Mulholland, LS Controls: D-pad/L stick: Move left/right X: Press to jump, hold to fly Start: Pause game Objective: Fly up and collect as many flowers as you can and reach the top before time runs out. Don't touch the thorny vines or you'll lose a life (you start with 3). Once you reach the top flower, you progress to the next level. Go Go Space Monkey Locations: -Ten Green Bottles bar in Ganton, LS Controls: D-pad/L stick: Move X: Fire weapon Start: Pause game Objective: There is a row of enemies in front of you that you need to destroy (shoot them with X). They'll fire back so be careful. Fortunately, they can only fire straight ahead, so all you have to do is move up or down to avoid it. You can also die by crashing into one of their ships. As you destroy entire fleets of enemy spaceships, they drop icons. Collect them to increase your firepower. Duality Locations: -Madd Dogg's Crib in Mulholland, LS Controls: D-pad/L stick: Rotate clockwise/counter-clockwise X: Accelerate Circle: Fire weapon Start: Pause game Objective: There are two bars in the bottom-left corner of the screen. The red represents your health, and the green represents your energy, which is lowered as you accelerate and fire your weapon, and raises as you lay off both. You every move affects your points. Firing your gun costs you one point per 'bullet.' Destroy the large black balls for 10 points; touching them hurts you. Destroying the large white balls loses you 10 points. Touching the small black balls costs 5 points but increases your energy, and collecting the white balls gains you 5. The trick is, white balls have negative gravity (they push you away), while black balls have positive gravity (they pull you in). So in order to collect the white balls, you're going to need to gain some momentum and speed before their gravity is too weak for you, and let you get close. The bigger the ball, the stronger the gravity.
Master Save File
A "Master Save File" is something people
create to give themselves the ultimate Grand Theft Auto challenge. It includes accomplishing
everything there is to before even starting the first mission. In San
Andreas' case, there is no mandatory mission right off the bat, so you
can do everything in this list even before getting on the bike and
heading to Grove Street. For details on how to begin the odd jobs, see
the Odd Jobs section above. This is not recommended unless you have
already beaten the game 100% atleast once, as you probably won't have
the skill to do some of these tasks very quickly - you're going to need
to think on your feet in the restricted areas. Plus, it helps to know
exactly where to go. Want an extra challenge? Try not getting busted,
wasted, or using cheats.
Before you first go to CJ's house: This list is ordered in an 'easiest first, then hardest later' order. Obviously, doing R3 misions first will increase both your driving skill (to be able to race in 8-Track) and earn you lots of money (for a safehouse to save your game somewhere besides your house on Grove Street; going there will start the first story mission). For the R3 missions, I recommend not doing Vigilante first, because unless you've killed enough gangsters to get an uzi and tons of ammo, that odd job will be next to impossible. Once you have your first house, save immediately, and save often afterwards. Immediately after a save, a good way to earn lots of money is to go to the horse betting shop under the south corner of the Mulholland Intersection and put all your money into the horse at the bottom of the list (worst odds = most money). If you lose the bet, just reload your game and go back to the betting shop to try again.
The airport gates won't open to let you pass from outside until you earn your piloting license. Normally, that would require finished 3/4 of the storyline, but there is a way to enter the Los Santos airport this early in the game. Simply drive up to the front gate, climb up onto the guard's booth (hopping from on top of a car will make this easier), then jump down on the other side of the fence. If you don't want to have to run all over the place, walk over to the gate (it will open since you're already inside), and when it opens all the way, get in your car and quickly drive back in before it closes again. Go up to a plane and get in. It's best to stick to flying around Los Santos for now, to avoid getting any wanted stars for going into locked parts of the map. Fly long enough to upgrade your flying skill four times and you'll earn your pilot's license, giving you 'legal' access to the airports.
CAUTION: Leaving Los Santos or Red County will gain you an automatic 4 wanted stars unless you're swimming (even then, jumping up out of the water will bring the heat). So if you want to attempt the odd jobs in other areas before they're unlocked, be aware of the SWAT chasing after you. You'll probably have to change cars often, so also make sure you have full health and armor before stepping out into the open. The odd jobs that require you to drive slow or go on foot will be especially difficult as you'll have to be constantly on the move to avoid getting busted.
Los Santos:
- Paramedic (increases driving skill)
- Taxi (increases driving skill)
- Firefighter (increases driving skill)
- Pimping (increases driving skill)
- Courier (increases cycling skill)
- Oysters (can increase the skill of your selected mode of transportation)
- 100 Tags (can increase the skill of your selected mode of transportation)
- Unique Stunt Jumps (I recommend the NRG-500; this increases your bikes skill - USJ's don't count towards 100%)
- 8 Track
- Vigilante
- Purchase available safehouses:
- Willowfield
- El Corona
- Jefferson
- Verona Beach
- Santa Maria Beach
- Mulholland
- Bonus:
- Max your stats (muscle, stamina, driving, cycling, biking, flying, lung capacity, guns)
- Never get busted or wasted
- Never use cheats
- Raise a ton of money
- Get the high score at all the video games
NOTE: The few Tags involved in "Tagging Up Turf" will reset when you reach that mission (the rest will be fine).
Badlands:
- Chiliad Challenge
- Oysters
- USJ's
San Fierro:
- Blood Bowl (have an uzi with plenty of ammo to make it easier)
- NRG-500 Challenge
- Courier (increases bike stat)
- Photo Ops
- Oysters
- USJ's
Desert:
- Oysters
- USJ's
Las Venturas:
- Dirt Track
- Kick Start
- Courier (increases bike stat)
- Horseshoes
- Oysters
- USJ's
Vehicle Database
*UNDER CONSTRUCTION*
Description Key:
Drivetrain:
- Front engine, front-wheel drive (FF)
- Front engine, rear-wheel drive (FR)
- Mid-engine, rear-wheel drive (MR)
- Rear engine, rear-wheel drive (RR)
- All-Wheel-Drive (AWD) Variations = Different body styles or options the vehicle is available with.
Other = Bonus features the car may have/things to note.
Resembles = Real-world car it looks like (based purely on looks, not on drivetrain or other stats). Sedans/Saloons: *All of these cars can be customized at Transfender. Admiral
- Drivetrain: FF Elegant
- Drivetrain: FR Emperor Euros Glendale Greenwood Intruder Merit Nebula
- Drivetrain: FF Oceanic Premier Primo Sentinel Sunrise
- Drivetrain: FF Vincent
- Drivetrain: FF Washington Willard Coupes: *All of these cars can be customized at Transfender. Alpha
- Drivetrain: FR Blista Compact Bravura
- Drivetrain: FF Buccaneer Cadrona
- Drivetrain: FR Club Esperanto Feltzer Fortune
- Drivetrain: FR Majestic Manana Picador - Drivetrain: FR
- Other: One is always parked in Ryder's driveway
- Resembles: '71 Chevrolet El Camino Previon
- Drivetrain: FF Stafford Virgo Classics & Muscle Cars: *Except for the Hotknife, all of these cars can be customized at Transfender. Buffalo - Drivetrain: FR Clover
- Drivetrain: FR Hermes - Drivetrain: FR Hotknife
- Drivetrain: FR
- Variations:
- With hood
- Without hood
- Other: This car is obtained by earning all gold medals at the driving school. Hustler Oceanic Phoenix
- Drivetrain: FR
- Other: This car is obtained either through stealing it from the "Hills of San Fierro" street race in SF, or finding it during the Paramedic/Firefighter/Vigilante odd jobs. Sabre - Drivetrain: FR
- Resembles: '70 Chevrolet Chevelle Stallion - Drivetrain: FR
- Variations:
- Coupe
- Hard top convertible (top down)
- Rag top convertible (top up) - Rag top convertible (top down) - Resembles: Debatable Lowriders: *These cars can be customized at Loco Low Co in Los Santos. Blade - Drivetrain: FR Broadway Remington
- Drivetrain: FR Savanna - Drivetrain: FR Slamvan
- Drivetrain: FR Tahoma Tornado Voodoo Tuners: *These cars can be customized at Wheel Arch Angels in San Fierro. Elegy - Drivetrain: FR
- Other: Spawns in Wang Cars showroom while progressing through the missions there.
- Resembles: Nissan Skyline GT-R (R32) front, Nissan Skyline GT-R (R34) rear Flash Jester Stratum
- Drivetrain: FR Sultan - Drivetrain: AWD (front engine)
- Resembles: Subaru Impreza WRX STi (GC) Uranus - Drivetrain: FR
- Resembles: Mitsubishi Eclipse (1G) High-Performance Sports Cars: *All of these cars can be customized at Transfender. Banshee
- Drivetrain: FR Bullet
- Drivetrain: FR Cheetah Comet - Drivetrain: AWD (front engine)
- Resembles: Porsche 911 (964) Carrera 4 Targa Infernus
- Drivetrain: AWD
- Resembles: first-gen Acura/Honda NSX Super GT
- Drivetrain: FR Turismo
- Drivetrain: AWD (mid-engine)
- Resembles: Ferrari F40 Windsor
- Drivetrain: FR
- Resembles 1966 Ferrari 500 Superfast (front) ZR-350
- Drivetrain: FR
- Variations:
- Standard
- With spoiler
- Resembles: Mazda RX-7 (FD) SUVs & Wagons/Estates: *All of these vehicles can be customized at Transfender. Huntley
- Drivetrain: AWD (front engine)
- Resembles: '95 Land Rover Range Rover Landstalker
- Drivetrain: AWD (front engine) Perennial
- Drivetrain: FF Rancher Regina
- Drivetrain: FF Romero Solair Light Trucks & Vans/People Carriers: Berkley's RC Van Bobcat - Drivetrain: AWD (front engine) Burrito - Drivetrain: FR - Variations:
- Standard
- With spoiler and roof lights Mesa
- Drivetrain: AWD (front engine) Moonbeam
- Drivetrain: FR Newsvan
- Drivetrain: FR Pony Rumpo Sadler
- Drivetrain: AWD (front engine) Walton Yosemite
- Drivetrain: FR Bicycles & Motorcycles: *None of these bikes can be customized. BF-400 Bike BMX Faggio FCR-900 Freeway Mountain Bike NRG-500 PCJ-600 Pizzaboy Sanchez Wayfarer Recreational & Race Cars: Bandito - Drivetrain: RR
- Other: No radio BF Injection
- Drivetrain: RR Bloodring Banger Caddy Camper
- Drivetrain: RR
- Variations:
- Standard
- Extended roof
- Mothership
- Standard
- Extended roof
- Other: You'll have opportunities to steal a Mothership during a few of the missions The Truth is involved in. If its paint job disappears in a garage, it'll become a regular Camper.
- Resembles: Volkswagen Type 2 (T1) Hotring Racer Jetpack Journey Kart Monster - Drivetrain: AWD (front engine)
- Variations: - Standard truck - Racing paintjob (win 8-Track to unlock) - Standard
- With fog lights - With spoiler
- With roll bar & fog lights - Michelle's truck (unlocked while dating her)
- Other: four-wheel steering replaces a handbrake (R1).
Quad Sandking - Drivetrain: AWD (front engine)
- Variations:
- Standard
- With hydraulics Vortex Civil Servant & Transportation: Baggage Brown Streak Engine Bus Cabbie
- Drivetrain: FR Coach Freight Mr. Whoopee Stretch Sweeper Taxi
- Drivetrain: FF Towtruck Trashmaster Tug Utility Van Heavy Trucks & Utility: Benson Boxville Cement Truck Combine Harvester DFT-30 Dozer - Drivetrain: RR
- Other: Features rear-wheel steering and a loader you control with the right stick. Dumper - Other: Operate the bed with the right stick. You'll find one at the bottom of Hunter Quarry after completing the missions there. Dune - Other: Great off-roader. Spawns outside Las Venturas' stadium once you complete the 'Kickstart' challenge. Flatbed Forklift Hotdog Linerunner Mower Mule Packer Roadtrain - Drivetrain: FR Tanker Tractor
- Other: The hook on the back can be used to tow cars; use the right analog stick to operate it. Yankee Commercial & Government Auctions: Ambulance
- Drivetrain: FR
- Other: Press R3 to begin the odd job "Paramedic" Barracks Cargobob Enforcer FBI Rancher FBI Truck Fire Truck
- Drivetrain: FR HPV1000 Hunter Hydra Patriot - Drivetrain: AWD (front engine)
- Resembles: AM General M998 HMMWV Police - Variations:
- Los Santos
- San Fierro
- Las Venturas Police Maverick Predator Ranger Rhino Securicar S.W.A.T. Aircraft: Andromada - Other: Only obtainable with cheat device. You can lower the rear ramp with the right stick, but you can't drive anything into the storage compartment. AT-400 Beagle Cropduster Dodo Hydra Leviathan - Other: There isn't a magnet outside of the mission "Up, Up, and Away!". Maverick Nevada News Chopper Raindance
Rustler Seasparrow Shamal Skimmer Sparrow Stuntplane Watercraft: Coastguard Dinghy Jetmax Launch Marquis Reefer Speeder Squallo Tropic RC Vehicles: RC Bandit RC Baron RC Goblin RC Tiger
Upload Your Photo Gallery to Your Computer
This particular guide is going to work
ONLY with the PS2 version of San Andreas, as the programs you download
were built specifically for the PS2 game. I'll go through step-by-step,
so even if you're not the most computer-savvy person, you'll be sharing
pictures in no time.
What you will need:
- PS2 Save Builder (download here)
- GTA: San Andreas Gallery Viewer (download here)
- USB drive (also known as a jump, pen, or thumb drive. Large storage capacities getting seriously cheaper all the time)
- Cheat device with a memory manager (buy at almost any video game retailer or online; I'll be using an Action Replay MAX, but CodeBreaker is said to be more reliable with your save files)
- An online photo hosting account (I recommend photobucket.com)
The first thing you'll want to do is create a folder in your Documents called something along the lines of "PS2 Tools." You don't need to do this, but it makes things more organized and easier to find. Download both the Save Builder and the Gallery Viewer listed above by clicking [Download this file Now!] below the description. When the window pops up, click on 'Save' and save the files to the folder you made. When the saves are complete, go into the folder and you'll see two sub-folders with zippers on them. Right-click each of them and click 'Extract All...' from the mini-menu. Another window will pop up. Click 'Next' at the bottom. At this second page, the 'Files will be extracted to this directory' text box should have your PS2 Tools folder typed in for you. If not, click 'Browse' and find the folder, then click 'Next' again. Make sure the 'Show extracted files' check box is checked and click 'Finish.' This creates another sub-folder (with the same name of the folder you just extracted from) with two documents inside. Once the files are extracted from both the Save Builder and Gallery Viewer, open them up by going into the non-zippered folder and opening them: for the Save Builder, it's the one with the 'V' image (titled ps2save-builder); and for the Gallery Viewer, it's the one with the picture of a girl (titled GTAGV - you could read the 'readme' file, but I'll explain it all here anyway).
Go play San Andreas and take some pictures (use L1 to snap the pic to be able to save them to your memory card). Plug your USB drive into the front of your PS2. Pop in your Action Replay MAX disc (not the Media Creator Software disc - if you're using another cheat device, go into it's respective memory manager) and go to 'Max Memory' at the main menu. Select 'My Devices,' then the memory card that your San Andreas save is on. Check the box for the GTA:SA save then "Copy to MaxDrive." Once the saving process is done, plug the USB drive into your computer.
*There has been a couple times when I tried to copy the save to the USB drive and the AR MAX disc froze during the copy process. If your San Andreas save is on the memory card that came with the AR MAX and this happens (you'll know because the background music keeps replaying the same few seconds of sound and the text at the bottom of the screen stops moving), the problem is most likely the memory card. Always use Sony's official memory cards to avoid corruption of your gamesaves.
Open the PS2 Save Builder on your computer. Once the window pops up, go to File > Open > 20946_14712_SanAndreas.max (that's what my save was called; yours will be slightly different, but it should still have 'SanAndreas.max' at the end). Now in the Save Builder window, look under 'File Name' and find 'GALLERY.DAT.' Right-click it and select 'Extract' in the mini-menu to save the picture gallery (leave its name as 'GALLERY' - I recommend saving to the PS2 Tools folder to find it easily.
Open the San Andreas Gallery Viewer. Once the window pops up, go to File > Open > [the folder you saved the gallery to] > GALLERY. Your pictures should now appear in the vertical menu on the left side of the Viewer Gallery window. You can save individual photos by selecting the image so it appears larger to the right, then clicking Gallery > Save current image, or you could save them all at once by going to Gallery > Extract all to folder. Either way, save them to your 'My Pictures' folder (create a San Andreas sub-folder if you want). If you don't have one already, create an account at PhotoBucket and upload your photos there to be able to show your friends online.
Button Cheats
Health, Armor, $250K: R1, R2, L1, X, Left, Down, Right, Up, Left, Down, Right, Up
Infinite Health: Down, X, Right, Left, Right, R1, Right, Down, Up, Triangle
Infinite Ammo: L1, R1, Square, R1, Left, R2, R1, Left, Square, Down, L1, L1
Weapons 1: R1, R2, L1, R2, Left, Down, Right, Up, Left, Down, Right, Up
Weapons 2: R1, R2, L1, R2, Left, Down, Right, Up, Left, Down, Down, Left
Weapons 3: R1, R2, L1, R2, Left, Down, Right, Up, Left, Down, Down, Down
Raise Wanted Level: R1, R1, Circle, R2, Left, Right, Left, Right, Left, Right
Lower Wanted Level: R1, R1, Circle, R2, Up, Down, Up, Down, Up, Down
Never Wanted: Circle, Right, Circle, Right, Left, Square, Triangle, Up
Bounty: Down, Up, Up, X, R2, R1, L2, L2
Spawn:
Romero: Down, R2, Down, R1, L2, Left, R1, L1, Left, Right Stretch: R2, Up, L2, Left, Left, R1, L1, Circle, Right Trashmaster: Circle, R1, Circle, R1, Left, Left, R1, L1, Circle, Right Bloodring Banger: Down, R1, Circle, L2, L2, X, R1, L1, Left, Left Caddy: Circle, L1, Up, R1, L2, X, R1, L1, Circle, X Dozer: R2, L1, L1, Right, Right, Up, Up, X, L1, Left Jetpack: L1, L2, R1, R2, Up, Down, Left, Right, L1, L2, R1, R2, Up, Down, Left, Right Hotring Racer 1: R1, Circle, R2, Right, L1, L2, X, X, Square, R1 Hotring Racer 2: R2, L1, Circle, Right, L1, R1, Right, Up, Circle, R2 Hunter: Circle, X, L1, Circle, Circle, L1, Circle, R1, R2, L2, L1, L1 Hydra: Triangle, Triangle, Square, Circle, X, L1, L1, Down, Up Monster: Right, Up, R1, R1, R1, Down, Triangle, Triangle, X, Circle, L1, L1 Parachute: Left, Right, L1, L2, R1, R2, R2, Up, Down, Right, L1 Quadbike: Left, Left, Down, Down, Up, Up, Square, Circle, Triangle, R1, R2 Rancher: Up, Right, Right, L1, Right, Up, Square, L2 Rhino: Circle, Circle, L1, Circle, Circle, Circle, L1, L2, R1, Triangle, Circle, Triangle Stunt Plane: Circle, Up, L1, L2, Down, R1, L1, L1, Left, Left, X, Triangle Tanker: R1, Up, Left, Right, R2, Up, Right, Square, Right, L2, L1, L1 Vortex: Triangle, Triangle, Square, Circle, X, L1, L2, Down, Down Pimp Mission Complete: Right, L2, L2, Down, L2, Up, Up, L2, R2 Taxi Mission Complete: Up, Left, Left, Down, Circle, Square, L1, L1, L2, R1, R2 Hitman Level All Weapons: Down, Square, X, Left, R1, R2, Left, Down, Down, L1, L1, L1 Max Vehicle Skills: Square, L2, X, R1, L2, L2, Left, R1, Right, L1, L1, L1 Max Respect: L1, R1, Triangle, Down, R2, X, L1, Up, L2, L2, L1, L1 Max Sex Appeal: Circle, Triangle, Triangle, Up, Circle, R1, L2, Up, Triangle, L1, L1, L1 Max Lung Capacity: Down, Left, L1, Down, Down, R2, Down, L2, Down Max Muscle: Triangle, Up, Up, Left, Right, Square, Circle, Left Max Fat: Triangle, Up, Up, Lft, Right, Square, Circle, Down No Muscle or Fat: Triangle, Up, Up, Left, Right, Square, Circle, Right No Hunger: Square, L2, R1, Triangle, Up, Square, L1, Up, X Super Punches: Up, Left, X, Triangle, R1, Circle, Circle, Circle, L2 Adrenaline Effects: X, X, Square, R1, L1, X, Down, Left, X Higher Jumps: Up, Up, Triangle, Triangle, Up, Up, Left, Right, Square, R2, R2 Higher Bike Jumps: Triangle, Square, Circle, Circle, Square, Circle, Circle, L1, L2, L2, R1, R2 All Cars Have Nitrous: Left, Triangle, R1, L1, Up, Square, Triangle, Down, Circle, L2, L1, L1 Perfect Handling: Triangle, R1, R1, Left, R1, L1, R2, L1 - press L3 to jump Deadly Vehicle: L1, L2, L2, Up, Down, Down, Up, R1, R2, R2 Aim While Driving: Up, Up, Square L2, Right, X, R1, Down, R2, Circle Taxis Upgraded: Up, X, Triangle, X, Triangle, X, Square, R2, Right Drive on Water: Right, R2, Circle, R1, L2, Square, R1, R2 Flying Boats: R2, Circle, Up, L1, Right, R1, Right, Up, Square, Triangle Flying Cars: Square, Down, L2, Up, L1, Circle, Up, X, Left Cars Fly Away When Hit: Square, R2, Down, Down, Left, Down, Left, Left, L2, X Invisible Cars: Triangle, L1, Triangle, R2, Square, L1, L1 Destroy All Vehicles: R2, L2, R1, L1, L2, R2, Square, Triangle, Circle, Triangle, L2, L1 Commit Suicide: Right, L2, Down, R1, Left, Left, R1, L1, L2, L1 No Effect: Square, Square, R2, Left, Up, Square, R2, X, X, X Faster Cars: Right, R1, Up, L2, L2, Left, R1, L1, R1, R1 Aggressive Traffic: R2, Circle, R1, L2, Left, R1, L1, R2, L2 Sports Car Traffic: Up, L1, R1, Up, Right, Up, X, L2, X, L1 Beater Traffic: L2, Right, L1, Up, X, L1, L2, R2, R1, L1, L1, L1 - the only way to find the Tornado once you've taken over all gang territories Rural Traffic: Triangle, Left, Square, R2, Up, L2, Down, L1, X, L1, L1, L1 Black Traffic: Circle, L2, Up, R1, Left, X, R1, L1, Left, Circle Pink Traffic: Circle, L1, Down, L2, Left, X, R1, L1, Right, Circle Reduced Traffic: X, Down, Up, R2, Down, Triangle, L1, Triangle, Left Slow Motion: Triangle, Up, Right, Down, Square, R2, R1 Fast Motion: Triangle, Up, Right, Down, L2, L1, Square Fast Clock: Circle, Circle, L1, Square, L1, Square, Square, Square, L1 Triangle, Circle, Triangle Always 21:00: Left, Left, L2, R1, Right, Square, Square, L1, L2, X Always 0:00 or 12:00: Square, L1, R1, Right, X, Up, L1, Left, Left Weather: Sunny: R2, X, L1, L1, L2, L2, L2, Triangle Very Sunny: R2, X, L1, L1, L2, L2, L2, Down Foggy: R2, X, L1, L1, L2, L2, L2, X Cloudy: L2, Down, Down, Left, Square, Left, R2, Square, X, R1, L1, L1 Very Cloudy: R2, X, L1, L1, L2, L2, L2, Square Stormy: R2, X, L1, L1, L2, L2, L2, Circle Sandstorm: Up, Down, L1, L1, L2, L2, L1, L2, R1, R2 Recruit anyone and they'll have guns: Down, Square, Up, R2, R2, Up, Right, Right, Up Recruit anyone and they'll have rockets: R2, R2, R2, X, L2, L1, R2, L1, Down, X Do not save the game after entering these cheats: Pedestrians are Gang Members: L2, Up, R1, R1, Left, R1, R1, R2, Right, Down Peds are Gangs and Workers: Left, Right, Right, Right, Left, X, Down, Up, Square, Right City in Chaos: L2, Right, L1, Triangle, Right, Right, R1, L1, Right, L1, L1, L1 - just like after the mission 'Riot' Peds Riot: Down, Left, Up, Left, X, R2, R1, L2, L1 Peds Have Weapons:R2, R1, X, Triangle, X, Triangle, Up, Down Peds Attack w/Weapons: X, L1, Up, Square, Down, X, L2, Down, X, L2, Triangle, Down, R1, L1, L1 Peds are Elvis: L1, Circle, Triangle, L1, L1, Square, L2, Up, Down, Left Police Cars Go After Peds: Right, R2, Up, Up, R2, Circle, Square, R2, L1, Right, Down, L1 Beach Theme: Up, Up, Down, Down, Square, Circle, Square, Down, Circle Kinky Theme: Square, Right, Square, Square, L2, X, Triangle, X, Triangle Rural Theme: L1, L1, R1, R1, L2, L1, R2, Down, Left, Up Yakuza Theme: X, X, Down, R2, L2, Circle, R1, Circle, Square
Romero: Down, R2, Down, R1, L2, Left, R1, L1, Left, Right Stretch: R2, Up, L2, Left, Left, R1, L1, Circle, Right Trashmaster: Circle, R1, Circle, R1, Left, Left, R1, L1, Circle, Right Bloodring Banger: Down, R1, Circle, L2, L2, X, R1, L1, Left, Left Caddy: Circle, L1, Up, R1, L2, X, R1, L1, Circle, X Dozer: R2, L1, L1, Right, Right, Up, Up, X, L1, Left Jetpack: L1, L2, R1, R2, Up, Down, Left, Right, L1, L2, R1, R2, Up, Down, Left, Right Hotring Racer 1: R1, Circle, R2, Right, L1, L2, X, X, Square, R1 Hotring Racer 2: R2, L1, Circle, Right, L1, R1, Right, Up, Circle, R2 Hunter: Circle, X, L1, Circle, Circle, L1, Circle, R1, R2, L2, L1, L1 Hydra: Triangle, Triangle, Square, Circle, X, L1, L1, Down, Up Monster: Right, Up, R1, R1, R1, Down, Triangle, Triangle, X, Circle, L1, L1 Parachute: Left, Right, L1, L2, R1, R2, R2, Up, Down, Right, L1 Quadbike: Left, Left, Down, Down, Up, Up, Square, Circle, Triangle, R1, R2 Rancher: Up, Right, Right, L1, Right, Up, Square, L2 Rhino: Circle, Circle, L1, Circle, Circle, Circle, L1, L2, R1, Triangle, Circle, Triangle Stunt Plane: Circle, Up, L1, L2, Down, R1, L1, L1, Left, Left, X, Triangle Tanker: R1, Up, Left, Right, R2, Up, Right, Square, Right, L2, L1, L1 Vortex: Triangle, Triangle, Square, Circle, X, L1, L2, Down, Down Pimp Mission Complete: Right, L2, L2, Down, L2, Up, Up, L2, R2 Taxi Mission Complete: Up, Left, Left, Down, Circle, Square, L1, L1, L2, R1, R2 Hitman Level All Weapons: Down, Square, X, Left, R1, R2, Left, Down, Down, L1, L1, L1 Max Vehicle Skills: Square, L2, X, R1, L2, L2, Left, R1, Right, L1, L1, L1 Max Respect: L1, R1, Triangle, Down, R2, X, L1, Up, L2, L2, L1, L1 Max Sex Appeal: Circle, Triangle, Triangle, Up, Circle, R1, L2, Up, Triangle, L1, L1, L1 Max Lung Capacity: Down, Left, L1, Down, Down, R2, Down, L2, Down Max Muscle: Triangle, Up, Up, Left, Right, Square, Circle, Left Max Fat: Triangle, Up, Up, Lft, Right, Square, Circle, Down No Muscle or Fat: Triangle, Up, Up, Left, Right, Square, Circle, Right No Hunger: Square, L2, R1, Triangle, Up, Square, L1, Up, X Super Punches: Up, Left, X, Triangle, R1, Circle, Circle, Circle, L2 Adrenaline Effects: X, X, Square, R1, L1, X, Down, Left, X Higher Jumps: Up, Up, Triangle, Triangle, Up, Up, Left, Right, Square, R2, R2 Higher Bike Jumps: Triangle, Square, Circle, Circle, Square, Circle, Circle, L1, L2, L2, R1, R2 All Cars Have Nitrous: Left, Triangle, R1, L1, Up, Square, Triangle, Down, Circle, L2, L1, L1 Perfect Handling: Triangle, R1, R1, Left, R1, L1, R2, L1 - press L3 to jump Deadly Vehicle: L1, L2, L2, Up, Down, Down, Up, R1, R2, R2 Aim While Driving: Up, Up, Square L2, Right, X, R1, Down, R2, Circle Taxis Upgraded: Up, X, Triangle, X, Triangle, X, Square, R2, Right Drive on Water: Right, R2, Circle, R1, L2, Square, R1, R2 Flying Boats: R2, Circle, Up, L1, Right, R1, Right, Up, Square, Triangle Flying Cars: Square, Down, L2, Up, L1, Circle, Up, X, Left Cars Fly Away When Hit: Square, R2, Down, Down, Left, Down, Left, Left, L2, X Invisible Cars: Triangle, L1, Triangle, R2, Square, L1, L1 Destroy All Vehicles: R2, L2, R1, L1, L2, R2, Square, Triangle, Circle, Triangle, L2, L1 Commit Suicide: Right, L2, Down, R1, Left, Left, R1, L1, L2, L1 No Effect: Square, Square, R2, Left, Up, Square, R2, X, X, X Faster Cars: Right, R1, Up, L2, L2, Left, R1, L1, R1, R1 Aggressive Traffic: R2, Circle, R1, L2, Left, R1, L1, R2, L2 Sports Car Traffic: Up, L1, R1, Up, Right, Up, X, L2, X, L1 Beater Traffic: L2, Right, L1, Up, X, L1, L2, R2, R1, L1, L1, L1 - the only way to find the Tornado once you've taken over all gang territories Rural Traffic: Triangle, Left, Square, R2, Up, L2, Down, L1, X, L1, L1, L1 Black Traffic: Circle, L2, Up, R1, Left, X, R1, L1, Left, Circle Pink Traffic: Circle, L1, Down, L2, Left, X, R1, L1, Right, Circle Reduced Traffic: X, Down, Up, R2, Down, Triangle, L1, Triangle, Left Slow Motion: Triangle, Up, Right, Down, Square, R2, R1 Fast Motion: Triangle, Up, Right, Down, L2, L1, Square Fast Clock: Circle, Circle, L1, Square, L1, Square, Square, Square, L1 Triangle, Circle, Triangle Always 21:00: Left, Left, L2, R1, Right, Square, Square, L1, L2, X Always 0:00 or 12:00: Square, L1, R1, Right, X, Up, L1, Left, Left Weather: Sunny: R2, X, L1, L1, L2, L2, L2, Triangle Very Sunny: R2, X, L1, L1, L2, L2, L2, Down Foggy: R2, X, L1, L1, L2, L2, L2, X Cloudy: L2, Down, Down, Left, Square, Left, R2, Square, X, R1, L1, L1 Very Cloudy: R2, X, L1, L1, L2, L2, L2, Square Stormy: R2, X, L1, L1, L2, L2, L2, Circle Sandstorm: Up, Down, L1, L1, L2, L2, L1, L2, R1, R2 Recruit anyone and they'll have guns: Down, Square, Up, R2, R2, Up, Right, Right, Up Recruit anyone and they'll have rockets: R2, R2, R2, X, L2, L1, R2, L1, Down, X Do not save the game after entering these cheats: Pedestrians are Gang Members: L2, Up, R1, R1, Left, R1, R1, R2, Right, Down Peds are Gangs and Workers: Left, Right, Right, Right, Left, X, Down, Up, Square, Right City in Chaos: L2, Right, L1, Triangle, Right, Right, R1, L1, Right, L1, L1, L1 - just like after the mission 'Riot' Peds Riot: Down, Left, Up, Left, X, R2, R1, L2, L1 Peds Have Weapons:R2, R1, X, Triangle, X, Triangle, Up, Down Peds Attack w/Weapons: X, L1, Up, Square, Down, X, L2, Down, X, L2, Triangle, Down, R1, L1, L1 Peds are Elvis: L1, Circle, Triangle, L1, L1, Square, L2, Up, Down, Left Police Cars Go After Peds: Right, R2, Up, Up, R2, Circle, Square, R2, L1, Right, Down, L1 Beach Theme: Up, Up, Down, Down, Square, Circle, Square, Down, Circle Kinky Theme: Square, Right, Square, Square, L2, X, Triangle, X, Triangle Rural Theme: L1, L1, R1, R1, L2, L1, R2, Down, Left, Up Yakuza Theme: X, X, Down, R2, L2, Circle, R1, Circle, Square
Action Replay MAX NTSC (North America)
These codes are for Version 1 of the game.
Master Code
This code must be on for any of the others to work.
9V8Z-XGVC-1GWC6
990H-WK1H-EJQQM Spawn Andromada (spawn Romero) While in game, enter the 'spawn Romero' cheat. The plane has a loading ramp you can raise and lower with the right analog stick, but an invisible barrier prevents you from getting inside. 2D0K-3H2X-GARAE
5ZEW-4MDU-Q35X6 Spawn FBI Truck (spawn Stretch) While in game, enter the 'spawn Stretch' cheat. There is no turret on the roof, but it can do Vigilante missions. C1DQ-8VAZ-CJNDC
M8TN-V2WJ-EY600 Spawn SWAT Tank (spawn Trashmaster) While in game, enter the 'spawn Trashmaster' cheat. The tank has a water turret on the top, which you can spray with Circle or L1, and aim with the right analog stick. This vehicle can perform Vigilante missions. PRV4-RH74-5RNJD
WCHJ-48QQ-ZBRXW Hot Coffee When a girl invites you in for coffee, instead of seeing a shaky view of the house, you start a mini game where the girl gives you a blow job then you have sex. The instructions for how to 'play' are all on-screen. Once the date is over, you'll probably be unable to move, so press L1, L2, R1, and R2 all at once to free yourself. Date & Girlfriend (folder) D1U0 7U5R BJ2ZC Hot Coffee (sub-folder) 7UZJ 9YW8 0T45Z 8UQH 1851 EZQPC Uncensored JD3N EV68 AGRW0 4PMG 6VNA PBZQ7 BKR1 JF84 6Q23C U7Q0 6H91 6JATX 5540 HY63 181MY 7FB5 3052 PWB8N 03AH 5PBC 9K2T7 Jetpack Unlimited Height This cheat is especially useful for exploring Liberty City during the mission 'Saint Marks Bistro'. 2V43-KT9J-J3XJH
KX13-2Y9F-7VNN0
QCXT-15GA-TTC1R
TD9X-QUQW-TFNE8 Grove Street Garage Modification First, you must park atleast one car in your garage on Grove Street. Make sure the car is not modified (via TransFender, etc) or the game will freeze when you go to open the garage. I'm just going to post the vehicles I find the most fun to drive, or are more rare than others (in alphabetical order). If you want the full list, as well as codes to replace car #2, go here. Grove Street Garage Mods (folder) UWYJ-52E8-CEW6N Replace Car 1 (sub folder) - this is the car closest to the main part of the house. NVBW-U50Z-DD1YA
8UQH-1851-EZQPC Bandito
V50E-H8A0-6KD9R
9WP0-GRBB-EBZ18
KV5R-8UKP-UBT5V Banshee
HC6U-A4ZN-1AKVV
9WP0-GRBB-EBZ18
Q463-ZK1R-7RB8D BF Injection
NPK7-JYF5-36VWZ
9WP0-GRBB-EBZ18
ZEET-F89X-6KEN6 Blista Compact CDJU-2RM1-BMHVZ
9WP0-GRBB-EBZ18
WAUU-13XM-79M4M Bloodring Banger
FANZ-RNAJ-533ER
9WP0-GRBB-EBZ18
QRPM-N1E8-2MA6C Buffalo 8JYH-22AF-6JG0X
9WP0-GRBB-EBZ18
XFCC-EQ2C-T31VQ Bullet
8ZP3-PZU8-WC0PE
9WP0-GRBB-EBZ18
1XEZ-5V7G-8GC1A Cheetah YZYG-7708-QPC6H
9WP0-GRBB-EBZ18
C8TJ-NF9Q-96DNG Club
WNPZ-X7Q8-6VTZJ
9WP0-GRBB-EBZ18
YU8T-84KR-Y0CWP Comet
ZCX6-2BAW-A7XHD
9WP0-GRBB-EBZ18
ZH0B-CEXB-YM91E Elegy
AMJP-E4DV-ZU4J8
9WP0-GRBB-EBZ18
DEMT-0CTB-VD61T FBI Rancher
M085-F3BZ-NM9JA
9WP0-GRBB-EBZ18
4VBY-4WB6-NR355 FBI Truck
23XA-K2UN-0WKT5
9WP0-GRBB-EBZ18
WYGA-8FPH-N1VXQ FCR-900 UVJ9-PU06-C32KT
9WP0-GRBB-EBZ18
HMX2-9ZPX-3N9VJ Flash
1RNE-K86Y-FKHNZ
9WP0-GRBB-EBZ18
WQFY-UENR-Z1T13 Hotknife
6T5T-99U0-J7NHD
9WP0-GRBB-EBZ18
YV42-HN3K-X94T9 Hotring Racer DMNK-TB6E-108V9
9WP0-GRBB-EBZ18
Q6Y9-P9DV-EXDCH Hotring Racer 2
YTGP-U0UD-DHZJY
9WP0-GRBB-EBZ18
THDJ-DQXT-XFG7J Hotring Racer 3 TCZB-ZCXN-43MHM
9WP0-GRBB-EBZ18
HFQQ-09QM-B2E0T Huntley
JB59-WG07-16EP1
9WP0-GRBB-EBZ18
R9VR-TPQ7-NKJWH Hustler
5TNM-0UFZ-8QNUW
9WP0-GRBB-EBZ18
1WB8-3UGW-GYA3J Infernus BKYE-55WJ-RHZTF
9WP0-GRBB-EBZ18
ZCH4-EWVJ-JDXPA Jester
DPEU-JDMK-4FPJH
9WP0-GRBB-EBZ18
AT1B-X6ZK-QGQ28 NRG-500
3KW5-1EY6-WJP0Q
9WP0-GRBB-EBZ18
X74A-Z364-N7W54 Patriot DD3Z-BZK1-GEGW2
9WP0-GRBB-EBZ18
EEPJ-EHCB-XMC8J Phoenix
E1TE-412R-QJ7RR
9WP0-GRBB-EBZ18
XE26-B0P0-BT3DE Quadbike
19T5-T1AU-4NA08
9WP0-GRBB-EBZ18
QGPB-8YNU-1UP43 Sanchez
QDPU-NAN7-A0VW2
9WP0-GRBB-EBZ18
VYBK-Z2FF-HNND1 Sandking TV29-8XRZ-B71JB
9WP0-GRBB-EBZ18
C6YE-9NVR-7T3RF Slamvan
90GV-8J65-AKDNG
9WP0-GRBB-EBZ18
HH3T-0XB0-WJEUD Stallion
7C0H-T1QH-MFPU8
9WP0-GRBB-EBZ18
EA82-P6XT-P2P4E Sultan
M9W8-APE9-GM9Q4
9WP0-GRBB-EBZ18
6HQ5-ZUX8-NDA4F SWAT Tank
HKJ7-XU5Q-XTGG6
9WP0-GRBB-EBZ18
2VJM-33KU-425BV Tornado
488N-J954-0UAA0
9WP0-GRBB-EBZ18
BBBY-AWH9-JUZ2W Turismo
5B76-PJY9-Q99J8
9WP0-GRBB-EBZ18
7YF2-URYK-2KGQ4 ZR-350
XRYP-DNH5-1E75C
9WP0-GRBB-EBZ18
6XPD-CB7Q-2GPYN Damage Mods (sub folder) ZYRM-TFTB-YXV18
JB9E-91K0-74840 Car 1 Damage (sub sub folder) - this is the car closest to the main part of the house EG4B-9TWY-GA7GG
8UQH-1851-EZQPC Everything-Proof 1P20-75HW-9G8JG
9WP0-GRBB-EBZ18
0TV1-H00F-V86JP Car 2 Damage (sub sub folder) - this is the car furthest away from the main part of the house FY68-CGJG-UAFV0
8UQH-1851-EZQPC Everything-Proof A9NB-WBVR-U6NQX
ZUD8-00XV-HF54Z
A3EX-JG98-8E39D Ramp World (Yakuza Theme) Only Packers and NRG-500s spawn on the streets. While in game, enter the 'Yakuza Theme' cheat. Do not activate this code at the same time as any others that replace the Yakuza Theme cheat. 0J31-20XE-UT5EX
J400-2M1E-47R74
DB9Q-VK0J-NKKMH Police State (Yakuza Theme) Pedestrians are police officers and army personnel, and SWAT Tanks and FBI Trucks are the only things driving in the streets. While in game, enter the 'Yakuza Theme' cheat. Do not activate this code at the same time as any others that replace the Yakuza Theme cheat. B4D5-WXE8-EKGRD
2AHF-XDN1-3KVM4
EWA2-7G4N-MRX75
Y0XY-77RV-UEVFM
J6VD-2677-BEYY6
8MB1-J496-U98ZB Grove Street Families Members Drive Banshees RH4N-P9BP-EDV7X
CFPA-93F7-8ZC4D
0N06-W7EW-FVZCA No Water This drains every ocean, river, and pond. It's a lot of fun for offroading. D2TR-J7YX-PVB8N
2YPB-MUH1-KYF7W Miscellaneous Codes (folder) AHDE-P6DA-UX15J Nitrous Effect (sub folder) VG2P-B0K6-0329V
JB9E-91K0-74840 Motorcycles I tried this code on an NRG-500 and you go so fast it's hard to control the bike - not to mention you're basically doing an infinite burnout. You can even go in reverse fast enough to throw yourself off the bike.
7DG6-3FWV-BMKTP
T8CZ-TZMX-8MQFY Super Molotov
You don't see the fire from the molotov explode, but the fire appears in a much bigger radius than usual. One of my molotovs kinda worked like a smoke bomb in the wind; fire was coming up from one small point and was blowing sideways. 3B93-EPJQ-PAY03
31Z4-VXCX-NFZ4H Super Car Explosion
The explosions when cars ... explode... are much bigger than usual. 02UY-B622-T2VW3
R0PA-PGBG-BHCBG More Cheat Device Codes: -Official AR MAX codes - the basics. Nothing that really expands the gameplay (find European-region codes here). -AR MAX Code Database - the fun codes, for all regions (NTSC, PAL, etc). -Edison Carter - more fun codes for all regions and multiple cheat devices.

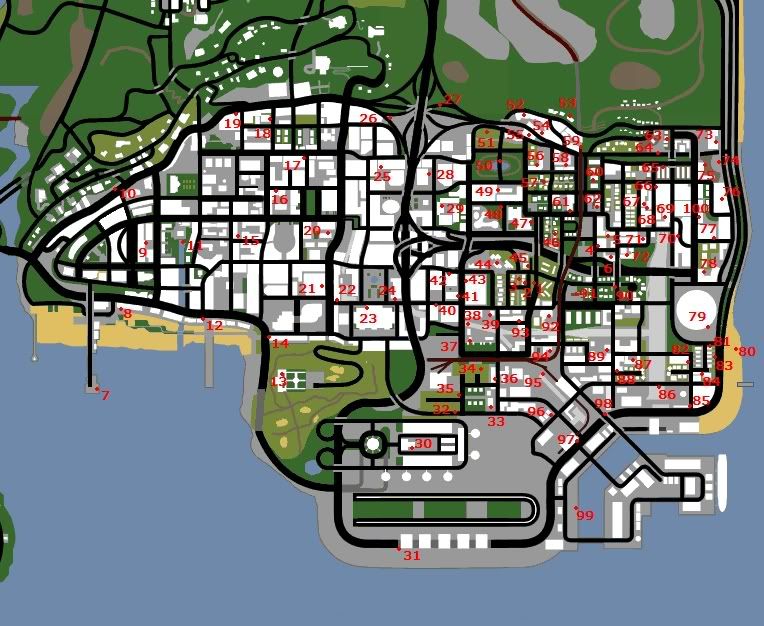
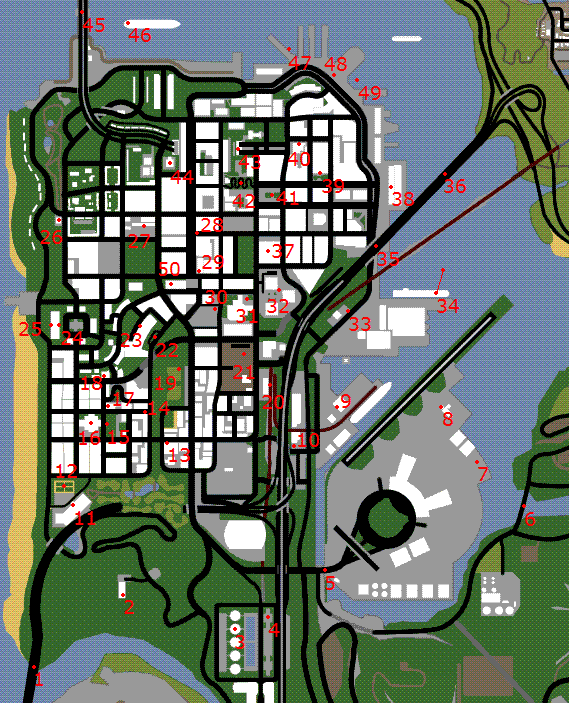
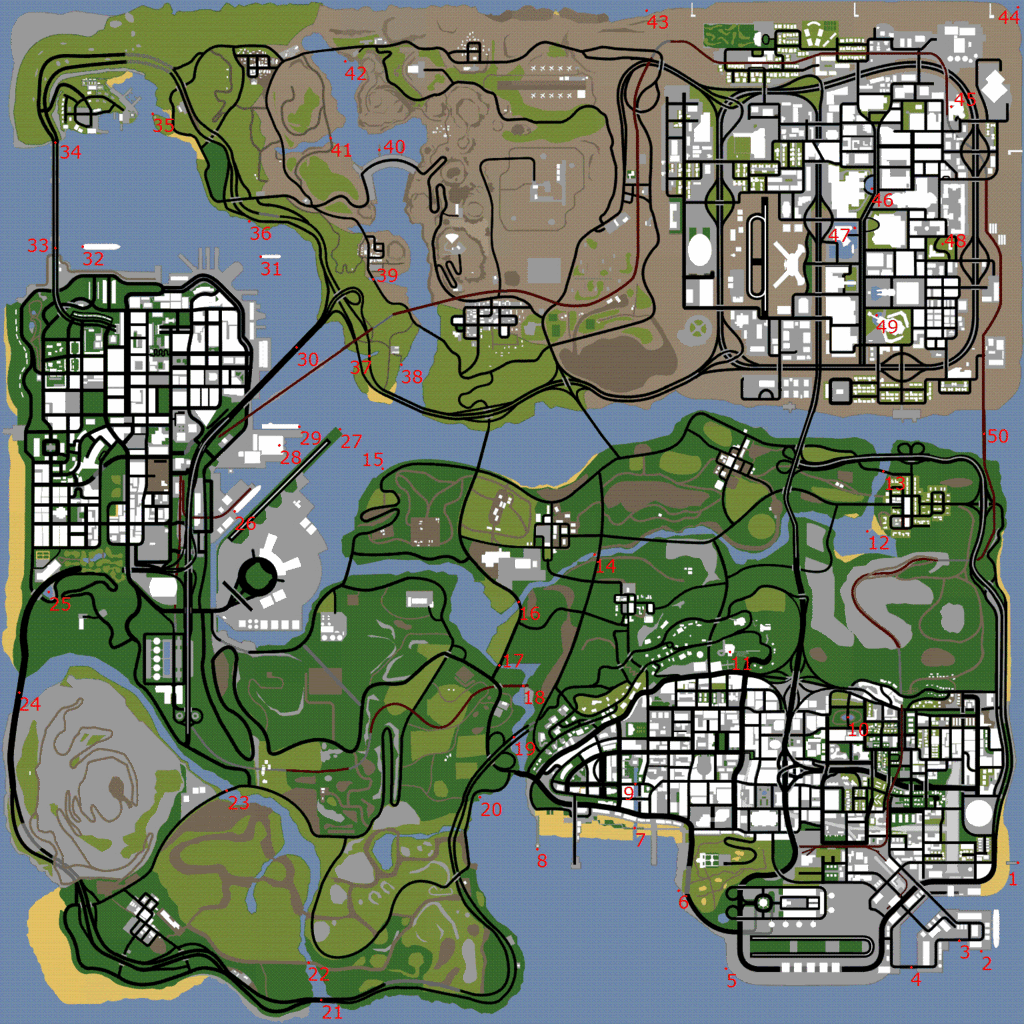