Grand Theft Auto: Vice City Stories
My complete guide for Vice City
Stories is on this one page, so use Find (Ctrl + F) to search for the
missions you're looking for. When the 'Find' search box pops up, enter
the codes (the number in between the [ ]'s) and hit 'Next' to get to the
corresponding mission. Keep in mind that this guide is for the PS2
version, so things like the Rampages and Unique Stunt Jumps may be in a
different place or missing altogether in the PSP game.
Tips & New Features [TPFT]
Story Missions
Sergeant Jerry Martinez
1) Soldier [J001]
2) Cleaning House [J002]
3) Conduct Unbecoming [J003]
Phil Cassidy
1) Cholo Victory [P004]
2) Boomshine Blowout [P005]
3) Truck Stop [P006]
Marty J. Williams
1) Shakedown [M007]
2) Fear the Repo [M008]
3) Waking Up the Neighbors [M009]
4) O, Brothel, Where Art Thou? [M010]
5) Got Protection? [M011]
Loise Cassidy-Williams
1) When Funday Comes [L012]
2) Taking Out the White Trash [L013]
Phil Cassidy (Cont'd)
1) Marked Men [P014]
Loise Cassidy-Williams (Cont'd)
1) D.I.V.O.R.C.E. [L015]
2) To Victor, the Spoils [L016]
Lance Vance
1) Jive Drive [L017]
Loise Cassidy-Williams (Part 3)
1) Hose the Hoes [L018]
2) Robbing the Cradle [L019]
Umberto Robina
1) Nice Package [U020]
2) Balls [U021]
3) Papi Don't Screech [U022]
4) Havana Good Time [U023]
Lance Vance (Cont'd)
1) The Audition [L024]
Bryan Forbes
1) Money For Nothing [B025]
Lance Vance (Part 3)
1) Caught As An Act [L026]
Bryan Forbes (Cont'd)
1) Leap and Bound [B027]
2) The Bum Deal [B028]
Lance Vance (Part 4)
1) Snitch Hitch [L029]
2) From Zero to Hero [L030]
3) Brawn of the Dead [L031]
Reni Wassulhaier
1) Accidents Will Happen [R032]
Lance Vance (Part 5)
1) Blitzkreig [L033]
Armando and Diego Mendez
1) The Mugshot Longshot [M034]
2) Hostile Takeover [M035]
3) Unfriendly Competition [M036]
4) High Wire [M037]
Lance Vance (Part 6)
1) Turn On, Tune In, Bug Out [L038]
Reni Wassulmaier (Cont'd)
1) The Colonel's Coke [R039]
2) Kill Phil [R040]
3) Say Cheese [R041]
Gonzalez
1) Home's On the Range [G042]
2) Purple Haze [G043]
Lance Vance (Part 7)
1) Taking the Fall [L044]
2) White Lies [L045]
3) Where It Hurts Most [L046]
Reni Wassulmaier (Part 3)
1) Kill Phil: Part 2 [R047]
Ricardo Diaz
1) Steal the Deal [R048]
2) The Exchange [R049]
Gonzalez (Cont'd)
1) Farewell to Arms [G050]
Armando and Diego Mendez (Cont'd)
1) Burning Bridges [M051]
Lance Vance (Part 8)
1) Blitzkrieg Strikes Again [L052]
2) Lost and Found [L053]
Reni Wassulmaier (Part 4)
1) So Long Schlong [R054]
Ricardo Diaz (Con'td)
1) Domo Arigato Domestoboto [R055]
Reni Wassulmaier (Part 5)
1) In the Air Tonight [R056]
Lance Vance (Part 9)
1) Light My Pyre [L057]
Ricardo Diaz (Part 3)
1) Over the Top [R058]
2) Last Stand [R059]
Required Odd Jobs
1) 99 Red Balloons [OJ01]
2) Air Rescue [OJ02]
3) Beach Patrol [OJ03]
4) Caddy Daddy [OJ04]
5) Civil Asset Forfeiture Impound: Boats [OJ05]
6) Civil Asset Forfeiture Impound: Land Vehicles [OJ06]
7) Crash! [OJ07]
8) Crims on Water Wings [OJ08]
9) Crims on Wings [OJ09]
10) Dirt Track Time Trials [OJ10]
11) Empire Businesses [OJ11]
12) Fire Copter [OJ12]
13) Fire Fighter [OJ13]
14) Haiti Hover Race [OJ14]
15) Harbor Hover Race [OJ15]
16) Hyman Memorial O.D.T. [OJ16]
17) Mashin' Up the Mall [OJ17]
18) Paramedic [OJ18]
19) Phil's Shooting Range [OJ19]
20) Playground on the Dock [OJ20]
21) Playground on the Park [OJ21]
22) Playground on the Point [OJ22]
23) Playground on the Town [OJ23]
24) Rampages [OJ25]
25) Rush! [OJ26]
26) Skywolf [OJ27]
27) Swinger's Club [OJ28]
28) Taxi Driver [OJ29]
29) Turismo [OJ30]
30) Unique Stunt Jumps [OJ31]
31) Vice Sights [OJ32]
32) Vigilante [OJ33]
33) Watersports [OJ34]
Maps
- Unmarked
- Health, Armor, & Police Bribes
- Odd Jobs
- Vehicles: Land - Vehicles: Sea & Air - Weapons - Easter Eggs
- Unique Stunt Jumps
- Rampages
- 99 Red Balloons
Easter Eggs [EGGS] Cheats 1) Button [CH01] 2) AR MAX (NTSC) [CH02]
- Vehicles: Land - Vehicles: Sea & Air - Weapons - Easter Eggs
- Unique Stunt Jumps
- Rampages
- 99 Red Balloons
Easter Eggs [EGGS] Cheats 1) Button [CH01] 2) AR MAX (NTSC) [CH02]
Tips & New Features
[TPFT] - *UNDER CONSTRUCTION*
New Features to the Series:
-Pause the game and go to your map. You can toggle on & off the Red Balloons and Unique Stunt Jumps you've already collected/completed.
-In the vehicle missions (Vigilante, Paramedic, etc), you get a checkpoint after each 5 levels completed, so you don't have to do the whole thing in one run.
Storyline
Sergeant Jerry Martinez
1. Soldier [J001]
After the scene, get on the
motorcycle in front of you, then follow the pink blip on the radar to
the V.I.P. terminal at the airport. Stop in the marker to activate
another scene. After the scene, you'll be in the water, so swim to
shore. You'll get a page, telling you to take the package to your
barracks, so follow the pink blip on the radar. You can save your game
if you want to, as well as pick up the ammo.
Reward: $50
2. Cleaning House [J002]
Exit your barracks, then follow
the yellow Sargeant stripes blip on the radar to begin. After the scene,
follow the pink blip on the radar to meet up with Phil Cassidy. After
the scene, get in his truck and drive him to his old place; it's a very
short trip. Shoot the cholos then go inside. Kill the two cholos in here
and you'll collect the cash. Take it back to Martinez.
Reward: $100
* Phil's shooting range is now open; you can visit it any time. You'll also get a page from your aunt... nothing important.
3. Conduct Unbecoming [J003]
Walk into the marker at Martinez'
office to begin. After the scene, meet Phil at his old place. Get in the
Stinger and look around Vice Port for Mary. When you enter the Port, a
girl with a blue arrow above her head will appear; ask her about Mary.
Take Mona to Starfish Island and meet up with Mary. After the scene,
kill the two guys and take Mary back to Martinez. Feel free to take an
Infernus if you like. Congratulations, you've been kicked out of the
army!
Reward: None
*You'll get a page from Phil. He's got work for you, along with a place to stay.
===========================================================
Phil Cassidy
1. Cholo Victory [P004]
Follow the 'P' on the radar to
begin. After the scene, drive to the police department. After another
scene, drive down the street to the hospital. After yet another scene,
chase after the cholo and get up next to him to Phil can shoot at him.
Once he catches on fire, get back to avoid the explosion. Take Phil's
truck to Pay-N-Spray, marked on the radar by a spray can. After
it's repaired, take Phil back to his place.
Reward: $200
*You'll get a page, opening up Marty J. Williams' mission strand.
2. Boomshine Blowout [P005]
Walk into the marker at Phil's to
begin. After the scene, get in Phil's truck and drive to the warehouse.
Just like Robbing Uncle Sam in San Andreas. After the scene, get in the
fork lift and put the four crates of boomshine in Phil's truck. They
have green arrows floating above them. Use the up/down buttons on the
d-pad to control the lift (it took me the entire time of the mission
before I found this out - read the on-screen instructions!) and keep the
crates away from fire or you'll blow the place up. After each crate is
put in the truck, another path will be blocked off, so you'll have to
find a new way around. Click here to see a map detailing the locations of the fallen debris.
Reward: $250
3. Truck Stop [P006]
Walk into the marker at Phil's to
begin. After the scene, drive to the Beachcomber Hotel to pick up Phil's
friends. Now follow the red blip on the radar and pull up close to the
truck so Phil and his buddies can shoot at it. When the three guys up
top are dead, get in front of the truck to stop it. After Phil starts
driving it back to his place, follow him and pull up close to any
followers so Phil's friends can shoot them.
Reward: $300
===========================================================
Marty J. Williams
1. Shakedown [M007]
Walk into the marker in front of
Marty's trailer to begin. After the scene, drive Marty to the shop. Kill
the three cholos and go inside the shop. Kill the two cholos inside.
After the scene, you'll have to do another job, but go to the hospital
and pick up the health out front if you're running low. Inside the next
store, destroy some of the store's shelves, then kill the three cholos;
atleast one of them's got a gun.
Reward: $500
2. Fear the Repo [M008]
Walk into the marker at Marty's to
begin. After the scene, take Marty to his lockup. You now have a list
of cars that need stealing. The first two are easy enough, just don't
let the owner's pull you back out of the car. The third, a deliver van,
is guarded by two guys. It's easy enough to get in the passenger door
and drive away, but you also attract a 2-star wanted level. The cops are
easy to ditch, so don't worry about them.
Reward: $500
3. Waking Up the Neighbors [M009]
Walk into the marker at Marty's to
begin. After the scene, pick up the grenades then head to each red blip
and blow up the trucks. Run over any cholos guarding them and pick up
the guns and ammo. After you destroy a second truck, the cholos will
start chasing after you. If you've been picking up their guns, you
should be able to take them out with a drive-by.
Reward: $500
4. O, Brothel, Where Art Thou? [M010]
Walk into the marker at Marty's to
begin. After the scene, head over to Stonewall J's. Take the Stubby
Shotgun Marty called ahead for. Next, go to the Brothel and destroy the
car. If you still have the grenades left over from the last mission,
this should be quick and easy. Your destruction will attract the
attention of about six cholos, so kill them too. Make sure to take any
ammo and money they drop. Walk into the brothel and kill the cholo
inside, and destroy any business assets. If you need a ride after the
scene, there's a muscle car behind the brothel.
Reward: $700
5. Got Protection? [M011]
After the scene, check out Marty's
brothel. After the scene, get the car behind the brothel and pick up
the three girls. Deliver them to the brothel to finish the mission.
Reward: $500
===========================================================
Loise Cassidy-Williams
1. When Funday Comes [L012]
Follow the 'L' on the
radar and walk into the marker to begin. After the scene, head to the
trailer park for an ATV race. This one might take a couple tries. It's a
fairly simple race, but it will take a little practice to get used to
the quad's handling, especially with the other obnoxious racers.
Reward: $500
*You can now
buy a quad at Sunshine Autos (on the south side of the new one that's
being built). You can also participate in street races.
2. Takin' Out the White Trash [L013]
You'll probably want a
gun before starting. After the scene, head to the trailer park and kill
the rednecks. When they're all dead, take Loise back to her sister's
place.
Reward: $200
===========================================================
Phil Cassidy (Cont'd)
1. Marked Men [P014]
Head back to Phil's
to start this mission. After the scene, take Phil to the lockup. Don't
damage the truck and you won't lose your life. After another scene, kill
Martinez's men, then take Phil back to his place.
Reward: None
*You'll get a
page from Martinez telling you you're still on his shit list... then
you'll get a call from Loise, who's got Marty troubles.
===========================================================
Loise Cassidy-Williams (Cont'd)
1. D.I.V.O.R.C.E. [L015]
Go back to Loise's sister's house to meet up with
Loise. Marty's taken her to the trailer park, so go there. After the
scene, kill the two rednecks then chase after Marty. Kill him, then
drive Loise to Phil's home in the original Vice City.
Reward: None
*Yay, trailer trash clothes! You've got a new safehouse, atleast.
2. To Victor, the Spoils [L016]
After the scene, get in a four-door car and drive
Loise to the blue blip on the radar. Hire the henchmen by targeting
them with R1, and then press R3. Now drive to Marty's loan shark and
kill everyone in the lot. Then drive your henchmen to the red blip and
kill Marty's other friends. If you're running low on health, head to the
hospital first. Try to run over and drive-by shoot as many as possible
to spare yourself the health. When they're all dead, pick up any ammo
and money that hasn't yet disappeared, then go inside the building. Kill
the two guys in the bar to gain the property.
Reward: $1500
*You can now start empires. The
whole deal is explained on-screen. You'll get a page, saying you earn
$900 every payday; you'll get a page whenever that day is. Pause the
game and look at your map to see all the empires you can own. You'll get
another page; someone's waiting for you at the airport.
===========================================================
Lance Vance
1. Jive Drive [L017]
Before starting, get full health, armor (click here
for one location - it's the blue dot), a lot of ammo, and save your
game. Follow the blue airplane blip on the radar to begin. After the
scene, Lance will be driving, and you'll be shooting. Obviously, you're
going to need to kill the cholos. After Lance crashes the car, take out
the cholos in the alley - do not let Lance die. It's pretty easy to die
here, so hopefully you saved the game beforehand - that way you can
reload and have all your ammo back.When they're all dead, drive Lance to
his hotel. You'll probably have a 2-star wanted level, so head to a
Pay-N-Spray on your way there.
Reward: None
*Umberto will page you, opening up his mission strand. But first, I'm going back to Loise.
===========================================================
Loise Cassidy-Williams (Part 3) 1. Hose the Hoes [L018] After the short scene, head to the blue blip to get a fire truck, then go put out the fire - the controls for the firetruck appear on-screen. After it's out, kill Marty's cousin. Reward: $300 *You'll get another pointless page from your mom. Head to the 'L' on the radar to continue Loise's missions... the southern 'L'. 2. Robbing the Cradle [L019] After the scene, stop the thugs from killing the Welfare Man. When the two guys are dead, warn off the Welfare Man by ramming into his truck or shooting it until it smokes - do not kill him. Reward: $300 *You'll get a page from Loise, just to say thanks. =========================================================== Umberto Robina 1. Nice Package [U020] You'll probably want to save before starting the mission; if you car blows up, you may die from the other cars around you that will explode. Follow the 'U' on the radar. After the scene, reach the package before the others. The fastest route is to get onto the main strip as soon as possible and follow that north. Another car had the package before me, so just chase after them. Juan will shoot when you're close, and if you have a gun, help him. When the package is dropped, pick it up before someone else does - if that happens, shoot them until they drop it, then try to pick it up again. Take the package to the marker in Vice Port. Reward: $750 2. Balls [U021] After the scene, get in the four-door car across the street and head to the re blip. Let your friends kill the cholos via drive-by. Rinse and repeat for the next four spots, then head back to Umberto's. Reward: $800 3. Papi Don't Screech [U022] After the scene, drive Umberto's car to the stadium downtown to pick up Alberto. Drive him to his new diner (you'll remember this from the original Vice City) before the time runs out. You should have plenty of time, so drive carefully. Go fast and Alberto's stress meter will begin to fill. As you head towards the diner, cholos will appear on the radar (red blips). Avoid them at all costs; take the side roads to go around them. If you're spotted, speed away and you should lose them before Alberto starts stressing out. Park in front of the diner to finish the mission.. Reward: $1000 4. Havana Good Time [U023] After the scene, grab the gun (it's got 453-30 ammo) and head to warehouse and kill the guards. After another scene, kill the cholos as they show up, and make sure to collect the ammo they drop. There are health and armor pickups in the warehouse if you need them. Once you're prompted, get in the van and drive back to Umberto's. Cholos will be shooting at you during the return trip, but they shouldn't be too hard to avoid. Reward: $1500 *The Cuban outfit is now available in your wardrobe. =========================================================== Lance Vance (Cont'd) 1. The Audition [L24] Follow the 'L' on the radar to start the mission. After the scene, drive down the street to the marker. After another scene, kill the robbers, take their guns, then go outside. Grab a cop car and drive lance down to Vice Port. After a third scene, get on the motorcycle the follow the markers up the stairs and off the ramp. From the top of this buiilding, go down the stairs on the north side, kill the guys with the arrows over their heads, and get in the marked car. Go around the building and jump the ramp - dont worry about the armed men. Reward: $750 *You'll get a page from Lance, telling you to meet him at Forbes' place. The Import/Export odd job is now available. Click here to see where it's located (the blue dot) - the list is on a nearby wall. =========================================================== Bryan Forbes 1. Money For Nothing [B025] Follow the 'F' on the radar. After the scene, get in the car with Lance and Forbes and drive to the decoy van. Get in and drive to the warehouse. After the scene, get back in the decoy van and drive south, away from Lance and Forbes. You'll get a three-star wanted level that you don't want to lose until the progress meter is full. Don't stop or you'll get shot at, and don't leave the van or let it explode. This mission's a real bitch, so you'll probably want to use the health code to repair your vehicle once it starts smoking (Up, Down, Left, Right, Circle, Circle, L1, R1). Once Lance and Forbes make it back to the lockup, get to the Pay-N-Spray to lose the cops. Reward: $1500 *You'll get a page from Lance. Something's not right about Forbes... =========================================================== Lance Vance (Part 3) 1. Caught As An Act [L026] Meet Lance at the stadium downtown. After the scene, jack a car (the nearby motorcycle isn't a safe choice) and chase after Forbes. The first time you hit him, money will fly out of his trunk. After that, ram him until he slows down, then drag him out of the car (just like you would any other driver when jacking a car). Reward: $750 *You'll get another pointless page from your aunt. =========================================================== Bryan Forbes (Cont'd) 1. Leap and Bound [B027] Follow the 'F' on the radar. After the scene, get to the lookout point. Look through the binoculars until you're told to get to Lance. Get there quickly! After another scene, take the nearby Porsche and drive down the main road to follow the boat. The chase ends just before Viceport. Get on the boat then enter the office. Go down this first flight of stairs, kill the guy and take his gun, and go through the door on your left. Follow the hallway around, go down the stairs, kill the two thugs, take their ammo, and go through the next door. Go through the hallway, kill the three guys standing around Lance, take their ammo, then untie Lance. After the short scene, go back the way you came, to where you took your first left through a door. From the bottom of the stairs, continue down the hall and collect the package. Head back up to the main deck and get the rest of the contraband. Kill the guy at the top of the stairs then go through the door. Kill the guys out here, then go up the steps about half way. Kill the guy and get the package. Now get to the top level, kill the guys and take their guns, and get the three packages up here. Go back downstairs and get to the back of the ship. Kill the guys here and take the package. Now get off the ship and meet Lance on shore. Reward: $1500 2. The Bum Deal [B028] You might want to get a gun, full health, and armor before starting. Drive to the White Stallionz Bar with Lance and go inside. Kill 'em all! The guys on this first side of the bar are unarmed, but there are about three guys on the other side of the wall that are. When they're all dead, leave through the south door.Kill the guys out here and get back to the building you started from. After the short scene, kill Forbes, then take Lance to his hotel. Reward: None =========================================================== Lance Vance (Part 4) 1. Snitch Hitch [L029] Before starting make sure you have full health, armor, and a gun with plenty of ammo. Get to the airport (try not to damage your car, so you can save yourself some health), and don't attract any attention from the cops along the way. After the scene, make sure to pick up your weapons outside (the metal detector took them before you could enter), then get to the private jet and kill the guards. If your car isn't damaged, run over as many of them as possible to preserve your health. You can actually draw a few out at a time by getting close to the group then driving back down the airstrip. Run them over then go back for more. Once everyone's dead, kill the bikers while Lance searches the plane for the files. Reward: $1000 2. From Zero to Hero [L030] Get full health and a gun, before starting. Drive to the docks in Little Haiti. There's an armor pick-up on the nearby bridge if you need it. Kill all the thugs, then get in the marked truck and follow Lance. Before long, two enemy cars will chase after you. You're too high up to do a drive-by, and the guy in the passenger seat isn't going to do anything, so just ram them if they get in your way and keep following Lance. The second island is now open! Once you're on the bridge, avoid the missiles the helicoptor shoots at you - it's pretty easy, as it only bombs the sides of the bridge (left, right, left, right, etc - swerve all the way to the sidewalks). After the second half of the city loads, you'll have a four-star wanted level. You shouldn't get too much trouble as you follow Lance to his new house. Reward: $3000 *Loise will page you. 3. Brawn of the Dead [L031] Follow the 'L' on the radar. After the scene, drive to the mall on the other end of the island. After another scene, follow the on-screen directions and kill the zombies. After the gore meter fills, you'll get another scene, and then you'll have to guard a store from the zombies, armed only with a katana. Use Circle to slice at them and keep them at bay until the time runs out. You'll have to get right up next to a zombie for the sword to make contact. It only takes one slice to kill them. After yet another scene, drive Lance back to his apartment. Reward: $850 *The Pastel Suit is now available in your wardrobe. You'll get a page from Spitz. =========================================================== Reni Wassulmaier 1. Accidents Will Happen [R032] Follow the 'R' on the radar. After the scene, get in the stunt car and drive to the starting line. Once there, follow the route; get to each checkpoint before the time runs out - each one will add more time. Along the way, run into as many stunt cars (they are red Infernuses, just like yours, with arrows over them) as possible to raise your action meter. If it drops to zero, you're fired. You don't need to fill the meter to pass the mission, just keep something in the meter, and don't run out of time. Go through the last checkpoint at speed to activate a cutscene. Reward: $850 =========================================================== Lance Vance (Part 5) 1. Blitzkrieg [L033] Meet Lance back at his apartment. You need to own a total of five businesses, so if you haven't taken any outside of the missions, go get three more. Read about Empires in the Odd Jobs section. *After you take over one business, the Hired Muscle outfit becomes available in your wardrobe. Lance will page you after you take over 2 businesses, so head back to his place to really do this mission. The Mendez boys are attacking your businesses, so get to Lance (blue blip) and kill all the Mendez boys (red blips). You should be able to run most of them down with a car if you keep making passes back and forth through the area (watch out for Lance!), and then get out to shoot the last ones that show up in a truck. Reward: $500 *Mendez will page you, opening up his mission strand. =========================================================== Armando and Diego Mendez 1. The Mugshot Longshot [M034] Follow the 'M' on the radar to Prawn Island. After the scene, go to the Washington Beach police station. After another scene, quickly get to the marker and take a picture of Martinez talking to the cop (don't get too close or you'll fail), then follow the car. Again, don't get too close. After a third scene, get to the vantage point and take another picture. Now you'll need to get to Lance's to pick up Forbes' ID. It's a short drive, but don't take the nearby Cheetah (it's a cop car; you can't enter Pay-N-Sprays with these) or the PCJ (that's just asking to get killed). If the car you brought along isn't badly damaged, there should be a Stinger or something similar by the other pier. After you've retrieved the ID, go around to the front of Lance's house and it should be a straight drive to the Pay-N-Spray to lose your wanted level, and you're home free for the printworks. Reward: None 2. Hostile Takeover [M035] You'll want full health & armor, and a gun (preferably an uzi) and plenty of ammo before starting. Get to Vice Point and kill the Bikers. It's important that you do not hit any cops; the two-star wanted level will only bring you trouble. A good spot to shoot from is the balcony on the front of the building. Just stay up there and kill everyone that approaches from this side of the building (there might be a couple on the roof you can reach). Then move on to the guys stuck by the fence on the other sides of the building. When everyone's dead, hop on a bike, chase after the others and shoot them. Even though they all have gunmen on the back, this part shouldn't be too hard, even if you do have the cops after you as well - just be sure they don't get a chance to knock you off the bike and bust you. Reward: $1,000 *Lance will page you, opening up more of his missions. 3. Unfriendly Competition [M036] Don't even attempt this without full health and armor, and a gun with tons of ammo (an uzi is important). Get to the first dealer's house in Vice Point and kill him and his bodyguards; take all the guns/ammo they drop. Next, get to the runner at the Standing Vice Point Hotel. "Motherf***er!". This is easily the toughest part of the game - atleast for me. The pool area is swarming with bikini-clad, machine-gun-toting women, and more will spawn. The key here is patience. If you go in with guns blazing, you're going to die. Take refuge behind the trees on the the side the area closest to the beach - there's a health icon that will keep respawning for when you need it. When you get a chance, come out a little from behind the trees and shoot as many girls as you can. You'll have to move closer to the diving board to get the ones up top, but keep yourself covered. Once they're all down, the back gate will open for you to go down to the ATV. Chase after the dealer and use your uzi to shoot the girl off the back. Now the dealer will start throwing grenades behind him, and a helicoptor with two shooters on board may also appear. The grenades are pretty easy to avoid. Keep shooting at him until his life meter empties and he falls off. Reward: $1,300 4. High Wire [M037] Get to Breaker's Yard, then fly the helicoptor to Vice Port and pick up the container. Deliver it to the drop off point on the other side of the airport, then chase after the truck and pick up the container. Deliver it to the same point, then chase after the car and pick it up before it's destroyed. Deliver him to the top of the marked carpark. Reward: $1,500 =========================================================== Lance Vance (Part 6) 1. Turn On, Tune In, Bug Out [L038] Make sure you have full health and armor, and a gun - preferably an automatic - with plenty of ammo before starting. Once the mission starts, go to Ammu-Nation, get the free rocket launcher (if you have the money, I recommend buying one more set of ammo; you'll probably need it), and head to the police station to destroy the antenna. You need to be quick; the DEA is gathering evidence on you. There's a staircase behind the station that you can use to get to the top. Shoot the guys next to the helicoptor (there's an armor pick-up up here if you need it), destroy the antennae with the rockets (the base of an antenna is the best place to aim; you'll get a 2-star wanted level for your work), then fly the helicoptor to the next police station roof. When you get there, destroy the antennae (there'll probably be a police helicopter shooting at you; this is where the extra ammo comes in handy) and fly to the next roof. You'll have a four-star wanted level, meaning cops will drop from helicoptors once you land. Try landing on the helipad next to the police chopper that's already there, get out, and immediately shoot the cop up here. Kill the few others as well, then take out your rocket launcher to destroy the antennae. Now you need to get to the nearest Pay-N-Spray to lose your heat. Head down the stairs and hop on the PCJ-600 under them. Follow this route to the spray shop, it should provide you with a fairly easy way around the police and the road blocks and spike strips they may use. You need to take it easy in that falling off your bike will almost certainly mean death, but you also need to be quick to avoid getting either you or your bike shot. Reward: $300 *You'll get a page from Reni, opening up the continuation of his/her mission strand. =========================================================== Reni Wassulmaier (Cont'd) 1. The Colonel's Coke [R039] Get to the meeting point Downtown. Get in the helicoptor and protect Gonzalez. For the most part, your friends can do the shooting for you, but you can fire the chopper's gun with circle. Eventually an enemy helicoptor will join the fight and you'll have to shoot him down; it's pretty easy. The chase ends around the southeast side of Vice Port. Reward: $850 2. Kill Phil [R040] Get a gun before starting (full health and armor couldn't hurt either). Pick up the bulletproof limo and drive to the meeting point. After a scene, kill all the enemies. Remember that the limo is bulletproof, so use it to your advantage and stand behind it for cover. Wow, who'd have thought an actual celebrity would let their face be seen in a GTA game, let alone Phil Collins! Drive Phil to his hotel. As you probably expected, some goons with guns will chase after you. Just be careful not to roll the car. Reward: $1,000 *You can now buy the bulletproof limo at Sunshine Autos (near the trailer park). You'll also get a page from Gonzalez, opening up his mission strand. 3. Say Cheese [R041] Go around the building to the jetty and get on the jetski. Simply follow the checkpoint markers. After the first jump, you might hit the wall and fall of the jetski. Don't worry; just get back on and get through the next marker before the time runs out. Once you take the final jump onto land, get on the motorcycle and follow more checkpoints. Reward: $850 =========================================================== Gonzalez 1. Home's On the Range [G042] Follow the 'G' on the radar to the driving range at the golf course. Follow the on-screen instructions to try and hit Jesus. Your goal is to hit Jesus before Gonzalez does; otherwise you fail the mission. Reward: $1,000 *You'll get a page from Lance. Rumor has it Martinez has ditched the witness protection program. Lance's mission strand is now open, and you can come back to the driving range to practice anytime. 2. Purple Haze [G043] Get to Gonzalez's lockup to get the drug-loaded van, then drive to the meeting place in Washington. You're now high and need to get to the phone and call Gonzalez. After the call, get on the dirtbike near the phone and head to Starfish Island to get the drugs back. Keep an eye on Vic while you're driving; you'll notice the bike will tip because he's so high. After a short scene, kill the gang members. If you still have the rocket launcher from Lance's last mission, that should clear out most, if not all, of them easily. Drive the van back to the lockup. Driving a van is worse than the bike, as Vic will constantly want to steer to one side. Reward: $1,000 =========================================================== Lance Vance (Part 7) 1. Taking the Fall [L044] Make sure you have full health (and armor if you're bad with shootouts; otherwise you shouldn't need it) and a gun with plenty of ammo before starting. Fly the helicopter to where the Bikers are located on the map. On the way, read the tips on the screen. When the balance meter is full (level the helicoptor), Lance has better aim. When the balance meter is empty (tilt the helicopter), Lance's aim sucks. Make sure that the right side of the chopper is facing the enemies, so Lance can shoot at them. Once the first group is dead, fly to the next and let Lance kill them. This second group is a little more split up, and they have guns. After the scene, go around to the back of the building and kill the bikers. Hide behind vans and crates whenever possible. When everyone on ground-level is dead, go up the ramps of the scaffolding and work your way to the top. There is one biker at the top of the ramp, and eight in the room. When they're all dead, find Lance by going to the end of the room to activate a scene. Once you get your reward, hop on one of the bikes and exit the building the same way Lance did. Reward: $300 *Mendez will page you. 2. White Lies [L045] Get in the hovercraft and follow Lance's helicopter. He'll drop glowing green packages of coke that you need to collect (just run over them). If you don't get to a package fast enough, it will disappear and chances are you won't get to the rest in time either and you'll fail the mission. If you flip your hovercraft over while in the water, you'll fail the mission in a minute because you didn't collect enough coke. You might as well use the time to get a head start back to Lance's place to do the mission again. To make this mission as easy as possible, wait until the weather is good, so the water's not throwing you around and making it harder to get to the packages. Reward: $1,500 *The hovercraft is now purchaseable at your suite hotel. Martinez will page you and decides to pay Loise a visit. 3. Where it Hurts Most [L046] Get full health, armor, and a gun before starting. Get to King Knut's burger bar. After the scene, kill the three guys then chase after one of the cars to look for Loise. You need to be extremely quick about this; her life if running out. Kill all the guys around the car, then get near it to see if Loise is inside - be careful not to destroy the car in case she is. Collect any ammo they drop. If she's not there, head to another car and do the same. When you find her, get in the car and take her to the Downtown hospital before she dies. Reward: $500 =========================================================== Reni Wassulmaier (Part 3) 1. Kill Phil: Part 2 [R047] Get to the Hyman Stadium. Once inside, kill the guy then ride the bike around to the next entrance. You need to kill everyone before a certain time (it was 17:30 for both of my tries), so be as quick as possible. Kill the hitmen here then continue on down the hall on your bike. Kill the guys at this entrance, then head to the dark stage and kill the guys here. Continue following the hall around and pick up the health and armor by the door, then keep moving. Kill the guys by the next entrance and pick up the keycard one of them drops. Now backtrack through the hall and ride into the marker. You'll lose your bike here. Follow the hallway forward and kill the guys in this room. Phil now arrives at the stadium. Reward: $1,500 *You'll get a page from Reni, opening up Diaz's mission strand. If you've played the original Vice City, you'll know right away where to meet him. =========================================================== Ricardo Diaz 1. Steal the Deal [R048] Get full health, armor, and a gun before starting. Follow the 'D' on the radar. After the scene, drive to the stip club. After another scene, follow Gonzalez' goon, but don't get to close or he'll spot you. After a third scene, quickly get on the jetski (Lance won't join you) and follow the guy some more. After a fourth scene, avoid the guards (red blips) and get to the boat (blue blip). Obviously, you fail if you die or destroy the boat. If you're seen, and there's a slim chance you won't be, kill the guards to avoid getting the boat destroyed when you're taking it back to Diaz. Reward: $1,500 2. The Exchange [R049] Drive the van to the meeting point. After a scene, grab the sniper rifle and kill all the snipers before the DEA arrive. Use your radar to locate each one. After another short scene, get in the truck and drive it back to Diaz. Once you leave that parking lot, more guys in cars will chase and shoot at you. Diaz's man has a gun, so try to drive on the left side of the road so he can shoot at the enemies. Do not drive down the main road. I was able to avoid the enemies completely by going through the neighborhoods until I needed to cross the main road to get onto Starfish Island (use the road on the north side of the hospital). Once you reach Diaz's, park in the garage to finish the mission. Reward: $1,750 *You'll get a page from Gonzalez, opening up his final mission strand. =========================================================== Gonzalez (Cont'd) 1. Farewell to Arms [G050] Follow the 'G' on the radar - if you're doing this right after Diaz's last mission, you won't have far to travel. Gonzalez will be driven to the airport while you provide protection from the skies. Whenever you see a car with a red marker, shoot it. Keep an eye on the radar so you know immediately when another enemy is coming and you can get a headstart on shooting him. A little ways down the road, Gonzalez's truck will stall. You'll just need to kill all the enemies around him. After that's taken care of, the helicoptor pilot will fly ahead and you'll need to take out the road block. Shoot at the center truck until it explodes - that should take care of the gunmen and both trucks next to it... yeah, I thought that mission was a little too short to be true. After the scenes, defend Gonzalez's guys at the airport entrance. Once the enemies here are taken care of, another entrance becomes under attack and you'll be flown to defend it, too. And after that, a third entrance is attacked. This time is a little harder because groups of enemies will be shooting at the entrance and there won't be a truck around them to explode and kill them. It doesn't help that your pilot doesn't know how to stay still. Once this last entrance is taken care of, the Sharks enter the airport and you'll have to shoot the cars while Gonzalez's plane takes off. Reward: $2,500 *The mini-gun is now in stock at the Vice Point Mall's Ammu-Nation. One of the Mendez brothers will call, opening up another of their mission strands. =========================================================== Armando and Diego Mendez (Cont'd) 1. Burning Bridges [M051] Get full health and armor before starting - don't worry about guns, you'll just get them taken away. After the scenes, go up the ramp on your left, grab the gun, then walk into the marker. You have to shoot the valves to burn off the oil. Kill the guys at the bottom of the steps and grab their guns. Go around the tanks and kill the guys here and on the helicoptor - take all the ammo you can find. Shoot the valve here (green blip on radar) until flames shoot out of it, then go around the next green tank, killing any enemies and taking their ammo along the way. Destroy the valve here, then head southwest, up the ramp. Kill the guy and take his sniper rifle, then move ahead, shoot the valve, and get on the motorcycle. Lance will get on, then quickly drive to the marker up ahead. Reward: None *You'll get a page from Lance. =========================================================== Lance Vance (Part 8) 1. Blitzkrieg Strikes Again [L052] Get full health, armor, and a gun with plenty of ammo before starting. The Mendezes are attacking three of your businesses. Drive Lance to the first and protect it. Preserve your health and run over as many of Mendez's men as you can. Lance will get out of the car, so be careful not to shoot him, run him over, or let a vehicle explode near him. If he dies, you fail. Once everyone here is taken care of, drive Lance to the next two businesses and do the same. If you're trying to get to the next business and wondering why you can't see Lance, try looking underneath a car - move it so you can get on with the mission. Reward: $700 *Reni will page you, opening up another of his/her mission strand. 2. Lost and Found [L053] Get to the hospital Downtown on the west island to pick up Loise. After the scene, walk into the marker ahead of you to get into the helicopter. Fly to the building Lance is on and land in the marker. After another scene, fly towards the boats to let Lance shoot them. Follow the same strategy as in another of Lance's missions, Taking the Fall. Once the gunmen on all three boats are dead, hover just over the boat that has your money so Lance can jump down and get it. Take Loise home. Reward: $1,500 =========================================================== Reni Wassulmaier (Part 4) 1. So Long Schlong [R054] Get full health, armor, and a gun before starting. After the scene, kill all Diaz's men that come in asap. After a few minutes, Reni will page you, saying he been found. There should be a car in front of the building you started the mission in. Get to Reni before his life meter runs out and get out of your car at the gate to activate a scene. After that's all taken care of, there's a health pick-up in the basketball courts here if you need it, then drive Reni to the hospital. On your way, more of Diaz's men will attack you. Reni's got a gun, and that should be enough to get you to the hospital. Reward: $1,000 =========================================================== Ricardo Diaz (Cont'd) 1. Domo Arigato Domestoboto [R055] Get to the van parked outside Medez's mansion (there's a Cheetah in front of Diaz's garage that you can drive down there). Once you enter the van, you become in control of Mendez's Domestobot. Your main goal is to open his safe. Use the COMMS arm (switch arms with R2 and L2) to locate the safe. The faster the signal beeps, the closer you are to the safe. To save you the time, look for the storeroom on the main floor (where Mendez is) and there's a marker that takes you down to the basement. The safe is down here. The code is 8423 - if you were to look on a phone, you could spell VICE!. Once the safe is open, switch to the lighter arm and move into the marker. Every so often, Mendez will tell the robot to do something and you must do it before the time runs out. Get to the green markers to clean up whatever mess he orders you to; be sure to use the correct arm for the job (a description of what each arm does is displayed on screen) - for me, I only ever had to use the cleaning arm. No pleasure jobs? :( Reward: $2,000 *Phil will page you, opening up another of Reni's mission strands. =========================================================== Reni Wassulmaier (Part 5) 1. In The Air Tonight [R056] Drive Reni to the airport. When you enter the airport area, more of Mendez's men will shoot at you. It's pretty easy to avoid them though; atleast is was when I came in through the entrance in front of Sunshine Autos (the small one that's already built). After the scene, drive to Phil's concert at Hyman Stadium (no trouble here!). After the scene, kill the guys on the catwalk before the Light Rig Stress meter fills. Every time one of Mendez's men try to cut a cable, another guy will head you off. Ignore him and run towards the red blip on the radar and kill the guy before he cuts the cable. Once four cables are cut, the lights will fall and kill Phil. When the first scene of Phil singing plays, that marks the halfway point. When the second scene shows, you've completed the mission. Reward: $3,000 *You can now buy access to the Phil Collins concert for $6,000. If only it was Quiet Riot, I'd buy the ticket! Loise will page you, opening up another one of Lance's mission strands. =========================================================== Lance Vance (Part 9) 1. Light My Pyre [L057] Get full health, armor, and a gun (preferably an AK, M4, or Minigun with tons of ammo) you can perform drive-byswith and get plenty of ammo before starting. Completing the Fire Fighter odd job will also help a lot. Follow Lance and destroy the attackers before he dies. Get up next to the gunmen's car and perform a drive-by. Once you get near the bridge to Prawn Island, a scene will play. Your main goal is to go around back of Mendez's mansion and walk into the blue marker at the door - don't bother trying to kill everyone outside, as there's an infinite amount of them. Just make a run for it and quickly kill anyone in your path if you can. If you need health, there's a pick-up in the grassy area that the street wraps around in front of the mansion, and behind the mansion you'll find one in the little building next to the tennis courts. If you're not against cheating, you'll probably want to use the health and armor codes just to avoid frustration of restarting this mission over and over again. Once inside, the camera will be switched to a top-down view and Mendez will be shooting flames at you. Pick up the health and armor if needed, then get as far away from Mendez as possible and open fire. It doesn't take much to kill him, but if you catch on fire (if you have completed the Fire Fighter odd job, you should be safe here) and once he calls his men in, it's also easy for you to die. Finish him off as quick as possible to activate a scene (why couldn't it have been Lance?!). Reward: $2,500 *Diaz will page you, opening up his next mission strand. =========================================================== Ricardo Diaz (Part 3) 1. Over the Top [R058] Get a weapon you can perform drive-bys with before starting. Go to Phil's. Once you leave Starfish Island, Mendez will have set up an ambush. Kill them and get to Phil's. After the scene, drive down to Fort Baxter. After Phil destroys his truck, hop the wall into the base and get into the admin building. You don't want to be spotted by the guards (red blip) or spotlights, so immediately head north and wait for the search light to come towards you. When it stops and heads back north, follow it (but do not walk into it) and when you reach the end of the fenced area go west. The admin building is straight ahead, and it'll be pretty hard to avoid the guards here, so just make a run for the door. If you were seen outside, two armed guards will now be running towards you. Kill them, then follow the hallway around to the control room (after the turn, it's the first room on the left) and walk into the marker. The guards will be trying to take the helicopter to safety, so get out the door you came in and get to the helicopter before it takes off. The propellers are already sped up enough to take off, so drag the guard out of the chopper and fly to the roof of Diaz's mansion. Reward: $3,000 *Martinez will page you, opening up the last mission. 2. Last Stand [R059] Fly to the Mendez building and kill the guards behind the green and blue windows near the top. Circle fires the missiles and R1 fires the machine gun. After the scene, grab the armor and weapons (make sure you get the rocket launcher!) and enter the stairwell. Do your best to kill everyone in this room and survive. There's another armor pick-up by the copier in the second half of the room. After everyone is dead, walk into the marker and kill the guards in this room. After the scene, head east into the next room and pick up the armor, then walk into the marker. Kill the two guards in this room and hide from the helicopter (behind the walls of filing drawers in the southwest part of the room is good), then attack it with your rocket launcher - one hit will take out nearly all of its health. Two more guards will come into the room, so take care of them. It'll keep switching back and forth - hide from heli, attack heli, kill guards, hide from heli, attack heli... - until the helicopter is destroyed. When the guards drop armor, be sure to pick it up. Once you're done here, walk into the marker to get to the roof. After the scene, hide behind the stairwell and take out Diego and Mendez when you can. There is an armor pick-up between the two stairwells and health at one of the corners. The whole ordeal shouldn't be too hard if you get the pick-ups; the guys die pretty easily. When the credits roll, hold X to scroll through them quickly or press start to stop them altogether. When you get back in control of Vic, there's a health pick-up behind you if you need it. Reward: None *The Winner's outfit is now available at the safehouse.
Loise Cassidy-Williams (Part 3) 1. Hose the Hoes [L018] After the short scene, head to the blue blip to get a fire truck, then go put out the fire - the controls for the firetruck appear on-screen. After it's out, kill Marty's cousin. Reward: $300 *You'll get another pointless page from your mom. Head to the 'L' on the radar to continue Loise's missions... the southern 'L'. 2. Robbing the Cradle [L019] After the scene, stop the thugs from killing the Welfare Man. When the two guys are dead, warn off the Welfare Man by ramming into his truck or shooting it until it smokes - do not kill him. Reward: $300 *You'll get a page from Loise, just to say thanks. =========================================================== Umberto Robina 1. Nice Package [U020] You'll probably want to save before starting the mission; if you car blows up, you may die from the other cars around you that will explode. Follow the 'U' on the radar. After the scene, reach the package before the others. The fastest route is to get onto the main strip as soon as possible and follow that north. Another car had the package before me, so just chase after them. Juan will shoot when you're close, and if you have a gun, help him. When the package is dropped, pick it up before someone else does - if that happens, shoot them until they drop it, then try to pick it up again. Take the package to the marker in Vice Port. Reward: $750 2. Balls [U021] After the scene, get in the four-door car across the street and head to the re blip. Let your friends kill the cholos via drive-by. Rinse and repeat for the next four spots, then head back to Umberto's. Reward: $800 3. Papi Don't Screech [U022] After the scene, drive Umberto's car to the stadium downtown to pick up Alberto. Drive him to his new diner (you'll remember this from the original Vice City) before the time runs out. You should have plenty of time, so drive carefully. Go fast and Alberto's stress meter will begin to fill. As you head towards the diner, cholos will appear on the radar (red blips). Avoid them at all costs; take the side roads to go around them. If you're spotted, speed away and you should lose them before Alberto starts stressing out. Park in front of the diner to finish the mission.. Reward: $1000 4. Havana Good Time [U023] After the scene, grab the gun (it's got 453-30 ammo) and head to warehouse and kill the guards. After another scene, kill the cholos as they show up, and make sure to collect the ammo they drop. There are health and armor pickups in the warehouse if you need them. Once you're prompted, get in the van and drive back to Umberto's. Cholos will be shooting at you during the return trip, but they shouldn't be too hard to avoid. Reward: $1500 *The Cuban outfit is now available in your wardrobe. =========================================================== Lance Vance (Cont'd) 1. The Audition [L24] Follow the 'L' on the radar to start the mission. After the scene, drive down the street to the marker. After another scene, kill the robbers, take their guns, then go outside. Grab a cop car and drive lance down to Vice Port. After a third scene, get on the motorcycle the follow the markers up the stairs and off the ramp. From the top of this buiilding, go down the stairs on the north side, kill the guys with the arrows over their heads, and get in the marked car. Go around the building and jump the ramp - dont worry about the armed men. Reward: $750 *You'll get a page from Lance, telling you to meet him at Forbes' place. The Import/Export odd job is now available. Click here to see where it's located (the blue dot) - the list is on a nearby wall. =========================================================== Bryan Forbes 1. Money For Nothing [B025] Follow the 'F' on the radar. After the scene, get in the car with Lance and Forbes and drive to the decoy van. Get in and drive to the warehouse. After the scene, get back in the decoy van and drive south, away from Lance and Forbes. You'll get a three-star wanted level that you don't want to lose until the progress meter is full. Don't stop or you'll get shot at, and don't leave the van or let it explode. This mission's a real bitch, so you'll probably want to use the health code to repair your vehicle once it starts smoking (Up, Down, Left, Right, Circle, Circle, L1, R1). Once Lance and Forbes make it back to the lockup, get to the Pay-N-Spray to lose the cops. Reward: $1500 *You'll get a page from Lance. Something's not right about Forbes... =========================================================== Lance Vance (Part 3) 1. Caught As An Act [L026] Meet Lance at the stadium downtown. After the scene, jack a car (the nearby motorcycle isn't a safe choice) and chase after Forbes. The first time you hit him, money will fly out of his trunk. After that, ram him until he slows down, then drag him out of the car (just like you would any other driver when jacking a car). Reward: $750 *You'll get another pointless page from your aunt. =========================================================== Bryan Forbes (Cont'd) 1. Leap and Bound [B027] Follow the 'F' on the radar. After the scene, get to the lookout point. Look through the binoculars until you're told to get to Lance. Get there quickly! After another scene, take the nearby Porsche and drive down the main road to follow the boat. The chase ends just before Viceport. Get on the boat then enter the office. Go down this first flight of stairs, kill the guy and take his gun, and go through the door on your left. Follow the hallway around, go down the stairs, kill the two thugs, take their ammo, and go through the next door. Go through the hallway, kill the three guys standing around Lance, take their ammo, then untie Lance. After the short scene, go back the way you came, to where you took your first left through a door. From the bottom of the stairs, continue down the hall and collect the package. Head back up to the main deck and get the rest of the contraband. Kill the guy at the top of the stairs then go through the door. Kill the guys out here, then go up the steps about half way. Kill the guy and get the package. Now get to the top level, kill the guys and take their guns, and get the three packages up here. Go back downstairs and get to the back of the ship. Kill the guys here and take the package. Now get off the ship and meet Lance on shore. Reward: $1500 2. The Bum Deal [B028] You might want to get a gun, full health, and armor before starting. Drive to the White Stallionz Bar with Lance and go inside. Kill 'em all! The guys on this first side of the bar are unarmed, but there are about three guys on the other side of the wall that are. When they're all dead, leave through the south door.Kill the guys out here and get back to the building you started from. After the short scene, kill Forbes, then take Lance to his hotel. Reward: None =========================================================== Lance Vance (Part 4) 1. Snitch Hitch [L029] Before starting make sure you have full health, armor, and a gun with plenty of ammo. Get to the airport (try not to damage your car, so you can save yourself some health), and don't attract any attention from the cops along the way. After the scene, make sure to pick up your weapons outside (the metal detector took them before you could enter), then get to the private jet and kill the guards. If your car isn't damaged, run over as many of them as possible to preserve your health. You can actually draw a few out at a time by getting close to the group then driving back down the airstrip. Run them over then go back for more. Once everyone's dead, kill the bikers while Lance searches the plane for the files. Reward: $1000 2. From Zero to Hero [L030] Get full health and a gun, before starting. Drive to the docks in Little Haiti. There's an armor pick-up on the nearby bridge if you need it. Kill all the thugs, then get in the marked truck and follow Lance. Before long, two enemy cars will chase after you. You're too high up to do a drive-by, and the guy in the passenger seat isn't going to do anything, so just ram them if they get in your way and keep following Lance. The second island is now open! Once you're on the bridge, avoid the missiles the helicoptor shoots at you - it's pretty easy, as it only bombs the sides of the bridge (left, right, left, right, etc - swerve all the way to the sidewalks). After the second half of the city loads, you'll have a four-star wanted level. You shouldn't get too much trouble as you follow Lance to his new house. Reward: $3000 *Loise will page you. 3. Brawn of the Dead [L031] Follow the 'L' on the radar. After the scene, drive to the mall on the other end of the island. After another scene, follow the on-screen directions and kill the zombies. After the gore meter fills, you'll get another scene, and then you'll have to guard a store from the zombies, armed only with a katana. Use Circle to slice at them and keep them at bay until the time runs out. You'll have to get right up next to a zombie for the sword to make contact. It only takes one slice to kill them. After yet another scene, drive Lance back to his apartment. Reward: $850 *The Pastel Suit is now available in your wardrobe. You'll get a page from Spitz. =========================================================== Reni Wassulmaier 1. Accidents Will Happen [R032] Follow the 'R' on the radar. After the scene, get in the stunt car and drive to the starting line. Once there, follow the route; get to each checkpoint before the time runs out - each one will add more time. Along the way, run into as many stunt cars (they are red Infernuses, just like yours, with arrows over them) as possible to raise your action meter. If it drops to zero, you're fired. You don't need to fill the meter to pass the mission, just keep something in the meter, and don't run out of time. Go through the last checkpoint at speed to activate a cutscene. Reward: $850 =========================================================== Lance Vance (Part 5) 1. Blitzkrieg [L033] Meet Lance back at his apartment. You need to own a total of five businesses, so if you haven't taken any outside of the missions, go get three more. Read about Empires in the Odd Jobs section. *After you take over one business, the Hired Muscle outfit becomes available in your wardrobe. Lance will page you after you take over 2 businesses, so head back to his place to really do this mission. The Mendez boys are attacking your businesses, so get to Lance (blue blip) and kill all the Mendez boys (red blips). You should be able to run most of them down with a car if you keep making passes back and forth through the area (watch out for Lance!), and then get out to shoot the last ones that show up in a truck. Reward: $500 *Mendez will page you, opening up his mission strand. =========================================================== Armando and Diego Mendez 1. The Mugshot Longshot [M034] Follow the 'M' on the radar to Prawn Island. After the scene, go to the Washington Beach police station. After another scene, quickly get to the marker and take a picture of Martinez talking to the cop (don't get too close or you'll fail), then follow the car. Again, don't get too close. After a third scene, get to the vantage point and take another picture. Now you'll need to get to Lance's to pick up Forbes' ID. It's a short drive, but don't take the nearby Cheetah (it's a cop car; you can't enter Pay-N-Sprays with these) or the PCJ (that's just asking to get killed). If the car you brought along isn't badly damaged, there should be a Stinger or something similar by the other pier. After you've retrieved the ID, go around to the front of Lance's house and it should be a straight drive to the Pay-N-Spray to lose your wanted level, and you're home free for the printworks. Reward: None 2. Hostile Takeover [M035] You'll want full health & armor, and a gun (preferably an uzi) and plenty of ammo before starting. Get to Vice Point and kill the Bikers. It's important that you do not hit any cops; the two-star wanted level will only bring you trouble. A good spot to shoot from is the balcony on the front of the building. Just stay up there and kill everyone that approaches from this side of the building (there might be a couple on the roof you can reach). Then move on to the guys stuck by the fence on the other sides of the building. When everyone's dead, hop on a bike, chase after the others and shoot them. Even though they all have gunmen on the back, this part shouldn't be too hard, even if you do have the cops after you as well - just be sure they don't get a chance to knock you off the bike and bust you. Reward: $1,000 *Lance will page you, opening up more of his missions. 3. Unfriendly Competition [M036] Don't even attempt this without full health and armor, and a gun with tons of ammo (an uzi is important). Get to the first dealer's house in Vice Point and kill him and his bodyguards; take all the guns/ammo they drop. Next, get to the runner at the Standing Vice Point Hotel. "Motherf***er!". This is easily the toughest part of the game - atleast for me. The pool area is swarming with bikini-clad, machine-gun-toting women, and more will spawn. The key here is patience. If you go in with guns blazing, you're going to die. Take refuge behind the trees on the the side the area closest to the beach - there's a health icon that will keep respawning for when you need it. When you get a chance, come out a little from behind the trees and shoot as many girls as you can. You'll have to move closer to the diving board to get the ones up top, but keep yourself covered. Once they're all down, the back gate will open for you to go down to the ATV. Chase after the dealer and use your uzi to shoot the girl off the back. Now the dealer will start throwing grenades behind him, and a helicoptor with two shooters on board may also appear. The grenades are pretty easy to avoid. Keep shooting at him until his life meter empties and he falls off. Reward: $1,300 4. High Wire [M037] Get to Breaker's Yard, then fly the helicoptor to Vice Port and pick up the container. Deliver it to the drop off point on the other side of the airport, then chase after the truck and pick up the container. Deliver it to the same point, then chase after the car and pick it up before it's destroyed. Deliver him to the top of the marked carpark. Reward: $1,500 =========================================================== Lance Vance (Part 6) 1. Turn On, Tune In, Bug Out [L038] Make sure you have full health and armor, and a gun - preferably an automatic - with plenty of ammo before starting. Once the mission starts, go to Ammu-Nation, get the free rocket launcher (if you have the money, I recommend buying one more set of ammo; you'll probably need it), and head to the police station to destroy the antenna. You need to be quick; the DEA is gathering evidence on you. There's a staircase behind the station that you can use to get to the top. Shoot the guys next to the helicoptor (there's an armor pick-up up here if you need it), destroy the antennae with the rockets (the base of an antenna is the best place to aim; you'll get a 2-star wanted level for your work), then fly the helicoptor to the next police station roof. When you get there, destroy the antennae (there'll probably be a police helicopter shooting at you; this is where the extra ammo comes in handy) and fly to the next roof. You'll have a four-star wanted level, meaning cops will drop from helicoptors once you land. Try landing on the helipad next to the police chopper that's already there, get out, and immediately shoot the cop up here. Kill the few others as well, then take out your rocket launcher to destroy the antennae. Now you need to get to the nearest Pay-N-Spray to lose your heat. Head down the stairs and hop on the PCJ-600 under them. Follow this route to the spray shop, it should provide you with a fairly easy way around the police and the road blocks and spike strips they may use. You need to take it easy in that falling off your bike will almost certainly mean death, but you also need to be quick to avoid getting either you or your bike shot. Reward: $300 *You'll get a page from Reni, opening up the continuation of his/her mission strand. =========================================================== Reni Wassulmaier (Cont'd) 1. The Colonel's Coke [R039] Get to the meeting point Downtown. Get in the helicoptor and protect Gonzalez. For the most part, your friends can do the shooting for you, but you can fire the chopper's gun with circle. Eventually an enemy helicoptor will join the fight and you'll have to shoot him down; it's pretty easy. The chase ends around the southeast side of Vice Port. Reward: $850 2. Kill Phil [R040] Get a gun before starting (full health and armor couldn't hurt either). Pick up the bulletproof limo and drive to the meeting point. After a scene, kill all the enemies. Remember that the limo is bulletproof, so use it to your advantage and stand behind it for cover. Wow, who'd have thought an actual celebrity would let their face be seen in a GTA game, let alone Phil Collins! Drive Phil to his hotel. As you probably expected, some goons with guns will chase after you. Just be careful not to roll the car. Reward: $1,000 *You can now buy the bulletproof limo at Sunshine Autos (near the trailer park). You'll also get a page from Gonzalez, opening up his mission strand. 3. Say Cheese [R041] Go around the building to the jetty and get on the jetski. Simply follow the checkpoint markers. After the first jump, you might hit the wall and fall of the jetski. Don't worry; just get back on and get through the next marker before the time runs out. Once you take the final jump onto land, get on the motorcycle and follow more checkpoints. Reward: $850 =========================================================== Gonzalez 1. Home's On the Range [G042] Follow the 'G' on the radar to the driving range at the golf course. Follow the on-screen instructions to try and hit Jesus. Your goal is to hit Jesus before Gonzalez does; otherwise you fail the mission. Reward: $1,000 *You'll get a page from Lance. Rumor has it Martinez has ditched the witness protection program. Lance's mission strand is now open, and you can come back to the driving range to practice anytime. 2. Purple Haze [G043] Get to Gonzalez's lockup to get the drug-loaded van, then drive to the meeting place in Washington. You're now high and need to get to the phone and call Gonzalez. After the call, get on the dirtbike near the phone and head to Starfish Island to get the drugs back. Keep an eye on Vic while you're driving; you'll notice the bike will tip because he's so high. After a short scene, kill the gang members. If you still have the rocket launcher from Lance's last mission, that should clear out most, if not all, of them easily. Drive the van back to the lockup. Driving a van is worse than the bike, as Vic will constantly want to steer to one side. Reward: $1,000 =========================================================== Lance Vance (Part 7) 1. Taking the Fall [L044] Make sure you have full health (and armor if you're bad with shootouts; otherwise you shouldn't need it) and a gun with plenty of ammo before starting. Fly the helicopter to where the Bikers are located on the map. On the way, read the tips on the screen. When the balance meter is full (level the helicoptor), Lance has better aim. When the balance meter is empty (tilt the helicopter), Lance's aim sucks. Make sure that the right side of the chopper is facing the enemies, so Lance can shoot at them. Once the first group is dead, fly to the next and let Lance kill them. This second group is a little more split up, and they have guns. After the scene, go around to the back of the building and kill the bikers. Hide behind vans and crates whenever possible. When everyone on ground-level is dead, go up the ramps of the scaffolding and work your way to the top. There is one biker at the top of the ramp, and eight in the room. When they're all dead, find Lance by going to the end of the room to activate a scene. Once you get your reward, hop on one of the bikes and exit the building the same way Lance did. Reward: $300 *Mendez will page you. 2. White Lies [L045] Get in the hovercraft and follow Lance's helicopter. He'll drop glowing green packages of coke that you need to collect (just run over them). If you don't get to a package fast enough, it will disappear and chances are you won't get to the rest in time either and you'll fail the mission. If you flip your hovercraft over while in the water, you'll fail the mission in a minute because you didn't collect enough coke. You might as well use the time to get a head start back to Lance's place to do the mission again. To make this mission as easy as possible, wait until the weather is good, so the water's not throwing you around and making it harder to get to the packages. Reward: $1,500 *The hovercraft is now purchaseable at your suite hotel. Martinez will page you and decides to pay Loise a visit. 3. Where it Hurts Most [L046] Get full health, armor, and a gun before starting. Get to King Knut's burger bar. After the scene, kill the three guys then chase after one of the cars to look for Loise. You need to be extremely quick about this; her life if running out. Kill all the guys around the car, then get near it to see if Loise is inside - be careful not to destroy the car in case she is. Collect any ammo they drop. If she's not there, head to another car and do the same. When you find her, get in the car and take her to the Downtown hospital before she dies. Reward: $500 =========================================================== Reni Wassulmaier (Part 3) 1. Kill Phil: Part 2 [R047] Get to the Hyman Stadium. Once inside, kill the guy then ride the bike around to the next entrance. You need to kill everyone before a certain time (it was 17:30 for both of my tries), so be as quick as possible. Kill the hitmen here then continue on down the hall on your bike. Kill the guys at this entrance, then head to the dark stage and kill the guys here. Continue following the hall around and pick up the health and armor by the door, then keep moving. Kill the guys by the next entrance and pick up the keycard one of them drops. Now backtrack through the hall and ride into the marker. You'll lose your bike here. Follow the hallway forward and kill the guys in this room. Phil now arrives at the stadium. Reward: $1,500 *You'll get a page from Reni, opening up Diaz's mission strand. If you've played the original Vice City, you'll know right away where to meet him. =========================================================== Ricardo Diaz 1. Steal the Deal [R048] Get full health, armor, and a gun before starting. Follow the 'D' on the radar. After the scene, drive to the stip club. After another scene, follow Gonzalez' goon, but don't get to close or he'll spot you. After a third scene, quickly get on the jetski (Lance won't join you) and follow the guy some more. After a fourth scene, avoid the guards (red blips) and get to the boat (blue blip). Obviously, you fail if you die or destroy the boat. If you're seen, and there's a slim chance you won't be, kill the guards to avoid getting the boat destroyed when you're taking it back to Diaz. Reward: $1,500 2. The Exchange [R049] Drive the van to the meeting point. After a scene, grab the sniper rifle and kill all the snipers before the DEA arrive. Use your radar to locate each one. After another short scene, get in the truck and drive it back to Diaz. Once you leave that parking lot, more guys in cars will chase and shoot at you. Diaz's man has a gun, so try to drive on the left side of the road so he can shoot at the enemies. Do not drive down the main road. I was able to avoid the enemies completely by going through the neighborhoods until I needed to cross the main road to get onto Starfish Island (use the road on the north side of the hospital). Once you reach Diaz's, park in the garage to finish the mission. Reward: $1,750 *You'll get a page from Gonzalez, opening up his final mission strand. =========================================================== Gonzalez (Cont'd) 1. Farewell to Arms [G050] Follow the 'G' on the radar - if you're doing this right after Diaz's last mission, you won't have far to travel. Gonzalez will be driven to the airport while you provide protection from the skies. Whenever you see a car with a red marker, shoot it. Keep an eye on the radar so you know immediately when another enemy is coming and you can get a headstart on shooting him. A little ways down the road, Gonzalez's truck will stall. You'll just need to kill all the enemies around him. After that's taken care of, the helicoptor pilot will fly ahead and you'll need to take out the road block. Shoot at the center truck until it explodes - that should take care of the gunmen and both trucks next to it... yeah, I thought that mission was a little too short to be true. After the scenes, defend Gonzalez's guys at the airport entrance. Once the enemies here are taken care of, another entrance becomes under attack and you'll be flown to defend it, too. And after that, a third entrance is attacked. This time is a little harder because groups of enemies will be shooting at the entrance and there won't be a truck around them to explode and kill them. It doesn't help that your pilot doesn't know how to stay still. Once this last entrance is taken care of, the Sharks enter the airport and you'll have to shoot the cars while Gonzalez's plane takes off. Reward: $2,500 *The mini-gun is now in stock at the Vice Point Mall's Ammu-Nation. One of the Mendez brothers will call, opening up another of their mission strands. =========================================================== Armando and Diego Mendez (Cont'd) 1. Burning Bridges [M051] Get full health and armor before starting - don't worry about guns, you'll just get them taken away. After the scenes, go up the ramp on your left, grab the gun, then walk into the marker. You have to shoot the valves to burn off the oil. Kill the guys at the bottom of the steps and grab their guns. Go around the tanks and kill the guys here and on the helicoptor - take all the ammo you can find. Shoot the valve here (green blip on radar) until flames shoot out of it, then go around the next green tank, killing any enemies and taking their ammo along the way. Destroy the valve here, then head southwest, up the ramp. Kill the guy and take his sniper rifle, then move ahead, shoot the valve, and get on the motorcycle. Lance will get on, then quickly drive to the marker up ahead. Reward: None *You'll get a page from Lance. =========================================================== Lance Vance (Part 8) 1. Blitzkrieg Strikes Again [L052] Get full health, armor, and a gun with plenty of ammo before starting. The Mendezes are attacking three of your businesses. Drive Lance to the first and protect it. Preserve your health and run over as many of Mendez's men as you can. Lance will get out of the car, so be careful not to shoot him, run him over, or let a vehicle explode near him. If he dies, you fail. Once everyone here is taken care of, drive Lance to the next two businesses and do the same. If you're trying to get to the next business and wondering why you can't see Lance, try looking underneath a car - move it so you can get on with the mission. Reward: $700 *Reni will page you, opening up another of his/her mission strand. 2. Lost and Found [L053] Get to the hospital Downtown on the west island to pick up Loise. After the scene, walk into the marker ahead of you to get into the helicopter. Fly to the building Lance is on and land in the marker. After another scene, fly towards the boats to let Lance shoot them. Follow the same strategy as in another of Lance's missions, Taking the Fall. Once the gunmen on all three boats are dead, hover just over the boat that has your money so Lance can jump down and get it. Take Loise home. Reward: $1,500 =========================================================== Reni Wassulmaier (Part 4) 1. So Long Schlong [R054] Get full health, armor, and a gun before starting. After the scene, kill all Diaz's men that come in asap. After a few minutes, Reni will page you, saying he been found. There should be a car in front of the building you started the mission in. Get to Reni before his life meter runs out and get out of your car at the gate to activate a scene. After that's all taken care of, there's a health pick-up in the basketball courts here if you need it, then drive Reni to the hospital. On your way, more of Diaz's men will attack you. Reni's got a gun, and that should be enough to get you to the hospital. Reward: $1,000 =========================================================== Ricardo Diaz (Cont'd) 1. Domo Arigato Domestoboto [R055] Get to the van parked outside Medez's mansion (there's a Cheetah in front of Diaz's garage that you can drive down there). Once you enter the van, you become in control of Mendez's Domestobot. Your main goal is to open his safe. Use the COMMS arm (switch arms with R2 and L2) to locate the safe. The faster the signal beeps, the closer you are to the safe. To save you the time, look for the storeroom on the main floor (where Mendez is) and there's a marker that takes you down to the basement. The safe is down here. The code is 8423 - if you were to look on a phone, you could spell VICE!. Once the safe is open, switch to the lighter arm and move into the marker. Every so often, Mendez will tell the robot to do something and you must do it before the time runs out. Get to the green markers to clean up whatever mess he orders you to; be sure to use the correct arm for the job (a description of what each arm does is displayed on screen) - for me, I only ever had to use the cleaning arm. No pleasure jobs? :( Reward: $2,000 *Phil will page you, opening up another of Reni's mission strands. =========================================================== Reni Wassulmaier (Part 5) 1. In The Air Tonight [R056] Drive Reni to the airport. When you enter the airport area, more of Mendez's men will shoot at you. It's pretty easy to avoid them though; atleast is was when I came in through the entrance in front of Sunshine Autos (the small one that's already built). After the scene, drive to Phil's concert at Hyman Stadium (no trouble here!). After the scene, kill the guys on the catwalk before the Light Rig Stress meter fills. Every time one of Mendez's men try to cut a cable, another guy will head you off. Ignore him and run towards the red blip on the radar and kill the guy before he cuts the cable. Once four cables are cut, the lights will fall and kill Phil. When the first scene of Phil singing plays, that marks the halfway point. When the second scene shows, you've completed the mission. Reward: $3,000 *You can now buy access to the Phil Collins concert for $6,000. If only it was Quiet Riot, I'd buy the ticket! Loise will page you, opening up another one of Lance's mission strands. =========================================================== Lance Vance (Part 9) 1. Light My Pyre [L057] Get full health, armor, and a gun (preferably an AK, M4, or Minigun with tons of ammo) you can perform drive-byswith and get plenty of ammo before starting. Completing the Fire Fighter odd job will also help a lot. Follow Lance and destroy the attackers before he dies. Get up next to the gunmen's car and perform a drive-by. Once you get near the bridge to Prawn Island, a scene will play. Your main goal is to go around back of Mendez's mansion and walk into the blue marker at the door - don't bother trying to kill everyone outside, as there's an infinite amount of them. Just make a run for it and quickly kill anyone in your path if you can. If you need health, there's a pick-up in the grassy area that the street wraps around in front of the mansion, and behind the mansion you'll find one in the little building next to the tennis courts. If you're not against cheating, you'll probably want to use the health and armor codes just to avoid frustration of restarting this mission over and over again. Once inside, the camera will be switched to a top-down view and Mendez will be shooting flames at you. Pick up the health and armor if needed, then get as far away from Mendez as possible and open fire. It doesn't take much to kill him, but if you catch on fire (if you have completed the Fire Fighter odd job, you should be safe here) and once he calls his men in, it's also easy for you to die. Finish him off as quick as possible to activate a scene (why couldn't it have been Lance?!). Reward: $2,500 *Diaz will page you, opening up his next mission strand. =========================================================== Ricardo Diaz (Part 3) 1. Over the Top [R058] Get a weapon you can perform drive-bys with before starting. Go to Phil's. Once you leave Starfish Island, Mendez will have set up an ambush. Kill them and get to Phil's. After the scene, drive down to Fort Baxter. After Phil destroys his truck, hop the wall into the base and get into the admin building. You don't want to be spotted by the guards (red blip) or spotlights, so immediately head north and wait for the search light to come towards you. When it stops and heads back north, follow it (but do not walk into it) and when you reach the end of the fenced area go west. The admin building is straight ahead, and it'll be pretty hard to avoid the guards here, so just make a run for the door. If you were seen outside, two armed guards will now be running towards you. Kill them, then follow the hallway around to the control room (after the turn, it's the first room on the left) and walk into the marker. The guards will be trying to take the helicopter to safety, so get out the door you came in and get to the helicopter before it takes off. The propellers are already sped up enough to take off, so drag the guard out of the chopper and fly to the roof of Diaz's mansion. Reward: $3,000 *Martinez will page you, opening up the last mission. 2. Last Stand [R059] Fly to the Mendez building and kill the guards behind the green and blue windows near the top. Circle fires the missiles and R1 fires the machine gun. After the scene, grab the armor and weapons (make sure you get the rocket launcher!) and enter the stairwell. Do your best to kill everyone in this room and survive. There's another armor pick-up by the copier in the second half of the room. After everyone is dead, walk into the marker and kill the guards in this room. After the scene, head east into the next room and pick up the armor, then walk into the marker. Kill the two guards in this room and hide from the helicopter (behind the walls of filing drawers in the southwest part of the room is good), then attack it with your rocket launcher - one hit will take out nearly all of its health. Two more guards will come into the room, so take care of them. It'll keep switching back and forth - hide from heli, attack heli, kill guards, hide from heli, attack heli... - until the helicopter is destroyed. When the guards drop armor, be sure to pick it up. Once you're done here, walk into the marker to get to the roof. After the scene, hide behind the stairwell and take out Diego and Mendez when you can. There is an armor pick-up between the two stairwells and health at one of the corners. The whole ordeal shouldn't be too hard if you get the pick-ups; the guys die pretty easily. When the credits roll, hold X to scroll through them quickly or press start to stop them altogether. When you get back in control of Vic, there's a health pick-up behind you if you need it. Reward: None *The Winner's outfit is now available at the safehouse.
Odd Jobs
99 Red Balloons
[OJ01]
Click here
to see a map with detailed locations of each balloon; I hope you can
read the numbers, it's the only VCS-era map I could find. I'll try to
find a better one. Each balloon needs to be shot to be added to your
collection. If you ever forget which balloons you've already collected,
go the map at the pause menu and hold X. From here, you can toggle the
different collections on to make them appear on the map. While going
through and collecting these, I missed one in Downtown, so it became
#99. It's on the list for the west island.
West & Center Islands:
1. Fort Baxter. Your army fatigues are
required to safely enter the base, so do this before you're kicked out.
If you've already passed that part, you won't get your fatigues back
until you complete the second-to-last story mission. The balloon is on
the roof of the main building, under the northernmost satellite dish. If
you're doing this on foot, get a sniper rifle and stand in front of the
main door to this building and walk east until you hit the fence. You
should be able to see the red balloon under the dish. If not, walk a few
steps north and look again.
2. Fort Baxter. Under the tower in the southeast corner of the Fort.
3. Escobar International. On the south side of the west wall of the long building, near the top.
4. Escobar International. Under one of
the east escalators inside the airport building. You'll lose all your
weapons if you go inside, so shoot it from outside the front of the
building with a sniper rifle.
5. Escobar International. Under the ramp at the northeast end of the diagonal runway.
6. Escobar International. Under the metal roof extending out from the long garages.
7. Vice Port. Inside the impound depot,
under the awning on the east side of the building in the east corner of
the depot (it's the small building marked on the map). Use a helicopter
to get in.
8. Vice Port. Under the raised structural beam near Phil's.
9. Vice Port. Near the top of the ship's mast. Use the stairs on the southeast side of the ship to get up there.
10. Vice Port. In front of the Beachcomber Hotel, near the top of a tree.
11. Vice Port. At the end of the
southernmost bridge that leads to the east island, there's a pink
building. On the north side of this building is an apartment, where
you'll find the balloon near the top of the south wall.
12. Little Havana. Near the top of one of the trees that reaches above the police station.
13. Little Havana. Under the lid of the giant cigarette box across the street from the police station.
14. Little Havana. Under the stairs beind Hardcore Pawn.
15. Starfish Island. Under the edge of the roof on the southeast corner of Diaz's mansion.
16. Starfish Island. Near the front door of a small house across the street from Diaz's mansion.
17. Little Havana. Behind the house on the south side of Umberto's. It's near the top of a tree.
18. Little Havana. Above the door to the El Peluquero Feliz barber.
19. Little Havana. Under the movie theater awning for Evacuator.
20. Little Haiti. Under the awning of a green house.
21. Little Haiti. Under the Redwood cigarettes billboard.
22. Little Haiti. Under the small metal bridge where you'll find an armor pick-up.
23. Little Haiti. Under the large slide in the coal(?) yard.
24. Little Haiti. Under an awning. I think you bombed this building in the original Vice City.
25. Little Haiti. Under the awning of the Le Singe d'Arbre building.
26. Little Haiti. Under the R*Lax billboard.
27. Little Haiti. Inside the big shed
by your safehouse. In the original Vice City, this was Phil's place, and
his Patriot was usually parked here.
28. Little Haiti. Near the top of a
tree on the south side of the building with yellow neon lights running
up and down the walls.
29. Little Haiti. In the narrow alleway on the north side of the building with yellow neon lights running up and down the walls.
30. Downtown. Behind the hotel that's under construction, in one of the small cement pipes.
31. Downtown. Under the Twilight Knife billboard.
32. Downtown. Above and to the right of the door of the townhall-like building near balloon #31.
33. Downtown. Up a tree next to King Knuts (it's a Well-Stacked Pizza in the original VC).
34. Downtown. On the northeast corner
of the building on the east side of the police station. It's fairly high
up, above the bottom part of the building with big blue windows, but
below the tall part of the building with windows wrapping around it. You
should be able to snipe it from the nearest Empire business.
35. Downtown. In the tall building on
the north side of the building in #34, the balloon is high above the
grassy ledges (above the parking lot) on the front of the building. It's
viewable from the road.
36. Downtown. In the same building as
#35, there are three tunnels going through the building high above the
ground. You'll need a helicopter (look on top of the police station) to
park inside the lowest tunnel. Take it very slow trying to land the
helicopter directly in between the two ledges - it's definitely
possible.
37. Downtown. Up a tree behind a hospital.
38. Downtown. Two buildings east of
Ammu-Nation (you'll see purple neon on the corners at night). From the
road in front of the building, you should be able to spot it easily.
39. Downtown. High up on the north side
of the stadium, where the roof is kinda separated from the rest of the
building. You can't see this one from the ground, so fly a helicopter up
there.
40. Downtown. *Possible Spoiler*. I
accidentally shot this one during the last mission of the story, and I'm
not sure where it was, so I'm going off another guide's description: "In
front of the blue building, looking from east. I stood on the of the
safe house from vice city 1, and sniped it (used a helicopter to get up
there)". It's from orgasmicoprah's Red Balloon guide here.
Now that I look at the building, I think I know exactly where it was:
on the east side of the building with breakable glass windows near the
top (one floor has green carpet, another has blue), the building is
indented. The balloon is at the top of the indented part.
41. Downtown. On the roof of the
building across the street to the north of your safehouse from the
original VC, under the satellite dish.
42. Downtown. Up a tree, behind the building across the street to the north of the building in #41.
43. Downtown. Up a tree behind the Empire business building on the west side of the dirtbike track.
44. Downtown. In the center of the office building with rounded corners. It's under the statue with the black ball.
45. Downtown. Underneath the Twatch billboard.
46. Downtown. Under the rim of the roof of the building with the rounded corner next to the bridge.
47. Prawn Island. Under the (water?) tower at the film studio.
48. Prawn Island. Under the southeast rim of a white building in the section of buildings on the southeast corner of the island.
49. Prawn Island. On the roof of the balcony that wraps around Mendez's mansion. It's on the east side, viewable from the lawn.
50. Prawn Island. Inside the tiny building next to Mendez's tennis courts.
99. Downtown. Behind the fire station, on the north wall of a gray building with balconies wrapping around its northeast corner.
East Island:
51. Vice Point. Near the roof on the
front of the hotel with pink/orange trim, across the street from the
mall's multi-story carpark.
52. Vice Point. Near the roof on the back the green hotel across the street from the mall's multi-story carpark.
53. Vice Point Mall. Under the stairs in between the two south entrances.
54. Vice Point Mall. Up the palm tree on the northwest side of the stairs in #53.
55. Vice Point. Under a small tree next to the bridge to Prawn Island.
56. Vice Point. Under the overhang on the north side of a hotel.
57. Vice Point. Across the street and a little south from #56, under a high pink/orange ledge.
58. Vice Point. Under a diving board behind the hotel Gonzalez was staying at.
59. Vice Point. On the north wall, near the roof, of a light brown hotel across the street from a potential business building.
60. Vice Point. Under the eastern staircase at your safehouse from the original Vice City.
61. Vice Point. Inside the bar in the pool.
62. Vice Point. Under the awning of the consessions trailer.
63. Vice Point. Up a tree in this grassy alleyway.
64. Vice Point. Near the roof, at the northeast corner of your safehouse from the original Vice City.
65. Vice Point. Near the roof of the building at the end of this grassy alleyway.
66. Vice Point. At the top of the staircase that leads to the roof of this apartment building.
67. Leaf Links. Under one of the
bridges connecting the two main golf course islands. You can shoot it
from the blue dot on the radar.
68. Leaf Links. Up a loan palm tree on
the northern island of the golf course. You'll lose your weapons if you
enter the course through the main entrance, so if you use a sniper
rifle, you can shoot it from the ramp at the blue dot.
69. Vice Point. Near the roof, on an inside corner of this apartment building.
70. Vice Point. Under the green section of this red, white, and green hotel.
71. Vice Point. On the back wall of the
hotel with the blue trim, across the street from the Malibu. It's under
the lowest blue ledge.
72. Vice Point. Up the northwestern-most tree in this corner lawn.
73. Washington Beach. Under the bridge
near the police station - that road leads directly to Starfish Island.
You can shoot this one from the grass if you don't want to get a boat.
74. Washington Beach. On the north wall
of a bluish building, under the ledge (it's in a tight gap between two
buildings). There's a armor pickup on the west side of the building.
75. Washington Beach. Under the south awning of a red-and-white-striped building, by some dumpsters.
76. Washington Beach. On the east sign on the Chunder Wheel, in the "W."
77. Washington Beach. On the northeast
wall of a very tall hotel, under the edge of the roof - you'll need a
sniper rifle for this one.
78. Washington Beach. Up a tree on the north wall of the police station.
79. Washington Beach. On the corner of a building, in this alleyway intersection.
80. Washington Beach. In plain sight,
on the northeast corner of a hotel with corner window sections sticking
out from the building. It's under the lowest red ledge.
81. Washington Beach. On the front wall of this yellow building, under the highest ledge.
82. Ocean Beach. Under the northeast
corner of the second floor of this corner building with blue
squares/rectangle on the front.
83. Ocean Beach. On the back wall of the building mentioned in #82, under an air conditioner.
84. Washington Beach. On the east wall of this purple building, under the ledge.
85. Washington Beach. Under the 'Stunt Double' billboard (it has a picture of two motorcycle helmets and a green background).
86. Ocean Beach. On the back wall of the green hotel/apartment with all the balconies. It's under a balcony.
87. Ocean Beach. In the southeast
corner of the destroyed building. It's a little hard to see, so go half
way up the ramp in here (it's reall part of the wall that's tipped over)
and look in the SE corner.
88. Ocean Beach. On the front wall of this 'Vice City Medical Foundation' building, under the ledge.
89. Ocean Beach. Up a mini palm tree just north of Pier 1.
90. Ocean Beach. On the north wall of this bright green building, under the ledge.
91. Ocean Beach. On the back wall of the green building two buildings north of Ammu-Nation, under the north side of the ledge.
92. Ocean Beach. On the southwest wall of the pink building next to Ammu-Nation, under the lowest ledge.
93. Ocean Beach. Under the front balcony of the light brown building facing the southern beach.
94. Ocean Beach. In the carpark on the back side of the building with all the circular, purple awnings.
95. Ocean Beach. Across the street to the west of the building in #94. Under the ledge on the northeast corner of this building.
96. Ocean Beach. At the entrance to the
multi-story carpark, under a ledge on the northeast corner of a
building with orange trim.
97. Ocean Beach. On the front wall of a big green hotel with orange trim, under the second-highest ledge.
98. Ocean Beach. Under the high ledge on the west side of the lighthouse.
99. See bottom of West Island list.
For convenience, here's another map.
Rewards - appear at your safehouses (not businesses)
10 Balloons - Pistol 20 - Scorpion 30 - Stubby Shotgun 40 - Molotov Cocktails 50 - AK-47 60 - Body Armor 70 - Flamethrower 80 - Equalizer 99 - M249 =========================================================== Air Rescue [OJ02] Location: The Air Ambulance on top of the Downtown hospital or behind the Ocean Beach hospital, here. Reward: Payment for each level completed, and your health bar increases after level 15. Your goal is to complete level 15. Get in the helicopter and press R3 to begin the mission. A blue blip will appear on the radar, representing a patient that needs delivering to a hospital with a helipad (you will not always use the same hospital; it really does depend on which one is closest). When you reach them, get low enough to pick them up with the winch hanging from your 'copter and fly them to the nearest hospital. Each patient picked up will usually give you somewhere around a 95-second bonus. You don't need to land at the hospital, so don't waste the time. Beginning on level 3, you'll get multiple patients that you'll have to deliver. Your winch capacity is limited to four people, but you'll never get any more than that in a single level. If you land too hard, you will kill any patients on your winch and fail the mission. After every fifth level, you'll get a checkpoint, so, you can stop then and you won't have to start all over when you come back. =========================================================== Beach Patrol [OJ03] Location: The BF Injection parked next to the lifeguard hut here. Reward: $1,500, infinite swimming, BF Injection becomes purchasable at Sunshine Autos. You get one of three jobs, only one is required. One job will have you knocking gangsters off their bikes (do a drive-by or run them over), one has you picking up a medic and getting him to his patients, and the other has you using a boat to rescue swimmers (do a drive-by to throw the lifesavers to each one). They're all very easy; the one with the bikers being the easiest for me. =========================================================== Caddy Daddy [OJ04] Location: The Caddy parked here. Reward: $2,500 Complete this 3-lap checkpoint race in under 6 minutes. The whole thing is pretty easy. Just be careful not to miss any of the bridges or go into the water. You're not in too much trouble if you get in a sand trap, but they'll really slow you down. =========================================================== Civil Asset Forfeiture: Boats [OJ05] Reward: Once you've completed all four lists (boats and cars), Pay-N-Sprays become free. Click here to see a map detailing the location of the impound and each boat. List Reward Dinghy $800 Jetski $500 Marquis $900 Rio $700 Reefer $600 Violator $700 Squallo $800 Tropic $700 =========================================================== Civil Asset Forfeiture: Land Vehicles [OJ06] Reward: Once you've completed all four lists (boats and cars), Pay-N-Sprays become free. Click here to see a map detailing the location of the impound and each vehicle. It'll be updated as I find more spawn points. A * next to a car means I haven't found a difinitive spawn location for it, but here are some tips to find them: Stallion: Outside of any drug business building. Pony: Drive a Stallion around Vice Port; one should pop up. Mule: These are driving all over vice port. List 1 Reward: $500 List 2 Reward: $500 List 3 Reward: $1300 Streetfighter $300 WinterGreen $300 PCJ-600 $500 Sanchez $200 Freeway $400 Deluxo $700 Oceanic $500 Banshee $600 Infernus $900 Cuban Hermes $400 Cheetah $700 Sabre $600 Polaris V8
$700 Comet $500 Stretch $700 Stallion* $600 Phoenix $700 Stinger $600 Pony* $400 Sentinel XS $500 Maverick $900 Boxville $500
Mule* $600 Sparrow $800 =========================================================== Crash! [OJ07] Location: The Coach parked by the rocket here. Prerequisite: "Say Cheese" Reward: $1,000 Your goal is to cause $2,000 within 3 minutes. Unfortunately, destruction by drive-by does not improve your score - you have to ram something for it to count. I got easily got $2,000 in a minute by going back and forth on the main road of the west island, driving on the wrong side (switching to the right side when there aren't cars on the left). The trip to the main road is a little long, but the road that includes the bridge to Prawn Island is usually pretty busy, so you'll get plenty of damage on the way. Here are some things that will raise you score: -Spin a car: $10 for every 90 degrees -Make a car jump (ram it into a high curb, off a ramp, etc): minimum $10; depends on height -Knock a motorcycle over: $50 -Flip a car: $150 (a lot of Landstalkers spawned while I was driving the bus, and you know how they like to roll!) -Destroy a car: $300 (Landstalkers = lots of explosions from roll-overs!) =========================================================== Crims on Water Wings *PS2-exclusive* [OJ08] Location: The Skimmer parked here. Reward: $500 Just like Crims on [regular] Wings, you need to fly an airplane through a series of checkpoints, in under 2:30. I don't know if it's because I haven't been flying lately or what, but the Skimmer seemed really squirmy in the air. This one's a little more difficult as well, as you have to weave between more buildings, under bridges, etc. The race ends exactly where it started. =========================================================== Crims On Wings [OJ09] Location: In the airplane parked here. Prerequisite: "From Zero to Hero" Reward: $500 It's a simple checkpoint race with no time limit. Just take your time and make sure you don't crash; one way to help this is to do the mission when the weather's nice (the wind will toss you around otherwise). Be especially careful with the coronas above Starfish Island; a couple of them are right above trees. =========================================================== Dirt Track Time Trials [OJ10] Click here to see a map detailing locations of each of the different race types. These checkpoint races are very straightforward. As far as tips go, use your handbrake (R1) to get around sharp turns and use the berms (dirt mounds at the corners of track) to help you turn. Be careful when going over small bumps when you're about to turn, and lean forward and land flat for big jumps to avoid being thrown off (land in a straight-ahead position to avoid spinning). The ATV slides around pretty easily, so don't floor it around the corners. Beating one race unlocks the next. The times marked here are required to pass the different races. Sanchez Quad BMX Course 1 1:55 1:25 1:25 Course 2 1:35 1:35 1:30 Course 3 2:00 1:20 1:20 Course 4 1:20 1:25 1:35 Course 5 1:40 N/A 1:45 Course 6 2:25 N/A 1:40 Course 7 2:10 N/A 1:35 Course 8 2:05 N/A 2:40 Course 9
2:10 N/A N/A Course 10 2:55 N/A N/A Course 11 3:00 N/A N/A Course 12 2:55 N/A N/A Reward $2,500 $2,500 $2,500 =========================================================== Empire [OJ11] Pause your game and look at the map. There are icons of buildings all over the place; they represent businesses you can take over and add to your empire. The blue ones are businesses you own (Vance), the red ones are owned by the Sharks (gang), and the purple ones are owned by the Bikers (another gang). These icons will either be whole or look broken. If they're broken, it means the building has been attacked and needs to be repaired. Destroying a Business Head to one of the red or purple building icons on the map and destroy the vehicle out front. This will start a battle in which the gang that owns the building will come out and try to kill you. Some of them are armed, some aren't Either way, make sure you have full health and armor, and a gun with plenty of ammo before starting. Once these guys outside are dead, go inside, kill the guys in here and destroy the business assets. It only takes two bullets to destroy an asset, so there's no need to get trigger-happy. Once everything's taken care of, you'll get a $2,000 reward for destroying the business. You can now purchase the property for yourself. Buying a Business After a business is destroyed, there will be a 'For Sale' sign out front. Stand near the sign and press R3 to buy it. Choose what type of business you want (Protection Racket, Loan Shark, Prostitution, Drugs, Smuggling, and Robbery), and the size of the business you want to run (Small Time, Medium Venture, or High-Roller). High-Roller isn't too much more expensive than Small Time, so if you can afford it, buy it; you'll earn more money. The business icon on the radar will now turn into a wrench, meaning the place is under construction. Just leave the area and come back and it should be finished (the icon will turn into a blue building). You might want to drive far away now... and fast! The gang you stole the property from will drive up and try to kill you, and they've got a lot of guns. Once you buy all of the businesses, the cars out front become bullet-proof. Protecting Your Business Just like the gang territories in San Andreas, your businesses will come under attack from opposing gangs. You'll get a message and a warning blip on your radar once this happens. Get to the building being attacked and kill the attackers. If you don't, the building will suffer damage (the icon will turn into a broken building) and you'll have to pay $500-1,000 to repair it. Sometimes it's just better to leave the attack unchecked and repair the building afterward; save yourself the life. To repair a building, go inside, stand next to the bulletin board, and press R3. The attacks won't stop completely until you've taken over all 30 businesses and did all of the required missions. Managing & Building Your Business You can change your business type and size by going inside to the board and pressing R3. Stand next to a guy (either one; they both give you the same mission) and press R3 to begin earning respect and reputation for your business. Once you beat the missions for one type of business in one building, you don't have to do it in another. For example, say you started a Protection business and completed the missions. If the next business you build is a Protection Racket, you don't have to do the missions again, because your reputation is already full in that area of business. You still need to do the other types of businesses to reach 100%. The Burglary and Smuggling business types open after you take over a couple businesses of each of those types. Once you've beaten the missions for each type of business, turn all of your businesses into robbery; it earns the most money. Protection Racket: Extortion Go to the indicated store and convince the owner pay protection by trashing their stock. The cops will get on you for this, so get to a Pay-N-Spray to lose them, then head to the next job. There are a total of 15 extorsion jobs, and you can quit any time by pressing R3. Some stores will have gangs guarding them, meaning the store's already protected. Take them out, enter the building and destroy their stock. The gang will then come inside, and you'll have to kill them. Once you leave, the gang will chase after you, and eventually they'll try to take their stores back, so you'll have to fight to protect them, just like you would your own business building. Once all 15 jobs are complete, your extortion stat maxes out and you become the Ultimate Badass, woohoo! Loan Shark You simply have to repossess atleast 15 vehicles without damaging them. For vans with cargo, pull alongside and shoot them once to get the drivers to get out. For bikes, just ram it to knock the driver(s) off and steal it. You get $150 for each repossession ($250 bonus for every three in a row). Keep an eye out for people that will shoot at you and try to ram you off the road. Prositution: Pimping This works exactly like Pimping in San Andreas. Get in the car, pick up the girl, and deliver her to her client. Get to the next girl and do the same. By the time you deliver the second girl, the first one will be done with her client. Get to her and take her to another client. A job is complete every time you pick a girl up after she's done with a client. Sometimes the client will try to run away without paying, attack your girl, or kidnap her, and you'll have to kill them. When a girl is kidnapped, perform a drive-by on the client's car - a few shots will get him out - then kill him. When a girl needs to be picked up, you have an unlimited amount of time (unless she's being attacked, kidnapped, or unpaid), so get your car repaired if it becomes too damaged. Once you complete 15 levels, your pimping stat maxes out and you become the Mack Daddy. Drugs: Drug Running You'll want a gun before starting. A deal has been arranged. Grab the money and leave your business' building, then head to the marked destination to buy the drugs. Get in the van with the drugs and drive back to your warehouse. You get $1,300 for the first job. For the second job, you have to sell the drugs, so go outside, get in the car, and drive to the destination. When you get there, two guys try to steal your drugs - kill them and safely (the would-be thieves' goons will chase after you) return to the warehouse for $1,800. For the third and fourth jobs, you're buying drugs again. Grab the money and head to the destination. For the third, you'll get a wanted level on your return trip. For the fourth, the drugs are fake and you need to kill the guys who stole your money - be careful not to destroy your money or you fail. The third mission is worth $2,200, the fourth is worth $2,400. For the fifth job, you're selling drugs, but a rival gang kills your client. Kill the gang and take the drugs and money back to your warehouse. Survive the gang trucks to earn $2,300. For the sixth and final required mission, you're once again selling drugs. This time, you need to take a boat to the meeting place. Once the deal is done, take the jetski full of money to the jetty to get your $2,200 reward. Smuggling First off, you do not want to do these missions while it's raining and the ocean is wavy. For the first mission, get to the jetty in Vice Point and drive the boat to the helicopter. Collect 15 of the packages the helicopter drops, then get back to the jetty. Drive the truck back to the warehouse without filling the damage meter and before time runs out to collect your reward (what you get depends on how full your damage meter is). For the second mission, you're doing the same thing as in the last mission, only this time there are other companies fighting for the same packages. For the third mission, you're doing the exact same thing as in mission 1, only you're on a tighter time limit. Once you get back to the jetty, you'll have a four-star wanted level. Avoid the cops and get to the nearest Pay-N-Spray (unless your warehouse is closer), then head back to the warehouse. Mission 4 is just like 2, but with a four-star wanted level. Mission 5 is just like 1/3, but instead of a wanted level, there are rival gang members on your return trip to the jetty. Don't worry about destroying the boats on your way back; you can do a drive-by to shoot the gunmen real quick, but worry about getting to the jetty (which, by the way, might not be where you first got in your boat) as quick as possible and do not let your boat explode. The boats tend to spawn ahead of you, in whatever direction you're facing, so use that to your advantage and don't drive directly toward the jetty. When the boats pop up, get somewhat close to them (not enough that they can shoot you) and then change your direction. Keep doing that until you're near the jetty and then head straight for it. Drive the truck back to your warehouse. For mission 6, you're once again competing for packages. This time the other boaters have gunmen shooting at you. You also need 20 packages instead of 15. While the other boats are heading for one group of packages, head to one that's in the opposite direction whenever there are some to guarantee the collection. Once you've grabbed 20, head back to the jetty, then to your warehouse - you'll get a four-star wanted level when you touch land, so head to the nearest Pay-N-Spray to get rid of it (again, only if it's closer than your warehouse). Robbery For mission one, simply damage a vehicle until the driver gets out (do not destroy it) - drive-bys are the easiest way. Once you start attacking the courier, his buddies will drive up and ram you. Kill the courier and take the briefcase to your business. Unless you destroy the courier's friends, they're going to follow you all the way back to your business. For the second mission, you need to stop a money truck. Immediately after you exit the building, you get a two-star wanted level. Get to a Pay-N-Spray to get rid of the heat then catch up with the truck and shoot it until the drivers get out. Take the truck to a Pay-N-Spray to get rid of the damage (kill the guys if necessary). Once you've stolen it, back up will have been called, so the repair is very important. For mission 3, you're doing the same thing as in mission 1, only in a boat. As long as the courier doesn't see you, he'll drive pretty slow, so stay at a good distance from them and shoot the drivers with a sniper rifle. You can also kill the guys onboard with a drive-by, but you have to be careful not to destroy the boat. Anyways, when the courier and the drivers of the guard boat are dead, get the briefcase and take it back to your business. For the fourth mission, you're doing the same thing as in mission 2, only the courier is closer to their destination. You also get cop attention instead of backup. Mission 5 is just like mission 3, only the boat has two guards and the cops will be allerted once the courier sees you (2 stars). Mission 6 is just like 4, but the cops and the courier's guards are alerted immediately when you start. Getting Paid You get paid every day at around 16:00. The more missions you complete, and the more businesses you have (and the bigger they are), the more you get paid. High-roller Robbery makes the most money out of any business, so once you've beaten all the mission types, you can turn all your businesses into Robbery and get the most money every payday. Personally, I wouldn't do that because I love having the Sabre Turbo parked everywhere. =========================================================== Fire Copter [OJ12] Location: The Armadillo (helicopter) behind the Downtown fire station, here. Prerequisite: "From Zero to Hero" Reward: $500 upon completing level 5 Your goal is to complete 5 levels of putting out fires. The bucket on the roap your helicopter is holding is full of water (there's a meter on the right of the screen) that you can release onto fires by pressing Circle. If you run out of water, get to the ocean and fly just above the water so your bucket will scoop some up - it doesn't need to be completely submerged, so be careful not to land the helicopter in the water. Obviously be extremely careful not to fly into a building, light pole, etc. If you fail the mission at any level, you have to start over at 1. For your first job, there are fires at three locations you need to put out, so get to a fire as quickly as possible. Hover directly over the fire and press Circle to drop water onto it - one quick button tap should be enough for each flame. Once they're all out, head back to the fire station and park in the marker to collect your reward, which is dependent on your time. For level 2, your water bucket has been refilled and you now have four fires to put out. Use the same technique as before. Levels 3 and 4 have you putting out 4 fires again, but they're slightly bigger and more spread out. On 4, be most careful when putting out the two southernmost fires, as they're in tight spots - fly fairly high above the fires to drop water on them. Level 5 has you putting out only 3 fires. The fires on the Hyman Stadium and at the army base are a little tricky. Just keep your height like in level 4 and you should be fine. =========================================================== Fire Fighter [OJ13] Location: Get in any fire truck and press R3.
Reward: Payment for each fire, and Vic becomes fire-proof after level 15 (him, not the cars you drive). Get in a fire truck and press R3. First off, use Circle to fire the water cannon on top to put out the fires. Aim it by moving the right analog stick; you can also use the left stick to aim up and down. Once you press R3, a blue blip will appear on the radar, indicating a car that's on fire. Beginning on level 2, once you put out the car fire, people will get out of the car and you'll need to put them out as well. You'll gain an extra 10 seconds for every person put out. It's a pretty easy side job, because unlike the console games, the fires in a single level aren't spread out. New to the GTA series is checkpoints after every 5 levels completed, meaning you don't have to start all over if you accidentally run over someone. =========================================================== Haiti Hover Race [OJ14] Location: The Hovercraft parked here. Prerequisite: "From Zero to Hero" Reward: $500 It's a simple enough checkpoint race; get through them all in under 1:45. Do this when the weather's nice if you can help it, because the water will toss you around a little while you're trying to collect the first few checkpoints. Also, once the checkpoints get back to the cobblestone ground near the water, be careful not to fall off into the water. Other than that, it's easy. =========================================================== Harbor Hover Race [OJ15] Location: The hovercraft parked here. Reward: $500 Just like the Haiti race, but this one includes ramps in the water. You have to complete the race in under 3:45. The race also has more checkpoints on the water, and the ramp you have to jump to get onto land requires quite a bit of speed or you won't clear the gap. The first few land checkpoints tightly weave between some small buildings, then you'll travel around the south side of Starfish Island, then you're back in the water. Overall, this one is slightly more difficult than the Haiti race because the ramps are so small and easy to miss with the hovercraft's sensitive handling. =========================================================== Hyman Memorial O.D.T. *PS2-exclusive* [OJ16] Location: The Biplane parked in this hangar. Reward: $500 Get through three sets of checkpoints, in three different vehicles, in under 4:50. It's a little tricky, so I'll walk you through it. The first two checkpoints are easy enough to find. Immediately after checkpoint 2, make a hard right turn to reach the third corona, go down for the fourth, then turn up and left for the fifth. Next, turn down and right for the sixth, up for the seventh, down and right for the eighth, then make a hard left and go up a little for the ninth. For the tenth, make an even harder left, then go up and a little left for number twelve, down and right for thirteen, make a hard right and go up for fourteen, then make a hard left and go down a little for fifteen. Sixteen is a little northwest of this, then make a hard left and go down for seventeen, and continue south for eighteen. Next, follow the blue blip on the radar and crash or jump into the water near the boat - get as close as you can!. Get in for the next set of checkpoints. The first is straight ahead, then make a hard left (R1 for handbrake) for two, then turn right for three. Turn a hard right for four, then go north for five, and a harder right for six. Seven is a little to the left, same for eight and nine, and ten is a very hard left. Turn a hard right for eleven, then drive the boat up the ramp to get on land. Get on the motorcycle for the third set of checkpoints. Number one is straight ahead, then follow around the arena for two through nine. Go left out of the arena parking lot for ten, then southeast onto the road for eleven. Twelve and thirteen are straight ahead, then make a 90-degree left for fourteen, and another for fifteen, then a third for sixteen. Turn a hard right for seventeen, then a hard left for eighteen, then right for nineteen. Go up the short stairs for twenty and the final, green checkpoint. =========================================================== Land, Sea, and Air Ace [OJ17] Location: The Sanchez parked here. Reward: $500 This is just like Hyman Memorial O.D.T., only the vehicle types are in reverse order. Complete the whole race in under 4:30. The first part, with the Sanchez, it very easy - just be careful you don't go into the water when trying to get onto the narrow bridge. You'll go out onto the beach, to a circle, then come back to near where you started and get on the jetski. When in the water, just be careful not to crash into rocks, boats, docks, etc. Once you reach the end, you can jump onto land and quickly get into the Sea Sparrow in the water nearby water. The first corona is up and straight ahead. After that, it's pretty easy. Keep an eye on your radar for the next corona (the darker-colored blip is the next one that will pop up after the pink one is collected). =========================================================== Mashin' Up the Mall [OJ18] Location: The BMX on the first floor of the mall, in a 'Win This Bike' booth in the northwest corner, here. Reward: $500 Your goal is to collect all the coronas in under 4:30, but they must be collected in a few different ways. Wheelie through the green ones, stoppie through the blues, and collect the red ones any way you want - just riding through them is obviously the fastest way. For the wheelie/stoppie coronas, you don't exactly need to be doing those things - jump through them (hold and release L1) and lean forward/backward while in the air and it will count. I found it easier to collect everything on the ground floor first, then go upstairs and circle around the balcony - none of the coronas will be in a store. This mission can get very frustrating, because it's incredibly easy to fall off a bike. Time your jumps onto the planters; you don't want to crash and fall. Some of them have steps low enough to ride up, so look out for that. =========================================================== Paramedic [OJ19] Location: Get in any ambulance. You can find them parked at any hospital.
Reward: Level completed x $100, infinite sprint after level 15. Get in an ambulance and press R3. A blue dot will appear on your radar, indicating an injured patient that you need to pick up and take to the hospital. Get to that person, let them get in your truck, and take them to the nearest hospital. As you progress through the levels, you will get more and more patients that need to get to the hospital. Your ambulance can only carry three at a time, so you'll have to take multiple trips from level 4 on. Immediately after the patients appear on your radar, pause the game and look at your map to plan the quickest route. I also recommend doing this on the west island, so you won't have to drive through any sand to get to someone; it really eats up your time. The main road also makes getting places a little faster. Once you beat level 15, you unlock infinite sprint, so you never tire while running. New to the GTA series is checkpoints after every 5 levels completed, meaning you don't have to start all over if you accidentally run over a patient. =========================================================== Phil's Shooting Range [OJ20] Location: The blue marker here. Reward: $3,500 ($500 for setting an accuracy record, $500 for setting a time, $2,500 for completing the 5 rounds) Just as the on-screen instructions say, you need to earn the target amount of points to move on to the next round. "Friendly" targets are those with their hands up and don't have target circles on them; sometimes they move, sometimes they don't - each one shot takes 200 points away from your score. Round 1 Weapon: Pistol Target Score: 1,000 Round 2 Weapon: Machine Pistol Target Score: 1,500 Tips: Know that machine guns shoot one bullet immediately after another unless you're very easy on the trigger. If you're shooting an enemy target with a friendly behind him, shoot at the lower part of the enemy's body incase you fire off more bullets; that way it hits the sand bags and not the friendly. Round 3 Weapon: Shotgun Target Score: 2,000 Tips: Know that the shotgun has a larger fire range than other guns, so don't even think about taking headshots at an enemy hidden behind a friendly. You can also take out two of the third-row enemies at once if you shoot between them. Round 4 Weapon: Assault Rifle Target Score: 2,000 Tips: Use the same strategy as with the machine pistol, mixed a little with the shotgun strategy; this gun shoots fast and has a slightly bigger fire range than a machine pistol. The targets are also moving much faster now, so you'll have to be even more careful when friendlies are out there. Round 5 Weapon: Sniper Rifle Target Score: 2,500 Tips: When zoomed out all the way, the gun movement is very sensitive. One bullet will go through one target and shoot anything behind it, so make sure you're shooting at the sand bags unless there are two enemies in a row. =========================================================== Playground on the Dock *PS2-exclusive* [OJ21] Location: The PCJ-600 parked here. Reward: $500 The timer begins when you collect your first checkpoint. From the starting point, go to the checkpoint straight ahead of you then turn right and get the next one, on the grass. Get on the orange roof top and collect the two points up here, then drop down at the end and make a U-turn into the alley between the rows of houses for the next three checkpoints. At the end, go left for one point, then cross the street and go north for another. Continue north and get the two points on the grass, then launch off the ramp at full speed for a third - you'll land on the ramp across the street, getting the fourth. Keep going north and get the checkpoint next to the Benny's Restaurant boat, then get on board and circle counter-clockwise around the main deck of the boat for 9 more. Right after the boat's ninth checkpoint should be a staircase that you need to go up to get the last 4 checkpoints; once again go counterclockwise around this top deck to collect them. =========================================================== Playground on the Park *PS2-exclusive* [OJ22] Location: The PCJ-600 parked in the southeast corner on the first floor (above ground level) of the multi-level carpark, here. Reward: $500 From the starting point, collect the checkpoint to your right, then continue straight ahead for the second, third, and fourth, then turn left and go straight for the fifth, then go south for the next two. Make an immediate left, up the ramp for another two, then go south for the next, then west and around the corner for three more (you're basically doing a figure-8 around the pillars), then go up the ramp. Collect the point up here, then go left, for another, then up the ramp and down the other side for two more. Continue around to your left for another, then go up the ramp for the next one, then drop back down onto the carpark's top level and go full speed up the next ramp to jump over the street and onto another roof. Speed ahead and go up the ramp (you're going fast enough to clear the small gap before the ramp without jumping - don't go too fast up the ramp or you'll fall off the building - start from the east side of the building that the ramp is on and you'll get the right amount of speed) and collect the next point. Again, you'll be able to go fast enough to cross the next small gap if you pull the front of your bike up (pull back on the left analog stick), then drop down onto the street and into the alley. Follow the alley for the final three points. =========================================================== Playground on the Point [OJ23] Location: The PCJ-600 parked here. Reward: $500 The timer begins when you collect your first checkpoint. From the starting point, go straight ahead and to your left to get the first checkpoint behind the pillar, then go right to get #2 by the tree, then go left again for the next point under the building. Go right, out to the next point, then back under the building for the next. Then go right and east for the next, then make a u-turn for the next one. Follow the ledge along the wall for the next two, then go down the ramps for the next two nearby checkpoints. Follow the sidewalk for the next two, then into the street for another. Go into the alley at full speed for the next two and jump up onto the roof - brake immediately so you don't fall off!. Collect this point and follow the roof around counterclockwise for the next four points, then go full speed in the direction where the first rooftop checkpoint was to jump over the street and onto the courtyard for another checkpoint. Go around the back (east) side of the building and behind the diving boards for the next three points, then into the next courtyard for another point, then in front of the hotel for the final one. =========================================================== Playground on the Town [OJ24] Location: The PCJ-600 parked here. Reward: $500 The timer begins when you collect your first checkpoint. From the starting point, go right and get the first one at the bottom of the steps. Go up the stairs and collect the checkpoint at the top. Go west to the next checkpoint. Go up the stairs just north of you and get this checkpoint. Turn around and get the checkpoint. Turn around again and hit the ramp to the next roof. You should land on or right next to the next checkpoint. Turn around again and follow the roof around, getting the 3 checkpoints. Hit the ramp at the edge of the roof to the next building. You'll land on the next checkpoint. Jump off this next ramp to the next building - you'll once again land on or near the next checkpoint. Drive off the end of the roof to get the next checkpoint. Go south, through the narrow alleyway and get the checkpoint. Immediately make a right and get the next checkpoint. Keep circling around the blue building to get the next two points. Once you go into the slope alleyway, get the point to your left, then the one just east of you. Go south for the next point, then left for another. Make a right immediately after the planter and go up the ramp on the side of the building. At the top, make a left and go to the end of the ledge. Go left, collecting the checkpoints, then hit the ramp for the final. =========================================================== Rampages [OJ25] Click here to see a map detailing the locations of each rampage (red dots mean it's the same for PS2 and PSP, and blue means it's exclusive to PS2. #16 is in a different spot in the PSP version, I believe the parking lot directly south from that alley, so I colored it as exclusive). ALWAYS make sure you have full health and armor before starting. Running the guys over with cars won't count unless it's in the job's description, so don't waste the time. Once you've completed the rampage, the skull in the icon turns blue to let you know. I recommend completing the Ambulance and Vigilante odd jobs before starting these because they increase your health and armor bars. The rewards aren't rampage-specific as they increase as you go through them, no matter what order. The first one is worth $50 while the last is worth $3500. 1. Little Havana, behind the dual-garage building in the front parking lot of Sunshine Autos. Execute 20 Cholos in 2 minutes. Get a safe distance away from the crowd of Cholos and shoot at them; the distance makes it harder for them to hit you. 2. Little Havana, on the roof of the police station (there are stairs around back). Hack and slash 20 Cholos in 2 minutes. The Cholos only have their fists to fight with, but your health will lower quickly if you let them get some shots in. 3. Little Havana, on the roof of the tall building two doors east of Robina's cafe. Kill 25 Cholos in 2 minutes. Hop up on the ledge of the lower roof (thebuilding next to Robina's) and use your sniper rifle to take out Cholos on the ground. Hopefully they won't already be in a gang fight. 4. Little Havana, on top of Guano's Cafe (go north to the opposite end of the block, go into the alley, and use the ramps to reach it). Kill 40 Cholos in 2 minutes. Jump down onto the ground or you won't be able to get clear shots at a lot of them. This one shouldn't be too hard because the shotgun has such a big blast radius. Shoot one and you're likely to kill five around them. 5. Little Havana, on the front steps of a house next to the north entrance of the alleyway near Robina's, where some body armor spawns. Gun down 25 Cholos in 2 minutes. Use basic tactics when fighting people with guns. That is, shoot from a distance or from behind a short ledge or car that you can shoot over. Remember the armor pick-up in the nearby alley; make sure to get it when needed. 6. Starfish Island, on the front porch of the house next to Diaz's mansion. Destroy 15 vehicles in 2 minutes. Grab the car that spawns in this house's driveway and get out to the street as quick as possible. Use your shotgun to destroy traffic. Try to keep your distance or the explosions can kill you. If you're having trouble reaching 15 cars, prepare before activating the rampage: wait out in traffic, steal some cars, park them in the front yard of the house with the rampage, then begin - destroy the cars in the yard and you've got a head start. This game is known to have a glitch where if you've been playing too long, traffic stops appearing on the roads altogether. If you're experiencing this, save and reload your game and try the rampage again. 7. Little Haiti, on the roof of the building next to the hovercraft (to the north) that starts the Haiti Hover Race. Erase 25 Cholos in 2 minutes. This one's pretty easy. Just stand on the edge of the roof and shoot the Cholos from there. You'll find armor on the bridge by the hovercraft if you need it. 8. Little Haiti, in a lowered alleyway near the R*LAX billboard. Incinerate 10 vehicles in 2 minutes. I recommend completing the Fire Fighter odd job before doing this rampage; it makes you fireproof. This is a pretty easy mission. You're pretty much guaranteed a fire truck will come, and there's a car that spawns next to the red building across the street from the rampage icon; that's two cars in the bag right there. This road has a decent amount of traffic flow too. 9. Downtown, in one of the cement pipes supporting a Unique Stunt Jump. Crush 15 Bikers in 2 minutes. You need to run the Bikers over with a vehicle. Before starting, get the nearby Bulldozer and park it next to the rampage, so when you start, you can get right in and drive out to the street. It's got a horrible turning radius, but it's heavy and less vulnerable to bullets than most other vehicles. You could also use the Rhino that spawns at the army base, but that's out of the way. Just try to run over as many big groups of Bikers as possible. 10. Downtown, in a shack on the roof of the building across the street from the Greasy Chopper bar. Terminate 25 Bikers in 2 minutes. This one's easy; just stand at the top of the stairs and fire away. 11. Downtown, on the roof of the police station, under the ramp leading up to the helipad. Exterminate 25 Bikers in 2 minutes. If took a motorcycle up to the roof, use it to jump down onto the street; otherwise take the stairs. This is another easy rampage. Just target and shoot. 12.Downtown, on the roof of the police station, behind a short tower at the very northwest corner of the building. Trash 10 vehicles in 2 minutes. You can stay up here if you want, and just throw the molotovs onto the street. Make sure to get the VCPD Cruiser parked next to the building. If you took a motorcycle up there, jump down to the street and get the fire truck as well. 13. Downtown, under the ramp on the roof of the burger restaurant. Use helicopter (on top of the police station or by the stadium) to get up there. Kill 25 Bikers in 2 minutes. Jump down to the street and shoot 'em up. As long as you have sufficient health, this should be easy. 14. Downtown, at the top of the tall staircase across the street from Ammu-Nation. Drive-by and execute 25 Bikers in 2 minutes. It's fairly easy, but you'll probably have to switch cars atleast once. 15. Downtown. Get on a motorcycle and find the 'Eight Ten VCN' building at the beginning of the bridge leading to Prawn Island. The entrance to the roof is just east of there, behind the bridge's guard rail - enter it on your motorcycle. From where you appear, turn east and drop down onto the lower roof, next to a couple big satellite dishes. Now go to the north edge of this roof and look down. You need to jump down to the lower roof of that skyscraper across the alley (it doesn't require much speed at all). When you get down there, drive around the building in a counter-clockwise direction and you should see the rampage after the second turn. Take out 25 Bikers in 2 minutes. Snipe the Bikers on the sidewalk from here. If you stand on the sharp northeast corner of the building, you'll get a clear view of the area. The only thing that makes this rampage hard is the rifle's slow reload. 16. Downtown, in the grass on the south side of the dirt track, in an inside corner of a building. Take out 20 Bikers in 2 minutes. Get out to the street and shoot Bikers. This one seemed more chaotic than any of the others so far, but if you run and shoot at the same time, you should be fine. 17. Downtown, in front of the Hyman Memorial Stadium sign. Decimate 25 Bikers in 2 minutes. If you be careful and don't throw the grenades near you or by a car that can explode near enough to hurt you, this one's a sinch. 18. Downtown, in a square corner alley, under a short staircase. Drive-by and eliminate 20 Bikers in 2 minutes. This is exactly like #14. 19. Prawn Island, in the water fountain across the street from the Mendez mansion. Destroy 15 vehicles in 2 minutes. Use the same strategy as in #6. 20. Vice Point, on a tall ledge at the northeast corner of the island. Obliterate 25 Bikers in 2 minutes. The gun is a one-shot-killer, so just auto-target one guy, shoot him, and press L2/R2 to target the next guy (while still holding R1). 21. Vice Point, at the northeast corner of the building next to the one by #20. Annihilate 25 Bikers in 2 minutes. Easy enough; just gun them down. 22. Vice Point, in the Security booth in the mall. Kill 70 Sharks in 2 minutes. As long as you have full health and armor bars, this shouldn't be too hard, especially if you stay in the booth the whole time. Use auto-target and L2/R2 to quickly change targets once a Shark is down. 23. Vice Point, in front of a high-rise hotel or apartment across the street from an empire business. Explode 15 vehicles in 2 minutes. Just like any other rampage that has you destroying vehicles. 24. Leaf Links Golf Course, in the middle of the tennis courts. Slay 20 Sharks in 2 minutes. Just like any other rampage using grenades. Just remember that these are remote-controlled, so they have to be detonated. 25. Leaf Links Golf Course, under the bridge leading to the east island. Kill 10 Sharks in 2 minutes. Use the same strategy as in #2. 26. Vice Point, on top of the big building in the carnival area. To get up there, walk up Unique Stunt Jump #28 and onto the red-and-white-striped tent. Then jump onto the Jerky Hatch booth to the west, then onto the roof of the big building to find the rampage. Terminate 25 Sharks in 2 minutes. It's just your basic machine gun rampage. 27. Washington Beach, in the multi-colored rooms in the apartment/hotel complex right before the bridge to Starfish Island. Destroy 10 vehicles in 2 minutes. Use the same strategy as in #6. 28. On the roof of a green building with a wide yellow stripe going around the middle, connecting all the windows. Use the stairs around back to get up there. Eradicate 30 Sharks in 2 minutes. Another basic machine gun killer. 29. Washington Beach, hidden inside a bush - literally inside the bush; very hard to see. Look at the dot for this one on my map. You should see a yellow building with red stripes running along the top and bottom of the walls. On the west/southwest side of that building is a short alley next to some bushes and trees. The rampage is in the northernmost bush along this alley. Terminate 30 Sharks in 2 minutes. You've got the mother of all machine guns, so I think you know how easy this is. 30. Ocean Beach, on the roof of a small building in the boot camp-looking area; it's right next to the Bobcat. The grass on the other side of the wall is high enough to let you jump onto the roof from there. Eliminate 30 Sharks in 2 minutes. You've got a rocket launcher, it can't be any easier. Just don't shoot at anything in your immediate surroundings. 31. Ocean Beach, in the condemned building - you'll see it right away if you enter from the north. Exterpate 25 Sharks in 2 minutes. From the starting point, go south to the ramp inside this building and get to the top. Then jump onto the scaffolding/roof to your right (north) and snipe from here (or at the top of the ramp). 32. Ocean Beach, on the Hotel awning above the red carpet. The only way I can think of to get up there is a helicopter. Grab the one on the roof of the police station. Kill 25 Sharks in 2 minutes. I recommend staying up here for safety. Take your helicopter to the next rampage. 33. Ocean Beach, on the pink awning that wraps around the south and east sides of a building two streets east of Ammu-Nation. Land a helicopter on the roof and drop down. Level 12 vehicles in two minutes. Use the same strategy as #6. 34. Ocean Beach, on the roof of the building next door to the south of Skinny Dick's Surf Shack. Use the stairs around back to get up there. Kill 25 Sharks in 2 minutes. Snipe from up here on the roof, it's an easy rampage. 35. Ocean Beach, next to a tree behind some hedges, across the street from the 'Los Santos Fop' billboard. Decimate 25 Sharks in 2 minutes. If you're doing this one immediately after #34, you should have no problem finding Sharks. It's your basic machine gun rampage. =========================================================== Rush! *PS2-exclusive* [OJ26] Location: In the Linerunner parked here. Reward: $1,000 Your goal is to cause $1,700 within 3 minutes. Unfortunately, destruction by drive-by does not improve your score - you have to ram something for it to count. I got a little over $2,000 by going back and forth on the main road, driving on the wrong side (switching to the right side when there aren't cars on the left). Here are some things that will raise you score: -Spin a car: $10 for every 90 degrees -Make a car jump (ram it into a high curb, off a ramp, etc): minimum $10; depends on height -Knock a motorcycle over: $50 -Flip a car: $150 -Destroy a car: $300 =========================================================== Skywolf [OJ27] Location: In the Hunter parked here. Prerequisite: "Last Stand" Reward: $500 A fairly easy checkpoint race/target practice session you need to finish in under 4 minutes. Helicopters are especially sensitive to wind, so be sure to do this when the weather's nice. I also recommend doing this during the day because it's impossible to see the Hunter while it's flying over water and you don't want to crash. The checkpoints are easy enough to get through, so there's no real explanation there; just do it fast. The targets are easy to get too, if you just repeatedly fire missiles in their general area. Here's what you'll be doing, in order: Two checkpoints, two trucks, two checkpoints, three trucks and two boats, one checkpoint, four trucks and one helicopter, one checkpoint. The helicopter may seem hard, but if you use the same strategy you use with the land/water targets and just fire missile upon missile at it, it should go down fast. =========================================================== Swinger's Club [OJ28] Location: The driving range, here. Prerequisite: "Home is on the Range" Reward: $1,000 Your goal is to reach a score of atleast 500, and the controls are exactly as they were in Gonzalez's mission. You get five shots to get the score, and the whole thing is pretty self-explanatory. You get a point for every meter the golf ball travels, plus a bonus 50 for hitting the buoy. =========================================================== Taxi Driver [OJ29] Location: In any Taxi or Cabbie Reward: Earnings from fares, taxis can turbo jump by pressing R3 while driving Get in any taxi and press R3 to activate this odd job. Your goal is to deliver 50 fares or make $5000, which ever comes first. It only took me 26 fares (in a row) to reach $5,200. Once you activate the mission, a blue blip will appear on your radar, somewhere in your immediate surroundings. This represents someone that needs a ride. Stop next to them, let them get in, then drive to their destination, marked on your radar by a pink blip. Get there as quick as possible, and without damage, to recieve the biggest tip. If your car gets too damaged, you'll lose the fare and will have to re-spray the car before you can collect another. You get a bonus $250 for every 5 fares delivered in a row. Once the fare is delivered, wait a few seconds for another person to appear on the radar. If you get the message that says there aren't any fares in the area, just drive around until one shows up and take them to their destination. Some fares will need to get to multiple destinations, and always seems to be because they did something wrong. For example, one of my fares wanted to be delivered to a donut shop, then came out with a two-star wanted level, asking to get to the police department. Maybe he had to turn himself in, I don't know, but another guy knocked off a carnival and felt he had to get to the airport and leave town. Some fares will ask you to tail a vehicle - keep your distance, but don't lose him - it's very easy to keep the tip meter full for these type of fares. =========================================================== Turismo [OJ30]
Location: The marker behind Sunshine Autos on the west island, and at the carnival on the east island, here. The map also includes spawn locations of good vehicles to use in the races.
Reward: Complete all races to earn $1,000 These are checkpoint races. A basic tip for motorcycles is to know that crouching (press forward on the left analog stick) makes you more aerodynamic, enabling you to go faster. For any vehicles, use the handbrake to swing around sharp corners easier. Also make sure to keep an eye on the radar for where the next checkpoint will appear so you can prepare sooner.
West Island Escobar Run-Way
Entrance Fee: $100
Reward: $500
Type: Motorbike
Tips: I won this race easily with the Streetfighter (see map). On some of these roads, be careful not to fall down to the lower streets; it's very hard to get back up. There are a lot of straightaways in this race, so crouch whenever possible to gain an easy lead. While you have the motorcycle, you may as well get the other two races out of the way. Downtown Showdown
Entrance Fee: $150
Reward: $600
Type: Car
Tips: I used a Sabre Turbo for this race, which you can find at any smuggling business. At the first turn, try to stay right behind another racer and ram the back of his car so he misses the turn; just make sure you make it. After another turn, you'll be on a long straightaway, and by this time I was in second place, just behind car #1. I pushed the side of his car, near his rear end, to spin him out and took first. Take the next turn very carefully - you don't want to get caught up in the pillars of the building straight ahead of you. After that, the race is pretty easy. Just take the same precautions on the second lap. If you haven't unlocked smuggling as a business type yet, but Prawn Island is open, the Deluxo is also a great choice. Port Sports
Entrance Fee: $200
Reward: $800
Type: Motorbike
Tips: Use the same tactics as before. You're racing on busier streets this time, so drive on the sidewalks to avoid crashing. Rum & Salsa Sting
Entrance Fee: $250
Reward: $1,000
Type: Car
Tips: The other racers are very competitive here. I first tried racing with the Sabre Turbo again, but it's probably not the best choice with all the power at the rear wheels and your opponents constantly trying to spin you around. I got 2nd with the Sabre, then tried the Deluxo (see map), which is a much more stable car, and got 1st. Cuban Wheels
Entrance Fee: $300
Reward: $1,200
Type: Motorbike
Tips: You're once again racing through busy streets, and there seem to be more street lights and turns than any of the other bike races. Just take it easy. You don't have a whole lot of chances to reach top speed, especially with all the cars around. East Island Fools Rush
Entrance Fee: $350
Reward: $1,400
Type: Car
Tips: I easily got first with the Deluxo. There aren't any particularly tricky areas of the race you've got to worry about. High Stakes Highway
Entrance Fee: $400
Reward: $1,600
Type: Motorbike
Tips: I got an easy 1st with the Streetfighter. There's nothing here you need to worry about too much. There's one checkpoint you'll get to that points straight ahead, right into a building. Just turn right to go to the next street and around the building and continue to the next checkpoint. Asphalt Assault
Entrance Fee: $450
Reward: $1,800
Type: Motorbike
Tips: I used the Streetfighter once again. After the checkpoint on the bridge near the police station, do not try to cut across the gray cement immediately after the bridge, on the left side. There's a short wall that will throw you off the bike if you hit it; just follow the street corner. The only other frustrating part of this race is the incredibly stupid competitors. There was one point near the start of the second lap where one of them rammed into another car, which swerved to the side of the road and knocked me off my bike. I got pretty far behind and didn't get a close 2nd until the very end of the race. In my second attempt (still with the streetfighter), I was able to get an early lead and keep it throughout the race. Supercharged Circuit
Entrance Fee: $500
Reward: $2,000
Type: Car
Tips: I used my trusty Deluxo again and won pretty easily. The other racers have a tendency to crash into light polls and things like that to slow them down. There a little aggressive, but not as much as in Rum & Salsa Sting. =========================================================== Unique Stunt Jumps [OJ31] Click here to see a map detailing the location of each ramp. The best vehicle choice for these jumps would be the PCJ-600; for a spawn point, check out any of the 'Playground' side missions and press R3 a couple times to cancel the race. If you ever forget which jumps you've already done, go the map at the pause menu and hold X. From here, you can toggle the different collections on to make them appear on the map. A basic tip for jumping with a motorcycle is to know that the first wheel that touches ground is what counts towards your distance. So when you're in the air, lean forward slightly and your front wheel will land first. That few feet could mean the difference between whether or not you get the Unique Jump. 1. Viceport. There are three wooden boards leaning up against a boat with a blue tarp over it. Jump from here onto the ship. 2. Viceport. The metal ramp leaning on a pile of red cargo containers. Clear the Port Authority building in front of it. 3. Viceport. The wooden ramp on top of the building with the 'Full Moon' billboard (notice the moon looks like an ass). Land on the roof across the street to re-enact the famous scene from E.T. The ramp for #4 is on this roof, so don't get off yet. 4. Viceport. The wooden ramp just north of where you landed in #3, still on the roof. Clear the building in front of it. 5. Escobar International. On the roof of the building next to the southeast entrance to the airport; drive up the stairs around back. I think you're supposed to land on the roof of the next building, but I landed on the sidewalk right next to it and it counted. If you start at the southeast corner (not southwest, by the short tower) of the building with the ramp, and lean forward until you jump, you should easily be able to reach the next roof. 6. Viceport. The ramp is on the north side of the southernmost bridge to the east island. Jump over the street and land on the next ramp. Take advantage of the long sidewalk and build up some speed. 7. Little Havana. The southern stairs leading onto the Benny's Restaurant boat. Clear the boat and land in the water. There's a ramp that will take you back up to land next to the north end of the boat. 8. Little Havana. The wooden ramp in an alley on the west side of a two-story blue building. Land in the lot behind Sunshine Autos. 9. Escobar International. The mobile stairs in between the main airport building and a blue, white, and red airplane. Clear the plane. 10. Escobar International. The mobile stairs next to the boomerang-shaped runway. Clear the wall and the fence on the other side of the street. 11. Little Havana. The huge pile of dirt near #10's landing. Land in the street straight ahead of the ramp. 12. Little Haiti. Go down the ramp from #11 and keep going straight. Eventually you'll get to a ramp next to a trailer. Use this ramp to clear the water - start back from the top of the huge dirt ramp. If you fall into the water, there's a ramp that will take you back up to land on the opposite side of the trailer referenced earlier. You definitely need the PCJ for this one; I tried several times with a Streetfighter and couldn't make it. Also, do your best to hit the ramp at a rightward angle. I think I went straight at it (it was dark) and landed on the ledge for a close call. 13. Little Haiti. The stairs on the south side of the White Stallionz gay bar. You don't have to clear the building, just jump pretty far. 14. Downtown. Another huge pile of dirt. Jump into Phil's place from the original Vice City. Get some serious speed for this one - start back at the Hyman stadium and crouch forward the whole way. I crashed into the short redish wall and it still counted. 15. Downtown. In the constuction yard; the ramp is on the fifth floor of the scaffolding on the west side of the building. Land on the building across the yard. 16. Downtown. In the construction yard; the wooden ramp leaning against the pile of three concrete pipes. Clear the fence. 17. Downtown. Downtown. The ramp is in an area surrounded by cement walls (there's a clear entrance) along the beach. I think you're supposed to land on the next low rooftop, but I landed next to it and still got the reward. Start as far back as possible and hit the ramp at a leftward angle. If you crouch forward the whole way, you'll be able to get up there. You'll need to get up here anyway to get jump #18. 18. Downtown. On the roof of the King Nutz burger restaurant. After you get up on the building for #17, drive east then south to the roof of the burger restaurant. You need to get onto the high rooftop across the street. 19. Downtown. The brown staircase on the south side of the parking lot entrance on the south side of Hyman stadium. Clear the water gap. 20. Downtown. The staircase going up the side of a gray building by the southwest corner of the dirt race track. Land on the track. 21. Downtown. The staircase on the back of the building on the south side of the bridge leading to Prawn Island. Clear the bridge. 22. Vice Point. The ramp with pipes coming out the sides, across the street from the mall's multi-level carpark. Clear the small water gap. 23. Vice Point. The ramp is on top of the building across the street from the northwest entrance of the mall. Use the stairs on the back of the building to get up there. Hit the ramp at a rightward angle and land on top of the next building. 24. Vice Point. The ramp near the mall's southeast entrance. Clear the 'Brodie's Hotel' sign. 25. Vice Point. The wooden ramp at the corner of the hairpin turn next to the Ducum Inn. Clear the water gap and land in the Leaf Links golf course. 26. Vice Point. The pile of rock in front of the hotel across the street to the east of the police station. Hit the ramp at a bit of a leftward angle to clear the concessions trailer. 27. Vice Point. The cement ramp with the pipes sitcking out of the sides, in front of the Malibu club. Land on the roof of the Malibu. 28. Vice Point. The ramp in the north exit of the parking lot in front of an empire building, next to the carnival. Land in front of the Chunder Wheel. 29. Starfish Island. The wooden ramp next to the part of Diaz's mansion that's under construction. Clear the water - it's not as hard as it looks. 30. Washington Beach. At the south end of an alleyway next to a hotel with a small pool in the back. Land on the roof across the street. 31. Ocean Beach. The sand ramp at the south end of the military training camp, near the Bobcat. Clear the next two brick walls. 32. Ocean Beach. Find the green 'Dicks' Surf Shack' building. Next door, to the south, is a white building with blue trim. Drive up the stairs around back (this is NOT the jump) to get on the roof. Now look north. See the ramp two buildings ahead? That's your jump. Use it to clear the next high roof and land on the lower one on the other side. It is possible, just crouch forward the whole way to gain enough speed. It may also help to lean forward slightly once you're in the air and get near the far edge of the high roof (if you can tell where you're at), so your back wheel doesn't catch on the roof. 33. Viceport. The rest of these jumps require the Jetski, which you can find next to the entrance of this dock. Also remember that Jetskis are just like motorcycles, in that you can lean forward to be more aerodynamic and gain speed. Jump the ramp coming out of the water and clear the wooden one on the dock. Now head back to Leaf Links to hit #34. 34. Leaf Links. On the northern island of the golf course, find the area where it thins out in the middle. On the south side of this, in the water, is a large rock conveniently shaped like a ramp. Clear that thin part of the island. Now head to the area by the lighthouse at the southern tip of the east island for the last two jumps. 35. Ocean Beach. These last two are in this order for a reason, so go with it. You'll find this sand-and-grass ramp next to the lighthouse. Use it to clear the thin stretch of land. 36. Ocean Beach. Next to the wooden pedestrian bridge, there's another conveniently-shaped rock. Use it to clear the bridge. You'll now be stuck in this small area of water, so if you did this one before #35, you'll have to get the Jetski up onto land next to the bridge and push it into the water on the other side - or go back to the docks and get another one. =========================================================== Vice Sights [OJ32] Location: In the Maverick parked here. Prerequisite: "From Zero to Hero" Reward: $500 It's simple enough; fly to each marker before the time runs out, and fly low to keep the tourists' fun level up. Immediately after getting in the chopper, pause the game, look at your map, and find the nearest blip (for level 1, it's Little Havana, then Escobar International, then Little Haiti). One you reach the first corona, steady the chopper as fast as possible (you don't need to be completely still) to let the tourists take pictures, then head to the next coronas and do the same. Once all three coronas have been visited, head back to the airport to collect your pay. Once you reach level 3, you'll have to get to 4 sights. Once you complete level 5, you've done all you need for this mission to count towards 100%. =========================================================== Vigilante [OJ33] Location: Get in any law enforcement vehicle. I highly recommend the Rhino, which you can find parked at the army base. Reward: Increased armor after level 15. Get in a law enforcement vehicle and press R3. A red blip will appear on the radar, representing a suspect that needs to be taken out. I recommend the tank because it's pretty much invincible. The Hunter made the first five levels fly by very quickly, but after that I kept getting shot out of the sky. That's where the Rhino comes in. It can withstand bullets for quite a while. To get around faster, just use the right analog stick to face your turret backwards and use it as makeshift nitrous oxide. Just don't run head-on into any cars too fast; I did that, flipped the tank over, and it caught on fire and exploded. You might want to save after every five levels (checkpoints) if your game has the same problem as mine: it starts to freeze at high wanted levels. Fortunately you lose all your stars after completing the mission. =========================================================== Watersports [OJ34] Location: The jetski parked here.
Prerequisite: Complete Reni's "Say Cheese" mission Reward: $2,500 A series of checkpoint races just like in Dirt Track, only on water. As with land vehicles, you can use R1 as a handbrake to turn sharper. You probably won't need it much though. Try to land flat, or a little leaned back, to be able to accelerate the fastest once you land. I also recommend you do this when the weather's nice, so the water isn't wavy, slowing you down and dragging you off course, and during the day, so visibility is greatest. Complete each course in the following times to collect your reward: Course 1 - 2:45 Course 2 - 3:30 Course 3 - 3:20 Course 4 - 2:45 Course 5 - 3:45 Course 6 - 6:30 Course 7 - 5:00 Course 8 - 6:30 =========================================================== CONRATULATIONS! You should now have completed Vice City Stories 100%. You can now view the cutscenes from the storyline in your Clymenus Suite in Vice Point. If you're missing something, use the contents section as a checklist.
Easter Eggs
[EGGS]
Click here for a map detailing the location of each egg.
The sign: The information sign on the USJ in front of Hyman Stadium.
#1: On the east side of a mobile home in the northeast corner of the trailer park.
#2: Inside of an open, green semi trailer near the main entrance to Vice Port.
#3: In the stairwell in the alley across the street from the "Drink Sprunk!" billboard, near Phil's place from the original Vice City.
#4: From the street on the east side of the Well-Stacked Pizza parlor (just southeast of Leaf Links), go north. Go into the second alley to your right in that apartment or motel complex. The picture is on the inside of that first wall on your right.
#5: On the roof of the yellow building next to the Mendez mansion on Prawn Island. Use a helictopter to get up there and look for the ramp leaning against the south ledge. The picture is underneath it.
#6: On the back wall of Hyman Stadium, in a corner.
#7: In a garage-type room in the area behind the Downtown Ammu-Nation.
#8: In a little room on the roof of the condemned building on the east island.
#9: Go inside the Vice Point mall and up to the second floor. Find the Vinyl Countdown record store on the southeast side and look at the records in between the two sales counters. Now look underneath the brown Franklin's Urethra 'Milk Riot' poster and you should see the #9 picture smiling it's happy face at you.
#10: Under the bridge right next to the police station on the east island (the one directly east of Starfish Island). The picture is on the east wall.
#11: In the same room as the egg in the original Vice City. Get onto the roof of the VCN building and onto the helipad. At the east corner, shoot the small, 3-pane window and you shouldn't see any sparks (shoot anywhere else and you will). Jump through that window and you'll see Vice City's easter egg under construction, with a #11 sign leaning against it.
Button Cheats
[CH01]
Health: Up, Down, Left, Right, Circle, Circle, L1, R1
Armor: Up, Down, Left, Right, Square, Square, L1, R1
$250K: Up, Down, Left, Right, X, X, L1, R1
Weapons 1: Left, Right, X, Up, Down, Square, Left, Right
Weapons 2: Left, Right, Square, Up, Down, Triangle, Left, Right
Weapons 3: Left, Right, Triangle, Up, Down, Circle, Left, Right
No Wanted Level: Up, Right, Triangle, Triangle, Down, Left, X, X
Raise Wanted Level: Up, Right, Square, Square, Down, Left, Circle, Circle
Black Traffic: L1, R1, L1, R1, Left, Circle, Up, X
Chrome Traffic: Right, Up, Left, Down, Triangle, Triangle, L1, R1
Traffic Avoids You: Up, Up, Right, Left, Triangle, Circle, Circle, Square
Commit Suicide: Right, Right, Circle, Circle, L1, R1, Down, X
Destroy All Cars: L1, R1, R1, Right, Left, Square, Down, R1
Fast Clock: R1, L1, L1, Down, Up, X, Down, L1
Fast Gameplay: Left, Left, R1, R1, Up, Triangle, Down, X
Slow Gameplay: Left, Left, Circle, Circle, Down, Up, Triangle, X
Guys Follow You: Right, L1, Down, L1, Circle, Up, L1, Square
Nearest Ped Gets in Your Vehicle: Down, Up, Right, L1, L1, Square, Up, L1 - enter while in a car
Perfect Traction: Down, Left, Up, L1, R1, Triangle, Circle, X - press down on the d-pad to jump
Upside Down Mode 1: Square, Square, Square, L1, L1, R1, Left, Right
Upside Down Mode 2: Left, Left, Left, R1, R1, L1, Right, Left
Spawn:
Rhino: Up, L1, Down, R1, Left, L1, Right, R1
Trashmaster: Down, Up, Right, Triangle, L1, Triangle, L1, Triangle
Weather:
Clear: Left, Down, R1, L1, Right, Up, Left, X
Sunny: Left, Down, R1, L1, Right, Up, Left, Circle
Foggy: Left, Down, Triangle, X, Right, Up, Left, L1
Overcast: Left, Down, L1, R1, Right, Up, Left, Square
Rainy: Left, Down, L1, R1, Right, Up, Left, Triangle
Do not save the game after entering these cheats:
Pedestrians Attack: Down, Triangle, Up, X, L1, R1, L1, R1
Peds Have Weapons: Up, L1, Down, L1, Left, Circle, Right, Triangle
Peds Riot: R1, L1, L1, Down, Left, Circle, Down, L1
Action Replay MAX NTSC (North America)
[CH02]
As always, it's not recommended you save after using a cheat device for risk of corrupting your game save. I've especially heard of a lot of cases of that with this game.
Master Code
9P3F-GXR8-29NUR
JCFB-113Y-4MHWN
Infinite Ammo
5U59-6C1Y-BB3N4
BBJ6-51V1-H0VYR
55V8-D6D3-7BT0V
2B87-XW6T-MPC08
P7UB-6Z16-VX4HW
Max/Infinite Cash
DW62-V2F6-P0BCV
DHQD-5X09-R09K8
Disable Save Cheat Warning
XB8T-ZMW2-N1TGX
P6BW-QF16-ZY5K5
Stat Codes
0162-EME6-3XYKT
Unique Jumps Passed
X2UA-084B-RRNX0
8UQH-1851-EZQPC
All Passed
74BN-EXEQ-AJH8U
XHCU-RPE5-BK30W
2Z2E-U14R-193U1
Number of Rampages Passed
F4JF-UEHT-FBT0F
8UQH-1851-EZQPC
All Passed
YQ2P-ZB39-NPXFY
KH9T-3HC1-HEHVJ
Q3DR-25PX-W1U50
Spawn Vehicle Codes (SELECT + R1)
EFQV-WYTY-B5V8K
Domesto Bot
3CHW-MVHE-Y4057
5ZU8-7103-FEYGE
T314-JYXE-2R973
5ZU8-7103-FEYGE
X580-BJTX-FQZBT
4TBK-G9YE-GU6B2
Deluxo
00X5-588Z-G21UT
5ZU8-7103-FEYGE
T314-JYXE-2R973
5ZU8-7103-FEYGE
X580-BJTX-FQZBT
8BB2-0NHD-V7CUQ
FBI Washington
TKBG-MU4R-8DF2Z
5ZU8-7103-FEYGE
T314-JYXE-2R973
5ZU8-7103-FEYGE
X580-BJTX-FQZBT
0VEH-CFJY-UU3K0
Sabre Turbo
CHFK-4RG7-4APED
5ZU8-7103-FEYGE
T314-JYXE-2R973
5ZU8-7103-FEYGE
X580-BJTX-FQZBT
J10W-GPA9-TUEJ2
Cholo Sabre
NP4V-J9HF-QHAMZ
5ZU8-7103-FEYGE
T314-JYXE-2R973
5ZU8-7103-FEYGE
X580-BJTX-FQZBT
N2B7-DARE-KUN45
Sandking
XUV1-F1PC-QAYAX
5ZU8-7103-FEYGE
T314-JYXE-2R973
5ZU8-7103-FEYGE
X580-BJTX-FQZBT
22JK-T3PU-G8RVQ
Sharks Rancher
W4YC-XK2K-KVZ2X
5ZU8-7103-FEYGE
T314-JYXE-2R973
5ZU8-7103-FEYGE
X580-BJTX-FQZBT
UYKT-ZQFK-RPF5X
FBI Rancher
ZAE0-GY6Y-ZVUEM
5ZU8-7103-FEYGE
T314-JYXE-2R973
5ZU8-7103-FEYGE
X580-BJTX-FQZBT
9TCD-V5HZ-5CTNN
Splitz-6 ATV
7480-UAMG-9Y7P2
5ZU8-7103-FEYGE
T314-JYXE-2R973
5ZU8-7103-FEYGE
X580-BJTX-FQZBT
HV5A-MQ8Q-Z4AU3
Quad
310B-XQQX-3V13D
5ZU8-7103-FEYGE
T314-JYXE-2R973
5ZU8-7103-FEYGE
X580-BJTX-FQZBT
N701-Y2C0-YT69W
BF Injection
TK5R-GZM0-BM7Y9
5ZU8-7103-FEYGE
T314-JYXE-2R973
5ZU8-7103-FEYGE
X580-BJTX-FQZBT
7W2D-D169-73QJP
VCPD Cheetah
G5XR-16CE-XCTMY
5ZU8-7103-FEYGE
T314-JYXE-2R973
5ZU8-7103-FEYGE
X580-BJTX-FQZBT
X1QV-RP6X-GZTHZ
Patriot
33K9-UMVV-URJTM
5ZU8-7103-FEYGE
T314-JYXE-2R973
5ZU8-7103-FEYGE
X580-BJTX-FQZBT
KN8B-82XE-JPB38
Rhino
R703-WBDG-KG7RV
5ZU8-7103-FEYGE
T314-JYXE-2R973
5ZU8-7103-FEYGE
X580-BJTX-FQZBT
F3YY-WVF9-UC6Y3
Mesa Grande
BGJX-D9K8-RK5NB
5ZU8-7103-FEYGE
T314-JYXE-2R973
5ZU8-7103-FEYGE
X580-BJTX-FQZBT
CU4G-5PN3-PPUNT
FNG's Ultimate Garage Mod
RTDV-UUZ8-58K9M
Proof Mod (Vehicle 1)
EKV6-1AYU-5P6FP
8UQH-1851-EZQPC
Everything-Proof
JJHE-8N7D-6EN7H
NRGQ-TF79-8VYGM
Proof Mod (Vehicle 2)
V8V9-VQ3F-0CG8Z
8UQH-1851-EZQPC
Everything-proof
ERY2-A2B3-D39P6
5U63-JDMP-9QCAB
Find more codes here:
-Official AR MAX NTSC
-Official AR MAX PAL
-Edison Carter (all cheat devices, all regions)

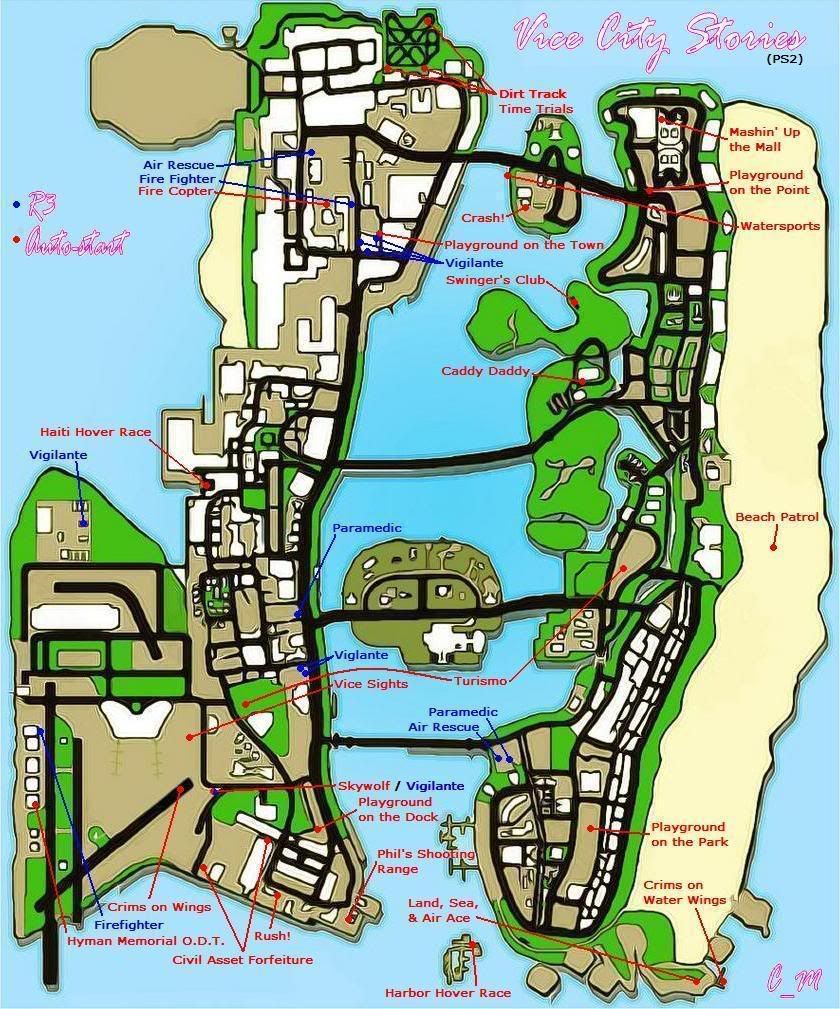
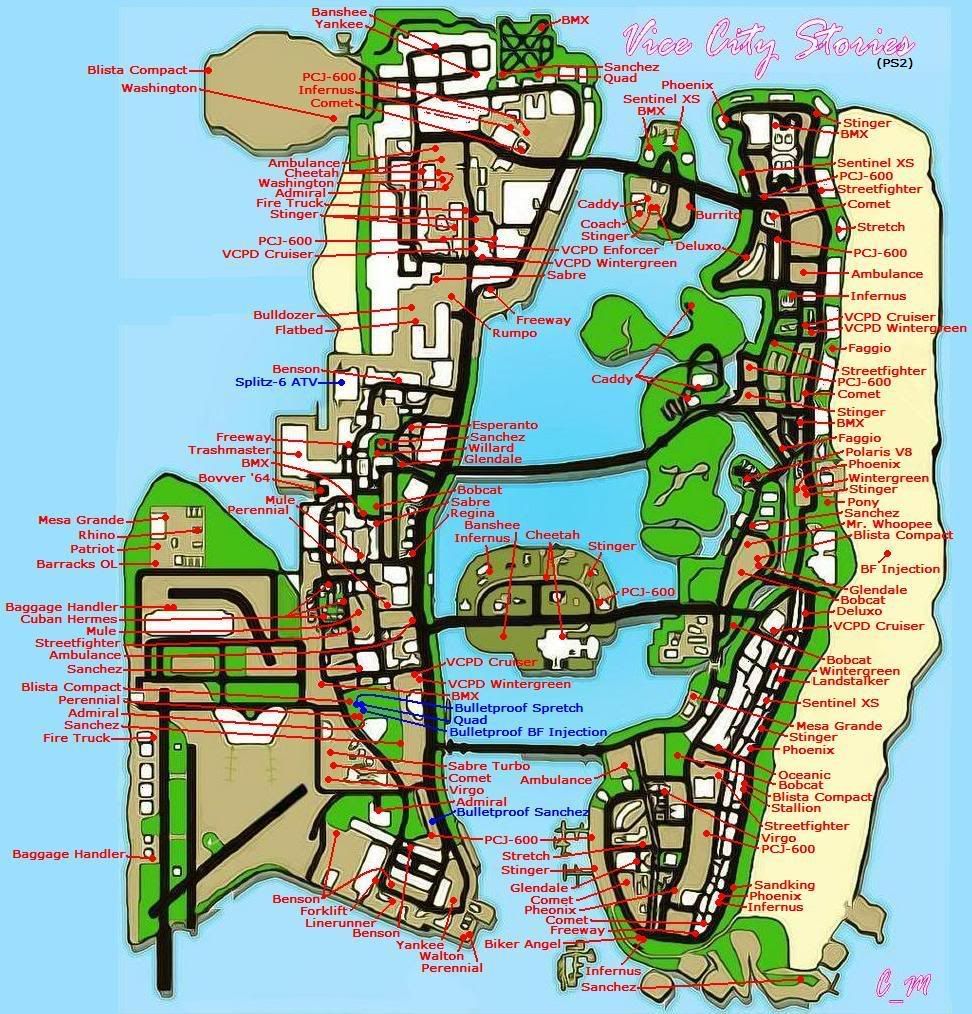
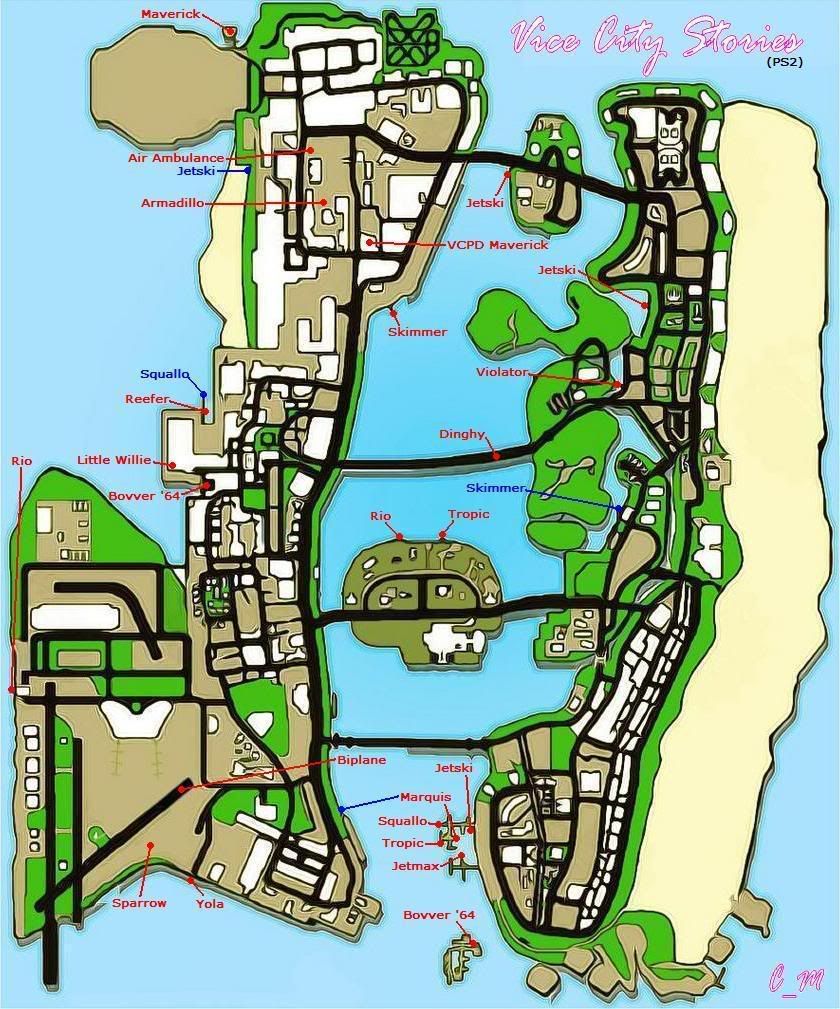
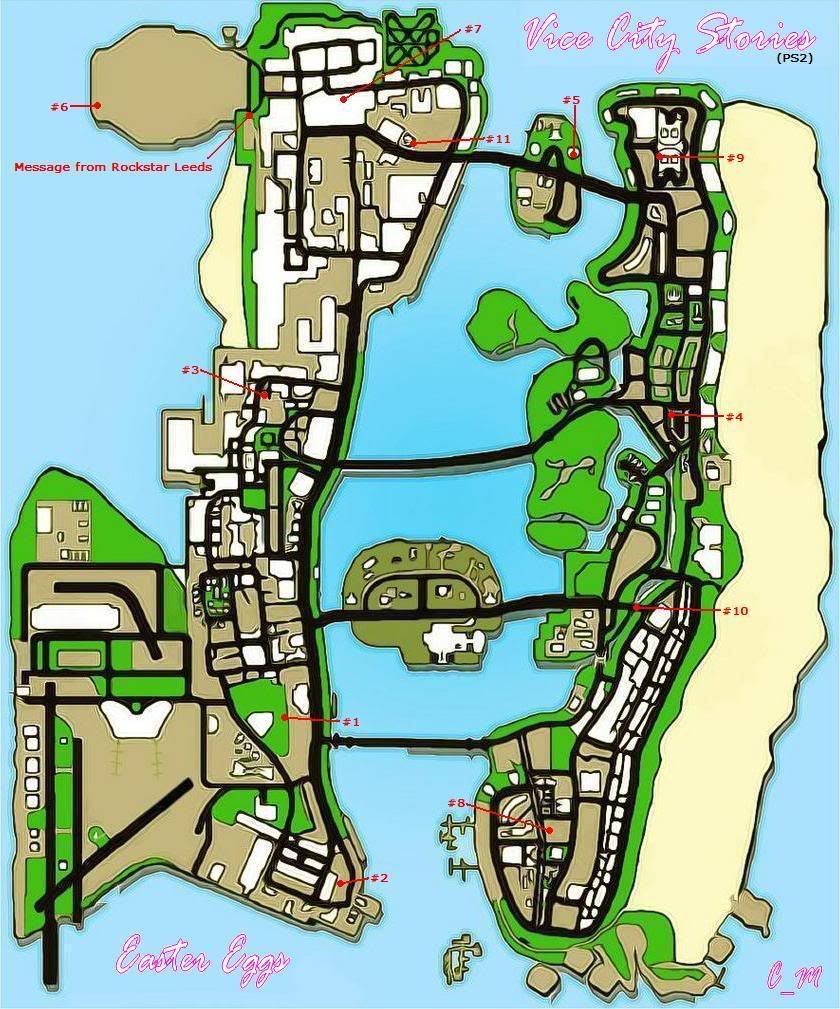
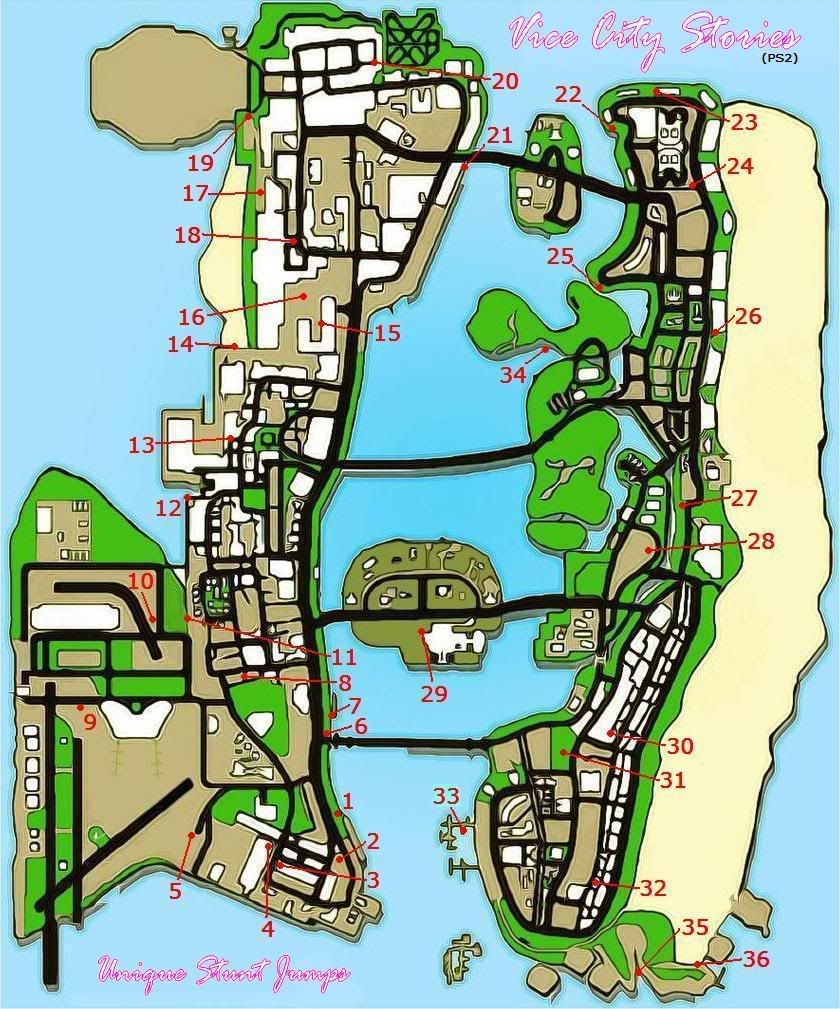
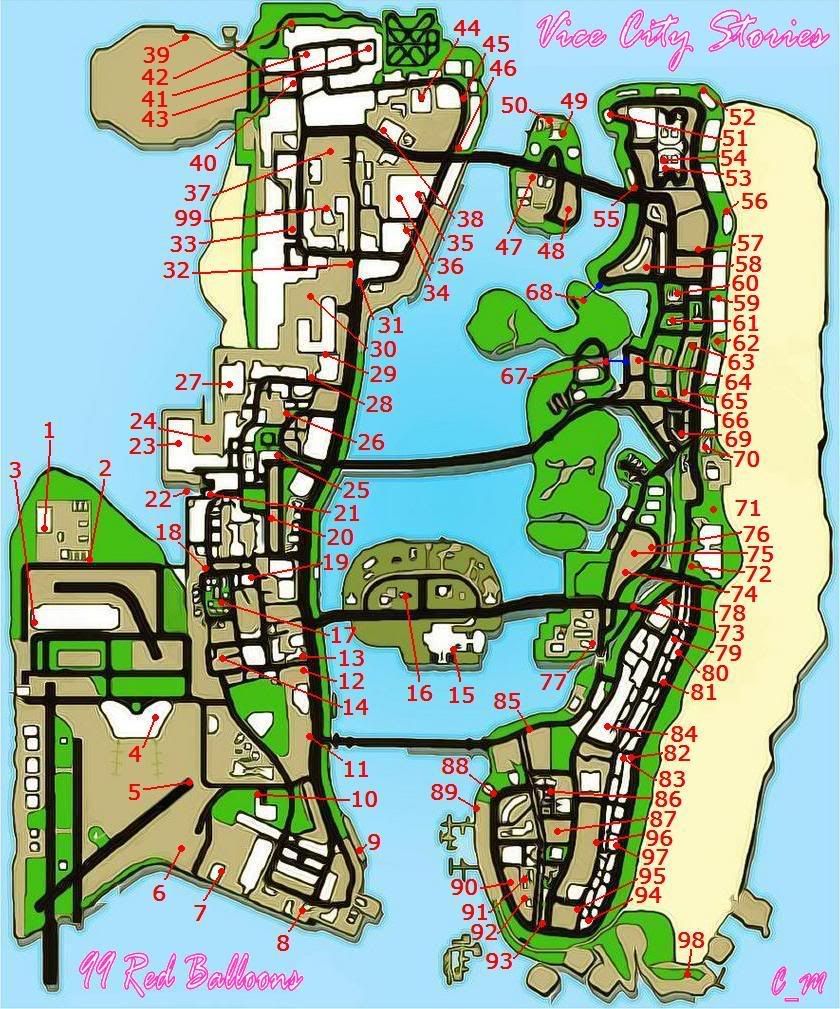
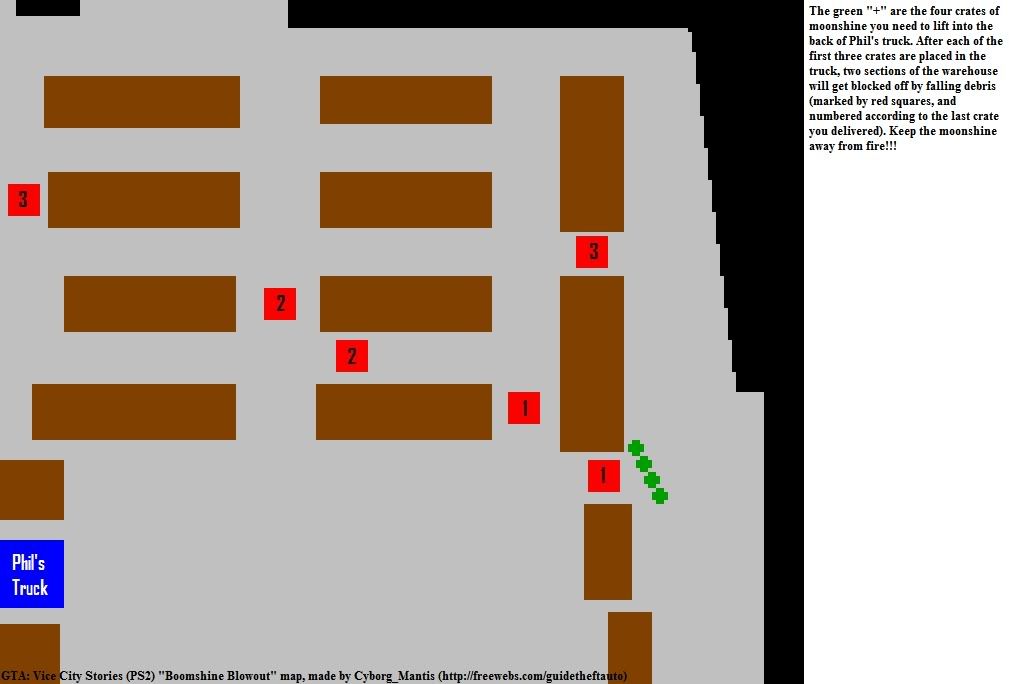
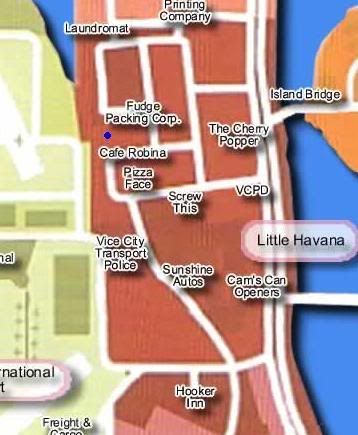
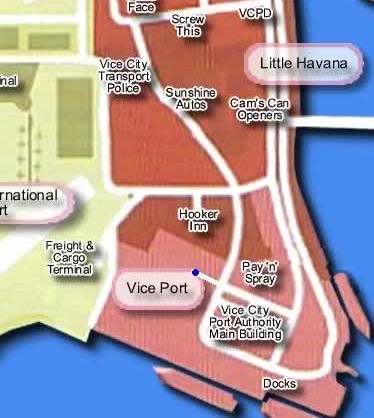
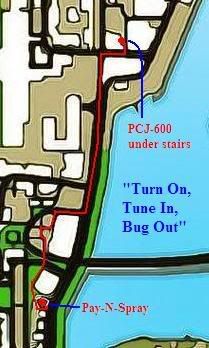
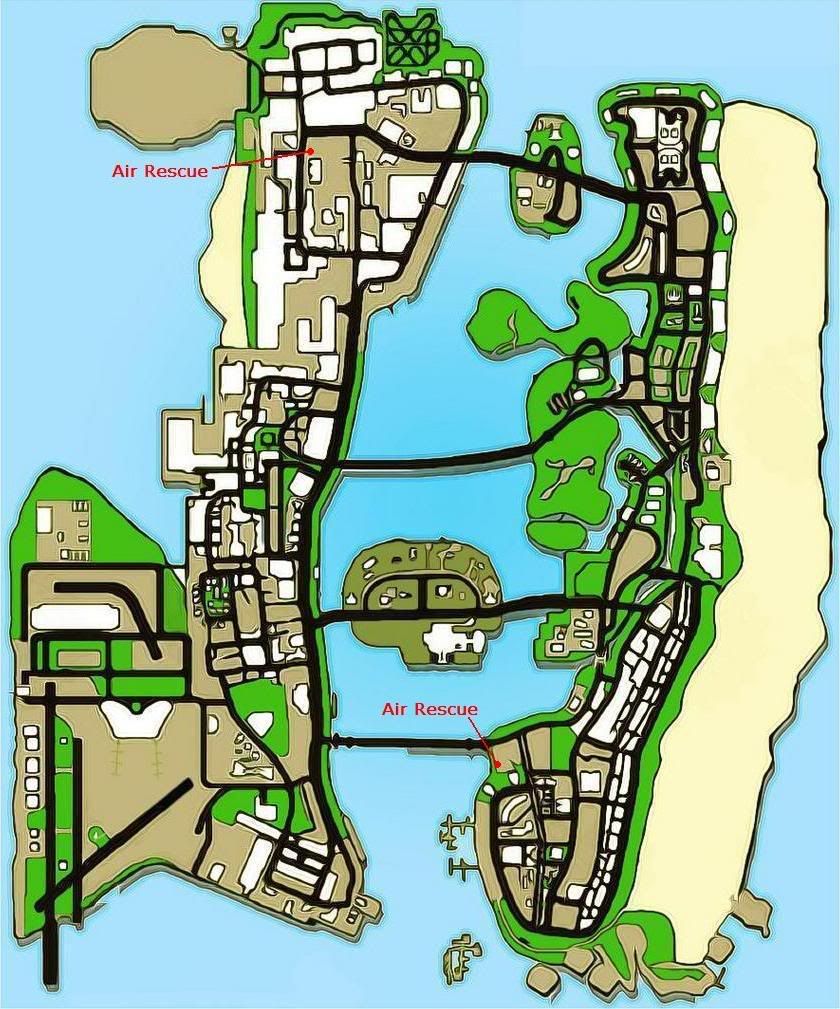
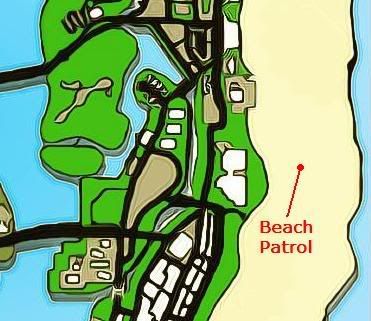
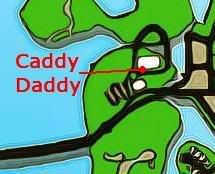
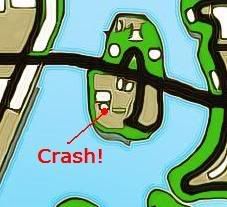
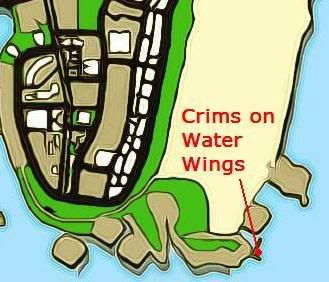
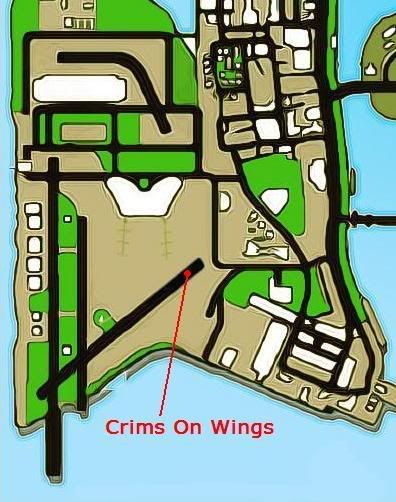
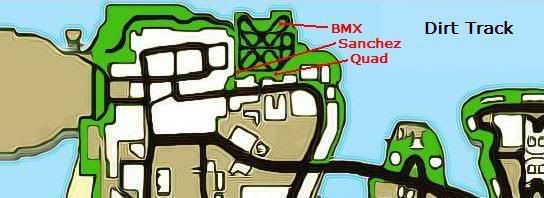
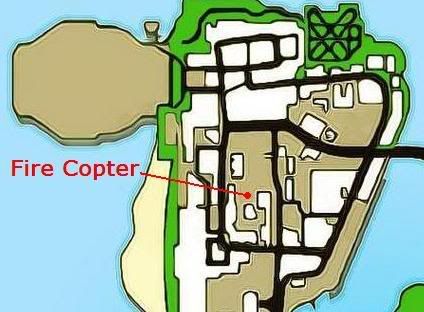
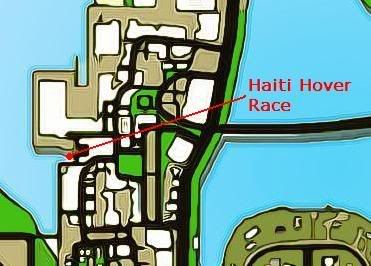
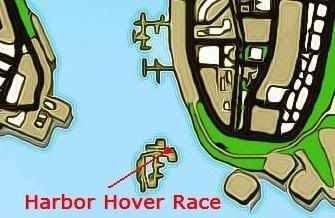
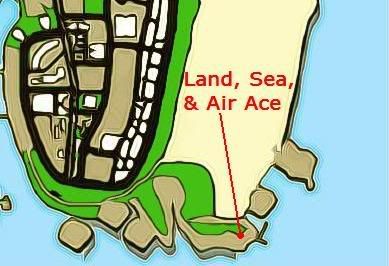
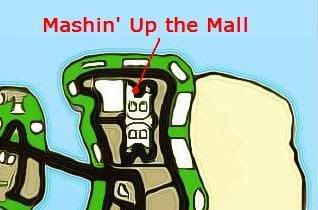
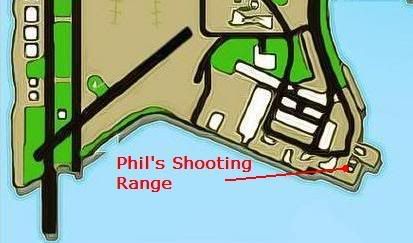
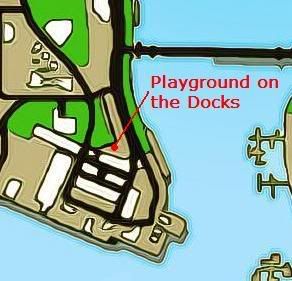
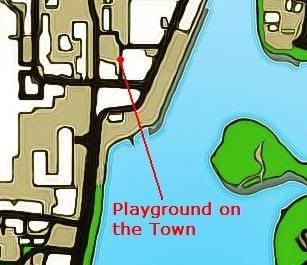
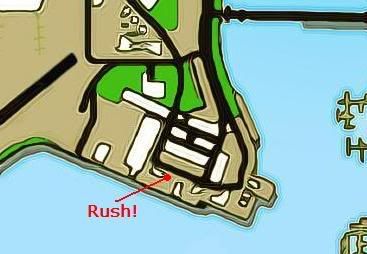
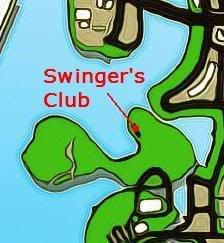
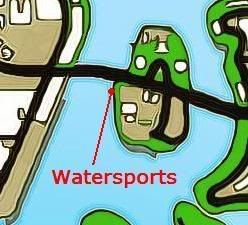